
Table area structure includes:
Sidehead dimensions. Dimensions located in the table area sidehead. The sidehead may contain shared dimensions of indicators, if required, one can move private dimensions of indicators to the sidehead.
Heading dimensions. Indicators and dimensions located in the table area heading. The heading may contain shared and private dimensions of indicators. Private indicator dimensions are displayed under the indicator in the Heading Dimensions tree of the Structure area in the Indicators branch. The Heading dimensions dimension cal also contain filter.
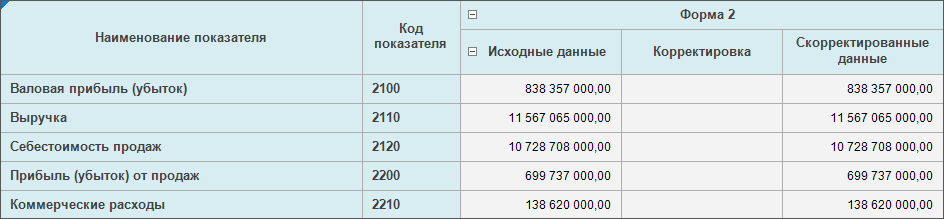
Filter is a cube that is used to filter dimension elements displayed in the sidehead for various parameter values. The filter cells can be filled with value or the cell can be empty. The sidehead will display elements with values. The filter structure can be different from the indicator structure for which filtering is launched:
If the indicator contains dimensions absent in the filter, then those dimensions are not taken into account on filtering.
If filter contains dimensions that are absent in the indicator, then on filtering by those dimension, the first selected element will be taken into account.
If indicator dimension has an element absent in filter, then the element will not be displayed in the sidehead on filtering.
So, on changing parameter value the displayed sidehead elements will change without editing table area.
The filter is not displayed in the table area heading if all its private dimensions do not have more than one element selected. When several dimension elements are selected, the behavior will depend on the selected filtering type:
Old type: filtering is executed by the first selected element, the rest of the elements will be displayed in the heading.
New type: filtering is executed by the first selected element, the rest of the elements will be ignored.
To determine a filtering type, create the NEW_D_CUBE global variable or change its value.
NOTE. When using a filter, aggregation of fixed dimensions, grouping of dimensions of alternative hierarchies and displaying of totals are unavailable.
In the Adding, Moving and Deleting Dimensions, Indicators and Filter section of the current article, there is an example showing filter work.
Fixed dimensions. Shared dimensions of indicators, which elements are displayed neither in the heading, nor in the sidehead.
NOTE. If shared dimension is not added to sidehead dimensions or to shared dimensions of table area heading, it will be a private dimension of indicators.
To set up table area structure, use the Table Area Structure page of the Table Area Wizard dialog box:
 Elements of the Table Area Structure page
To determine table area structure:
For additional settings of table area structure:
Add a filter for shared dimensions on selecting elements based on attribute values.
Transpose table.
After the table area structure is set up, go to the Setting Up Sidehead Structure step.
To add an indicator:
Go to the Indicators tab of the Data Sources area. The tab displays repository object tree, the tree is filtered, that is, only cubes and folders with them are shown.
Select the required cube or several cubes and using Drag&Drop mechanism move it(them) to the Heading Dimensions tree of the Structure area to the Indicators branch.
To add a filter:
Go to the Indicators tab of the Data Sources area. The tab displays repository object tree, the tree is filtered, that is, only cubes and folders with them are shown.
Select the required cube, using Drag&Drop move it to the Heading Dimensions tree of the Structure are to the Filter branch. Only one filter can be added.
The filter is applied to filter shared dimensions by empty values.
To add dimensions:
Go to the Dimensions tab of the Data Sources area. This tab displays filtered repository object tree, that is, only dictionaries, which are shared dimensions for indicators and folders including dictionaries, are displayed.
Add one or several dimensions to the Heading Dimensions tree of the Structure area to the Shared Dimensions branch.
Add one or several dictionaries as sidehead dimensions.
Add dictionaries to the Fixed Dimensions tree.
NOTE. If folders containing indicators and dimensions were set, hierarchy in dimension tree and indicators tree will be expanded to the contents of the corresponding folder.
To move dimension to another panel:
Select the Move to Heading/Move to Sidehead/Move to Fixed Dimensions context menu item.
Use Drag&Drop.
The item set depends on the panel where the dimension is placed. One or several dimensions can be moved simultaneously. To select several dimensions, use the SHIFT or CTRL keys.
To move indicator to the filter branch and vice versa:
Select the Move to Filter/Move to Indicators context menu item.
Use Drag&Drop.
NOTE. To move indicator from table area heading to sidehead, click the Transpose button.
To delete dimensions and indicators, select the Delete context menu item. One or several dimensions and/or indicators can be deleted simultaneously. To select several dimensions and/or indicators, use the SHIFT or CTRL keys.
NOTE. It is available to change number of displayed indicators and their location on working with ready data entry form.
To make the table area look as required, private indicators dimensions can be included into shared sidehead dimensions.
Under each indicator in the Heading Dimensions tree of the Structure area in the Indicators branch, its private dimensions are displayed.
To move private dimensions of indicators to shared sidehead dimensions or back, select private dimension and:
Select the Move to Sidehead/Move to Heading context menu item.
Use Drag&Drop.
NOTE. All private dimensions except parametric can be included into shared dimensions.
A private dimension, included into the Sidehead Dimensions tree of the Structure area, will get the  icon.
icon.
After the private dimension is moved to sidehead, it can be processed as sidehead dimension.
After the dimension has been moved to the sidehead:
Strings of the moved dimension elements will be added.
Indicators values where the moved dimension is absent will be located next to the first element of the moved dimension. For the rest indicators cells, editing is not available, the  icon is displayed in cells.
Example of moving private dimension
Setting up fixed dimensions is executed using context menu items and using the Fixed Dimension Aggregation Method drop-down list of the Structure area.
Aggregation of fixed dimensions
Select fixed dimension elements
To select elements based on attribute values for dimensions contained in all data entry form indicators, click the Filter Shared Dimensions button, the dialog box opens:

It is used only for dimensions containing linked attributes.
The drop-down lists contain attributes grouped by dimensions.
The process of filtering setup:
Select linked attribute from the current dimension in the left drop-down list.
Select linked attribute from linked dimension in the right drop-down list.
To exclude empty values from filtering, select the Ignore Link When Attribute Value is Empty checkbox.
One or several links can be added. As a result, filtering by attribute links is set up.
To delete the link, click the  Delete button next to the link.
To automatically determine dimension attribute link, click the Autosetup button.
To place sidehead dimension in heading and heading dimensions in sidehead, click the Transpose button.
The name of the next stage will be changed to Heading Structure, all other stage settings remain unchanged.
Table area can be transposed on:
Editing data entry form. To do this, click the  Transpose button on the Table ribbon tab.
See also:
Getting Started with the Interactive Data Entry Forms Extension in the Web Application | Building Data Entry Form| Inserting and Setting Up Table Area| Working with Ready Data Entry Form


 Search button and start typing dictionary name. Only one dictionary can be selected.