 Create a new data entry form
To get started with the extension, create a new or open a ready data entry form.
To create a new data entry form in theobject navigator:
Click the New Object > User Objects > Data Entry/Output Form button in the Create group on the Home ribbon tab.
Select the Create > Custom Objects > Data Entry/Output Form item in the object navigator's context menu.
To open a ready data entry form for edit in the object navigator select the data entry form and execute one of the operations:
Click the  Edit button in the Open group on the Home ribbon tab.
Select the Edit item in the data entry form's context menu.
Press F4.
To open a ready data entry form for view in theobject navigator select the data entry form and execute one of the operations:
Click the  Open button in the Open group on the Home ribbon tab.
Select the Open item in the data entry form's context menu.
NOTE. If the data entry form has parameters, set parameter values on opening the data entry form.
To create a data entry form, see the Building Data Entry Form article.
To work with a ready data entry form, see the Working with Ready Data Entry Form article.
The main window of the Interactive Data Entry Forms extension:
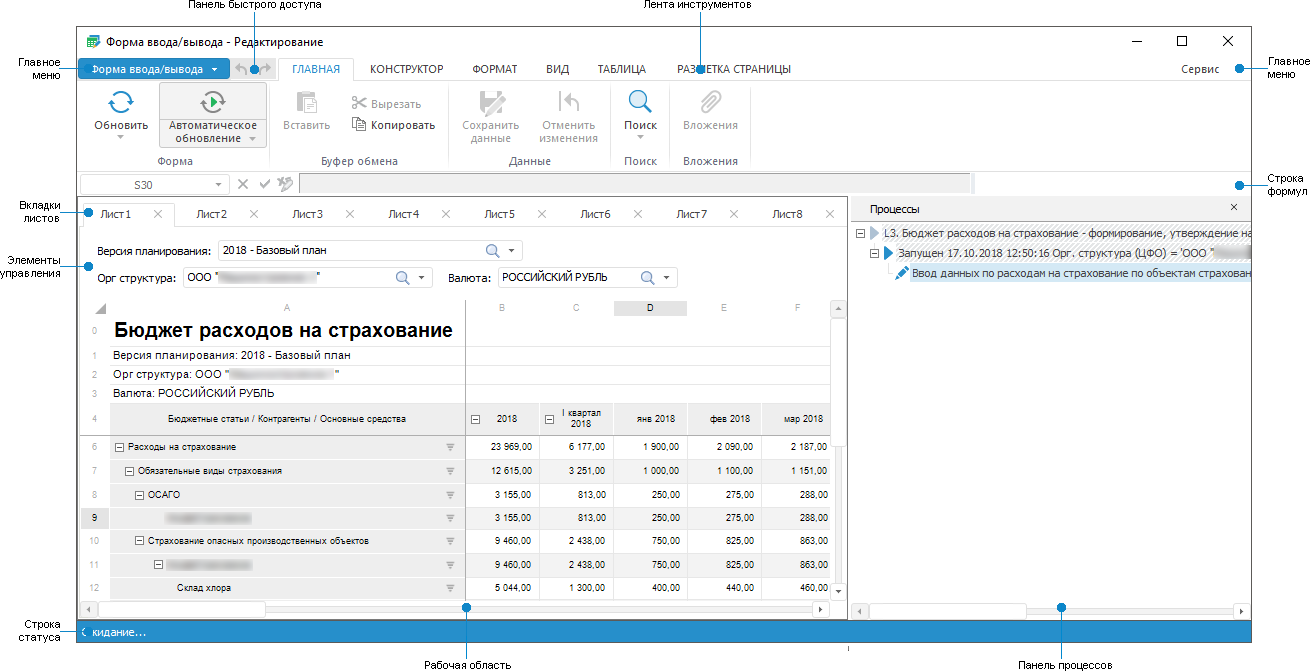

 Data entry form window in the view mode
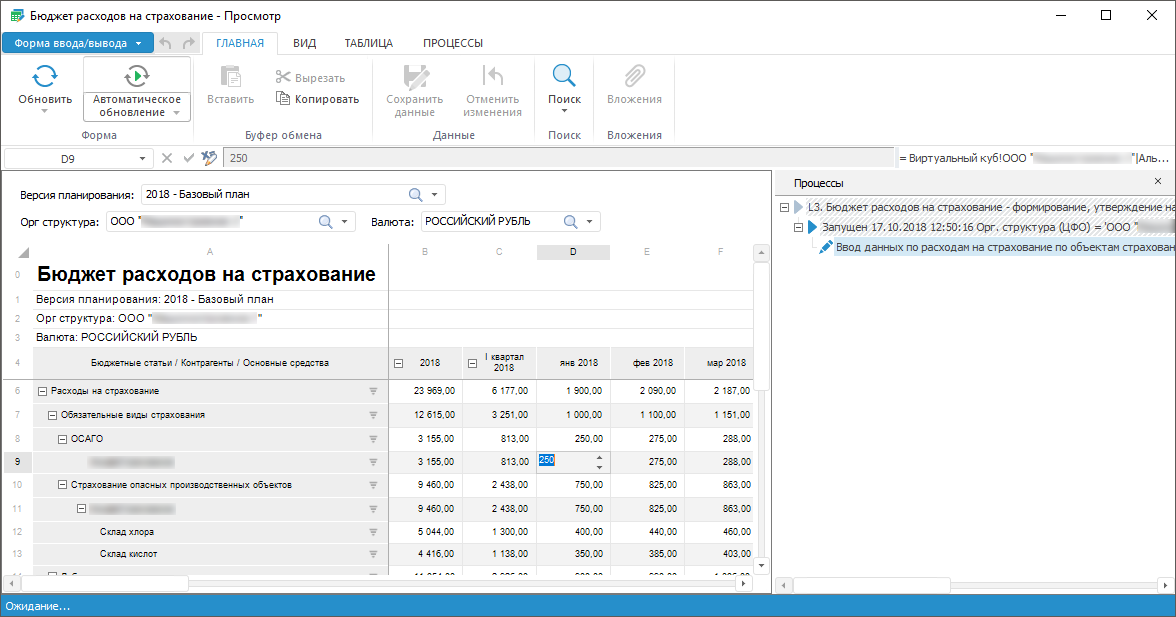

 Data entry form window elements
Main menu. It contains a list of commands that are used to execute various operations with a form. Data entry form can also be saved in the edit mode.
Ribbon. It contains buttons to create a form in the edit mode and to work with data in the view mode. One can additionally set up displayed tabs and groups in the edit mode.
Quick access toolbar. It contains frequently used commands.
Formula bar. It is used to enter formulas to table cells and to display addresses of selected cells and algorithm formulas if cell values by them are not calculated.
Working area. It is used to create a form in the edit mode and to enter data in the view mode.
Sheet tabs. It is used to work with form sheets in the edit mode and to navigate between them in the view mode.
Processes panel. It is used to set up process properties in the edit mode and to manage process in the view mode.
Controls. It is used to display controls that are required to manage data on working with a ready form.
Status bar. It is used to display values of basic aggregates for the selected cell range.
To set up the Interactive Data Entry Forms extension, use the Parameters dialog box.
NOTE. The Parameters dialog box is available only in the desktop application. Use it on creating or editing the form.

 To open the Parameters dialog box
Select the Tools > Parameters item in the data entry form's main menu.
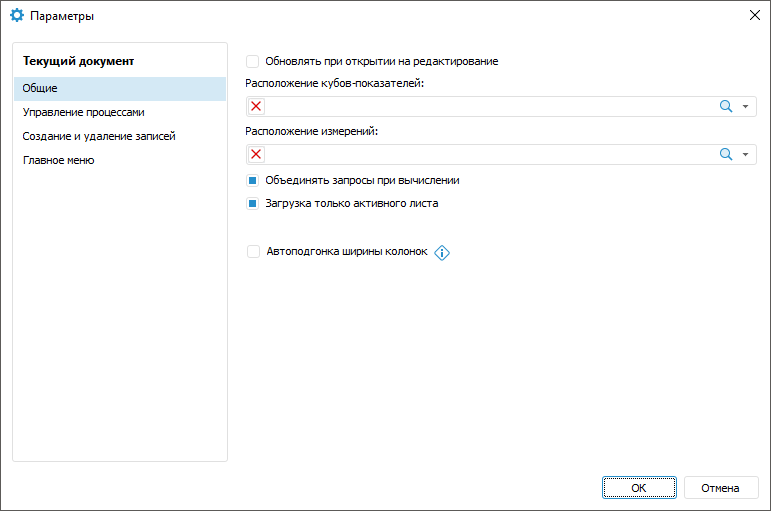
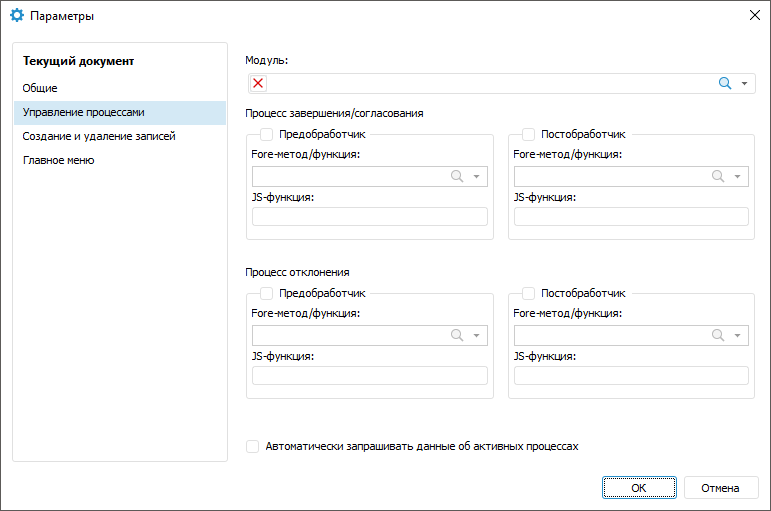
Available settings:
The General tab contains settings:
Refresh on Open for Edit. Select the checkbox to automatically refresh data entry form on opening it for edit. The checkbox is deselected by default.
Cube-Indicators Layout. Specify path to folders where indicators to build a data entry form are located. To do this, select the folder with cube views in the drop-down list or click the  Search button and start typing folder name. To delete the folder, click the
  Clear button.
Dimension Layout. Specify path to folders where dimensions to build a data entry form are located. To do this, select the folder with dimensions in the drop-down list or click the  Search button and start typing folder name. To delete the folder, click the
  Clear button.
Combine Queries on Calculation. Select the checkbox to:
Speed up data entry form work on displaying several attributes of one dictionary on the form sheet or on displaying indicators of one source if the indicator from another dictionary is placed between them.
Calculate algorithm for indicators added to the heading several times.
Run partial data recalculation in table areas. Recalculation is executed if modified data is input data for another table area, which data is calculated using the algorithm executed on modification.
NOTE. Work with calculation algorithms is available only if the Calculation Algorithms extension is installed.
Features of combining queries:
If the checkbox is deselected, data is recalculated only in one table area on the current data entry form sheet. Other table areas will not be recalculated.
If the checkbox is selected, and a data entry form contains several table areas based on a single data source, cell data may be recalculated even in the table areas, for which calculation algorithm is not connected. To avoid it, deselect the checkbox or use a cube view as a data source for such table areas.
If the checkbox is selected, and a data entry form contains a table area based on a cube with calculated elements, cube data will be unavailable for calculation. Element calculation can be set up:
In a standard cube on the pages: Cube Facts Binding, Relations, Calculated Facts, Manage Parameters, Controlling Dimensions, and Data Aggregation.
In a cube view on the pages: Fixing Dimensions, Manage Parameters, and Controlling Dimensions.
In a virtual cube on the pages: Manage Parameters and Controlling Dimensions.
In a calculated cube on the pages: Manage Formulas, Manage Parameters, Controlling Dimensions, and Formula Editor.
In an automatic cube on the pages: Controlling Dimensions, Data Aggregation, Manage Parameters, and Fixing Dimensions.
To calculate cube data, use calculation algorithms.
Before combining queries on calculation one can set a custom event using the IPrxReportUserEvents.EventOnBeforeExecuteCombined method in the development environment.
Query combination is unavailable during the work with global cache.
After the checkbox is selected, save and reopen the form to apply the setting. The checkbox is selected by default.
Load Only Active Sheet. Select the checkbox to load data of only active form sheet, data of inactive sheets will be loaded on requesting them. The checkbox is selected by default on creating a form.
Column Width Autofit. Select the checkbox to automatically change column width on window resize when viewing a data entry form in the web application. The checkbox is deselected by default. This option can be used for cards and tables, which sizes are not changed on use.
If paths to folders of cube-indicators and dimensions were set, then on building a table area on the Table Area Structure tab hierarchy in dimension tree and indicators tree will be displayed by default to contents of the corresponding folder.
The Manage Processes tab contains the settings:
Unit. Specify the unit in the Fore language to set handlers for process execution buttons. All methods/functions to set up handlers should be contained in this unit.
Finish/Approval/Rejection Process. Select the checkbox to set the corresponding handler. A handler should be set, for example, to check if the entered data is sufficient.
Automatically Request Active Process Data. Select the checkbox to approve active steps without displaying the process tree and selecting steps. The  Finish/Approve and the
  Reject buttons will be displayed on the Home ribbon tab. The checkbox is deselected by default.
NOTE. The Manage Processes tab is available only if the Business Process Management extension is installed.
To display a text message with a custom text, before executing the action of the  Finish/Approve button or
  Reject button, on the Home or Processes ribbon tab set up prehandler.
To set up prehandler:
Select the function in the Fore Method/Function list. The list contains all functions of the selected unit corresponding to the signature:
Function <Function name>(<Report>: IPrxReport; [Var messageType: Integer]): String;
Parameter:
Report. The regular report in the IPrxReport format is sent to the parameter. When working with this object, all properties and methods of the IPrxReport interface.
messageType. Optional variable, use it to determine displayed message format. If the variable is not specified, the confirmation dialog box is used. To show message text to the development environment console in the desktop application and to not show the message in the web application, remove returned value in return. The example of such function is given below. Available values:
0. Confirmation dialog box. Clicking the Yes button in the dialog box executes the operation specified for the button. Clicking the No button cancels the action selected for the button.
1. Error. Clicking the OK button in the dialog box does not execute the operation specified for the button.
2. Warning. Clicking the OK button in the dialog box does not execute the operation specified for the button.
3. Information message. Clicking the OK button in the dialog box does not execute the operation specified for the button.
Function example:
Function MessageInformationBox(Report: IPrxReport; Var messageType: integer): String;
Begin
messageType := 3;
Return "Operation is available when all data is entered";
End Function MessageInformationBox;
The example of the function, which execution in the web application does not return a message, and in the desktop application the message text will be displayed in the development environment console:
Function BeforeOper2(Report: IPrxReport): String;
Begin
debug.WriteLine("BeforeOper2");
Return "";
End Function BeforeOper2;
Determine function name in the JavaScript language in the JS Function box that should be started in the web application after the button action is executed. Function name:
javascript:<Function name(custom parameters, callback, args)>
Parameters:
Custom parameters. Required custom parameters. Optional parameter.
Callback. Callback function. Mandatory parameter.
Args. Function arguments. Optional parameter.
Using angle brackets when specifying function name with parameters is mandatory.
Example of function name:
javascript:<AfterOperTest(callback)>
If JS function and Fore function are specified, Fore function is firstly executed in the web application and then JS function, in the desktop application only Fore function is executed.
JS function can be added in the Layout and Formatting section in the designer of business applications. Click the  Add button in the File Loading area and load the file in the UTF-8 encoding. The function should have the required signature:
function <Function name>(custom parameters, callback, args)
{
…callback();
}
The following parameters can be obtained as arguments:
Report. Parameter to manage report.
DataEntryForm. Parameter to manage data entry form.
DataArea. Parameter to manage table area.
Function example:
function addAttachments(callback, args)
{
var rep = args.Report;
var da = args.DataArea
var grid = da.getGridView();
var tabSheet = grid.getTabSheet();
var tableSource = grid.getTableSource();
var onMeasuresLoaded = (function(){
var tabSheetRange = tabSheet.getSelection().getRange();
attachFile(da, tabSheetRange);
tableSource.MeasuresLoaded.remove(onMeasuresLoaded, this, );
});
tableSource.MeasuresLoaded.addOne(onMeasuresLoaded, this, args);
callback();
}
function attachFile(da, tabSheetRange) {
var rep = da.getSource();
var grid = da.getGridView();
var tabSheet = grid.getTabSheet();
if (tabSheetRange && tabSheetRange.isValid()) {
var cells = tabSheetRange.getCells();
if (cells.length == 1) {
var cell = cells[0];
var coord = cell.getCoord();
var range = { top: coord.rowIndex, left: coord.colIndex, width: 1, height: 1 };
var views = rep.getGridViews(range);
var gridKey = views.length ? views[0].key : undefined;
var attachDlg = da.getGridView().showAttachmentDialog(gridKey, coord.rowIndex, coord.colIndex);
}
}
}
If a prehandler is set for the button, and the condition specified in the preprocessor is not executed, the step execution is blocked but the step keeps active.
To execute any actions after executing actions of the  Finish/Approve button or
  Reject button, on the Home or Processes ribbon tab set up postandler.
To set up posthandler:
Select the Posthandler checkbox.
Select the method in the Fore Method/Function list. The list contains all methods of the selected unit corresponding to the signature:
Sub <Method name>(<Report>: IPrxReport);
Parameter:
Report. The regular report in the IPrxReport format is sent to the parameter. When working with this object, all properties and methods of the IPrxReport interface are available.
Method example:
Sub UpdateData(Report: IPrxReport);
Var
SheetT: IPrxTable;
ItemIndex: Integer;
Begin
ItemIndex := Report.ActiveSheet.Index;
SheetT := Report.Sheets.Item(ItemIndex) As IPrxTable;
SheetT.TabSheet.CellValue(10,10) := 1000000;
End Sub UpdateData;
Determine function name in the JavaScript language in the JS Function box that should be started in the web application after the button action is executed. Function name:
javascript:<Function name(custom parameters, callback, args)>
Parameters:
Custom parameters. Required custom parameters. Optional parameter.
Callback. Callback function. Mandatory parameter.
Args. Function arguments. Optional parameter.
Using angle brackets when specifying function name with parameters is mandatory.
Example of function name:
javascript:<AfterOperTest(callback)>
If JS function and Fore function are specified, Fore function is firstly executed in the web application and then JS function, in the desktop application only Fore function is executed.
JS function can be added in the Layout and Formatting section in the designer of business applications. Click the  Add button in the File Loading area and load the file in the UTF-8 encoding. The function should have the required signature:
function <Function name>(custom parameters, callback, args)
{
…callback();
}
The following parameters can be obtained as arguments:
Report. Parameter to manage report.
DataEntryForm. Parameter to manage data entry form.
DataArea. Parameter to manage table area.
Function example:
function addAttachments(callback, args)
{
var rep = args.Report;
var da = args.DataArea
var grid = da.getGridView();
var tabSheet = grid.getTabSheet();
var tableSource = grid.getTableSource();
var onMeasuresLoaded = (function(){
var tabSheetRange = tabSheet.getSelection().getRange();
attachFile(da, tabSheetRange);
tableSource.MeasuresLoaded.remove(onMeasuresLoaded, this, );
});
tableSource.MeasuresLoaded.addOne(onMeasuresLoaded, this, args);
callback();
}
function attachFile(da, tabSheetRange) {
var rep = da.getSource();
var grid = da.getGridView();
var tabSheet = grid.getTabSheet();
if (tabSheetRange && tabSheetRange.isValid()) {
var cells = tabSheetRange.getCells();
if (cells.length == 1) {
var cell = cells[0];
var coord = cell.getCoord();
var range = { top: coord.rowIndex, left: coord.colIndex, width: 1, height: 1 };
var views = rep.getGridViews(range);
var gridKey = views.length ? views[0].key : undefined;
var attachDlg = da.getGridView().showAttachmentDialog(gridKey, coord.rowIndex, coord.colIndex);
}
}
}
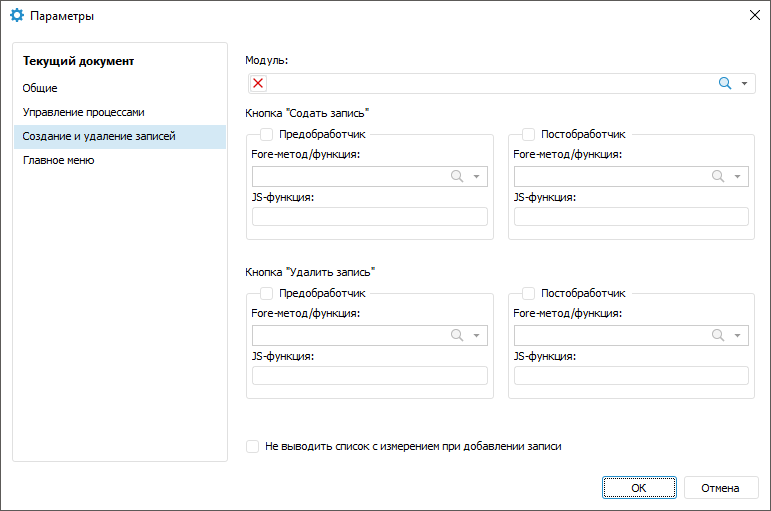
The Create and Delete Records tab contains the settings:
Unit. Specify the Fore unit to set handlers for the  Create Record and the
  Delete Record buttons. All methods/functions to set up handlers should be contained in this unit.
The Create Record/Delete Record button. Select the checkbox to set the corresponding handler. A handler should be set, for example, to deny adding or deleting of record depending on the dictionary attribute value or on executing the specific process step.
Do Not Display List with Dimension on Adding a Record. Select the checkbox to hide the list of dimensions on adding a record to the table area. The checkbox is deselected by default.
To display a text message with a custom text before executing the action of the  Create Record or the
  Delete Record button on the Table ribbon tab, set up the prehandler.
To set up prehandler:
Select the function in the Fore Method/Function list. The list contains all functions of the selected unit corresponding to the signature:
Function <Function name>(<Report>: IPrxReport; [Var messageType: Integer]): String;
Parameter:
Report. The regular report in the IPrxReport format is sent to the parameter. When working with this object, all properties and methods of the IPrxReport interface.
messageType. Optional variable, use it to determine displayed message format. If the variable is not specified, the confirmation dialog box is used. To show message text to the development environment console in the desktop application and to not show the message in the web application, remove returned value in return. The example of such function is given below. Available values:
0. Confirmation dialog box. Clicking the Yes button in the dialog box executes the operation specified for the button. Clicking the No button cancels the action selected for the button.
1. Error. Clicking the OK button in the dialog box does not execute the operation specified for the button.
2. Warning. Clicking the OK button in the dialog box does not execute the operation specified for the button.
3. Information message. Clicking the OK button in the dialog box does not execute the operation specified for the button.
Function example:
Function MessageInformationBox(Report: IPrxReport; Var messageType: integer): String;
Begin
messageType := 3;
Return "Operation is available when all data is entered";
End Function MessageInformationBox;
The example of the function, which execution in the web application does not return a message, and in the desktop application the message text will be displayed in the development environment console:
Function BeforeOper2(Report: IPrxReport): String;
Begin
debug.WriteLine("BeforeOper2");
Return "";
End Function BeforeOper2;
Determine function name in the JavaScript language in the JS Function box that should be started in the web application after the button action is executed. Function name:
javascript:<Function name(custom parameters, callback, args)>
Parameters:
Custom parameters. Required custom parameters. Optional parameter.
Callback. Callback function. Mandatory parameter.
Args. Function arguments. Optional parameter.
Using angle brackets when specifying function name with parameters is mandatory.
Example of function name:
javascript:<AfterOperTest(callback)>
If JS function and Fore function are specified, Fore function is firstly executed in the web application and then JS function, in the desktop application only Fore function is executed.
JS function can be added in the Layout and Formatting section in the designer of business applications. Click the  Add button in the File Loading area and load the file in the UTF-8 encoding. The function should have the required signature:
function <Function name>(custom parameters, callback, args)
{
…callback();
}
The following parameters can be obtained as arguments:
Report. Parameter to manage report.
DataEntryForm. Parameter to manage data entry form.
DataArea. Parameter to manage table area.
Function example:
function addAttachments(callback, args)
{
var rep = args.Report;
var da = args.DataArea
var grid = da.getGridView();
var tabSheet = grid.getTabSheet();
var tableSource = grid.getTableSource();
var onMeasuresLoaded = (function(){
var tabSheetRange = tabSheet.getSelection().getRange();
attachFile(da, tabSheetRange);
tableSource.MeasuresLoaded.remove(onMeasuresLoaded, this, );
});
tableSource.MeasuresLoaded.addOne(onMeasuresLoaded, this, args);
callback();
}
function attachFile(da, tabSheetRange) {
var rep = da.getSource();
var grid = da.getGridView();
var tabSheet = grid.getTabSheet();
if (tabSheetRange && tabSheetRange.isValid()) {
var cells = tabSheetRange.getCells();
if (cells.length == 1) {
var cell = cells[0];
var coord = cell.getCoord();
var range = { top: coord.rowIndex, left: coord.colIndex, width: 1, height: 1 };
var views = rep.getGridViews(range);
var gridKey = views.length ? views[0].key : undefined;
var attachDlg = da.getGridView().showAttachmentDialog(gridKey, coord.rowIndex, coord.colIndex);
}
}
}
To be able to execute the required actions after executing the action of the  Create Record or the
  Delete Record button on the Table ribbon tab, set up the posthandler.
To set up posthandler:
Select the Posthandler checkbox.
Select the method in the Fore Method/Function list. The list contains all methods of the selected unit corresponding to the signature:
Sub <Method name>(<Report>: IPrxReport);
Parameter:
Report. The regular report in the IPrxReport format is sent to the parameter. When working with this object, all properties and methods of the IPrxReport interface are available.
Method example:
Sub UpdateData(Report: IPrxReport);
Var
SheetT: IPrxTable;
ItemIndex: Integer;
Begin
ItemIndex := Report.ActiveSheet.Index;
SheetT := Report.Sheets.Item(ItemIndex) As IPrxTable;
SheetT.TabSheet.CellValue(10,10) := 1000000;
End Sub UpdateData;
Determine function name in the JavaScript language in the JS Function box that should be started in the web application after the button action is executed. Function name:
javascript:<Function name(custom parameters, callback, args)>
Parameters:
Custom parameters. Required custom parameters. Optional parameter.
Callback. Callback function. Mandatory parameter.
Args. Function arguments. Optional parameter.
Using angle brackets when specifying function name with parameters is mandatory.
Example of function name:
javascript:<AfterOperTest(callback)>
If JS function and Fore function are specified, Fore function is firstly executed in the web application and then JS function, in the desktop application only Fore function is executed.
JS function can be added in the Layout and Formatting section in the designer of business applications. Click the  Add button in the File Loading area and load the file in the UTF-8 encoding. The function should have the required signature:
function <Function name>(custom parameters, callback, args)
{
…callback();
}
The following parameters can be obtained as arguments:
Report. Parameter to manage report.
DataEntryForm. Parameter to manage data entry form.
DataArea. Parameter to manage table area.
Function example:
function addAttachments(callback, args)
{
var rep = args.Report;
var da = args.DataArea
var grid = da.getGridView();
var tabSheet = grid.getTabSheet();
var tableSource = grid.getTableSource();
var onMeasuresLoaded = (function(){
var tabSheetRange = tabSheet.getSelection().getRange();
attachFile(da, tabSheetRange);
tableSource.MeasuresLoaded.remove(onMeasuresLoaded, this, );
});
tableSource.MeasuresLoaded.addOne(onMeasuresLoaded, this, args);
callback();
}
function attachFile(da, tabSheetRange) {
var rep = da.getSource();
var grid = da.getGridView();
var tabSheet = grid.getTabSheet();
if (tabSheetRange && tabSheetRange.isValid()) {
var cells = tabSheetRange.getCells();
if (cells.length == 1) {
var cell = cells[0];
var coord = cell.getCoord();
var range = { top: coord.rowIndex, left: coord.colIndex, width: 1, height: 1 };
var views = rep.getGridViews(range);
var gridKey = views.length ? views[0].key : undefined;
var attachDlg = da.getGridView().showAttachmentDialog(gridKey, coord.rowIndex, coord.colIndex);
}
}
}
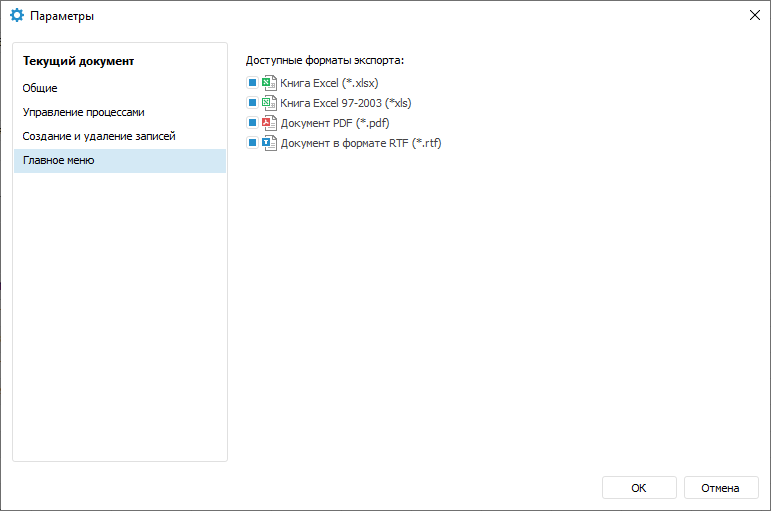
The Main Menu tab contains settings:
Available Export Formats. Select checkboxes next to the export formats to determine available formats in the main menu on opening data entry form for view. On deselecting the checkbox next to the format, it will be hidden from the main menu and from the quick access toolbar, if it was moved there on opening data entry form for view.
See also:
Getting Started with the Interactive Data Entry Forms Extension in the Web Application | Building Data Entry, Control and Approval Forms | Building Data Entry Form | Working with Ready Data Entry Form