In this article:
Setting Up Basic Properties and Parameters of Step Description
Setting Up Link between Subprocess and Process Parameters
Setting Up Actions Executed When Event Occurs
Creating the Subprocess Call Step
To create a step for starting one or several nested subprocesses with specific parameters:
Select the process stage or stage step and select the
 Subprocess Call step in the drop-down menu of the
  Data Entry button. The step selection button looks like the last selected step.
Select the Subprocess Call created step in the working area and click the
 Settings button on the toolbar. The Subprocess Call side panel opens to set up the step.
Setup of the Subprocess Call step includes the following operations:
After creating and setting up process steps, set up steps execution conditions.
Setting Up Basic Properties and Parameters of Step Description
To set up basic properties and step description parameters, use the Settings tab on the side panel:
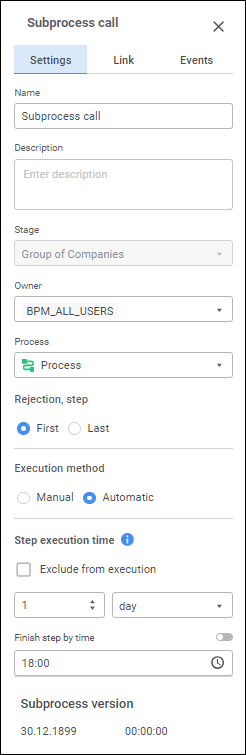
Set the parameters:
Process. The box is mandatory. Select the subprocess for starting in the drop-down list.
To quickly select an object, enter object's name/identifier/key in the search box depending on display settings. Search is executed automatically while the searched text is entered into the search string. The list will display the objects, which names/identifiers/keys contain the entered text.
To set up displaying of repository objects in the list of objects, click the
 Show Object button and select display option in the drop-down menu:
Name. Objects are displayed with their names. Default option.
Identifier. Objects are displayed with their identifiers.
Key. Objects are displayed with their keys.
Several options can be selected. Identifier and key will be specified in brackets.
First. The first step will be active in subprocesses after the current step is rejected for the Subprocess Call finished step.
Last. The last step will be active in subprocesses after the current step is rejected for the Subprocess Call finished step.
Execution Method. Select the Manual or Automatic radio button:
By default, automatic execution is selected for the step. Process steps with automatic execution method are marked with the  icon. Execution method can be changed in step settings by selecting the step in the working area during business process setup and clicking the Settings button on the toolbar.
Subprocess Version. Date and time of creating the latest subprocess version are displayed.
Setting Up Link between Subprocess and Process Parameters
To start a subprocess with the same parameters as the process step, set up a link between subprocess parameters and process parameters on the Link tab of the side panel:
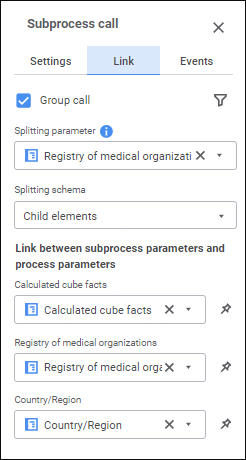
Determine the following on the side panel for the Subprocess Call step on the Link tab:
Group Call. Select the Group Call checkbox to start several subprocesses and set parameters in the drop-down lists:
Splitting Parameter. Subprocess parameters are used as splitting parameter. Select the dictionary subprocess parameter, which elements will be used for multiple start of subprocess instances. For each dictionary element selected on process start, single subprocess instance will be started.
Splitting Schema. Select subprocess dictionary selection method for elements, for which subprocess single instances will be started. A subprocess is split by subprocess parameter elements. Dependency between subprocess parameters and parent process is set in the Link between Subprocess Parameters and Process Parameters area:
Source. Subprocesses are started for each selected dictionary element. Subprocesses are not started for dictionary child elements.
Child Elements. Subprocesses are started only by dictionary child elements.
By Function. Subprocesses are started by elements obtained after Fore method execution. Determine the following settings for the Fore method:
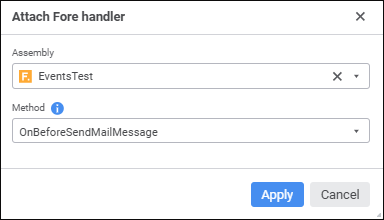
Assembly. The box is mandatory. In the drop-down list select a Fore unit, the list contains all repository units and folders containing units. Search by unit name is available.
Method. The box is mandatory. Select a method in the drop-down list. The list contains all unit methods corresponding to the signature:
Sub <Fore-method name>(Sender: IBProcessInstance; Args: IBProcessStepStateEventArgs);
Parameter:
Sender. Process instance.
Args. Event information: step, step old state, new state.
To filter subprocess start by splitting parameter attributes or by its values, set up subprocesses call conditions using the  Filter button.
Link between Subprocess Parameters and process Parameters. For each static field, which displays subprocess parameter name, select the corresponding process parameter or parameter attribute in the drop-down list. As a parameter, one can set only one dictionary or one dictionary attribute. The dictionaries selected as process parameters and subprocess parameters should have identical structure or should be linked by attributes. If the parameter is not selected, selection is absent in the subprocess parameter.
To set required parameter values, with which the subprocess will open, execute the following operations:
Click the
 Fix Subprocess Parameter Values button. The drop-down list displays subprocess parameter dictionary elements.
Select parameter value of the subprocess parameter linked to process step. Multiple selection is available.
To work with element selection, change selection by criterion and set up displaying of element names use context menu items.
If the parameter value is not selected, selection is absent in the subprocess.
Setting Up Actions Executed When Event Occurs
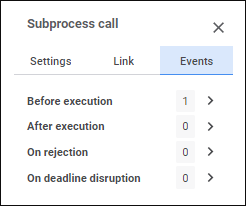
To set up events executed automatically on step execution start or end, use the Events tab of the side panel:
Create a list of executed operations:
Select the configured event:
Before Execution. The list of actions will be started before executing the current step in the specified order.
After Execution. The list of actions will be started after executing the current step in the specified order.
On Rejection. The list of actions will be started on the current step rejection. The list is available for steps with manual execution. If the step is executed automatically, the tab is not displayed.
On Deadline Disruption. The list of actions will be started on deadline disruption to execute the current step in the specified order. To execute the actions:
When the server execution of processes is selected, select the Check Deadline Disruption of Steps checkbox on the Scheduler page and set check frequency.
When the client process execution is selected, select the Check Deadline Disruption item on the Administration page.
In the drop-down menu of the
 Add button on the toolbar select the added action:
 Fore Method. Fore method execution.
 Message. Sending email.
NOTE. One can add several operations.
Set up the operation.
To change the order of executed actions, use the  Move Up and
  Move Down buttons on the Events tab of the toolbar, to delete, use the
  delete button.
The list of automatically executed actions can be empty.
Setting Up the Fore Method Action
To set up Fore method execution, determine mandatory parameters on the side panel of the selected event:
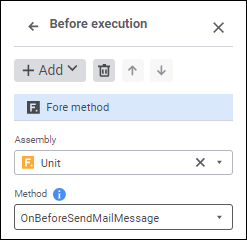
Available parameters:

 Execution
Setting Up the Message Action
To set up email sending, determine mandatory parameters on the side panel of the selected event or in the Message dialog box. Use the Message dialog box to create and edit a message text with complex formatting.
 In Modal Window button next to the added
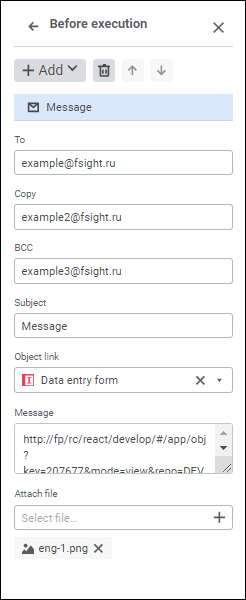
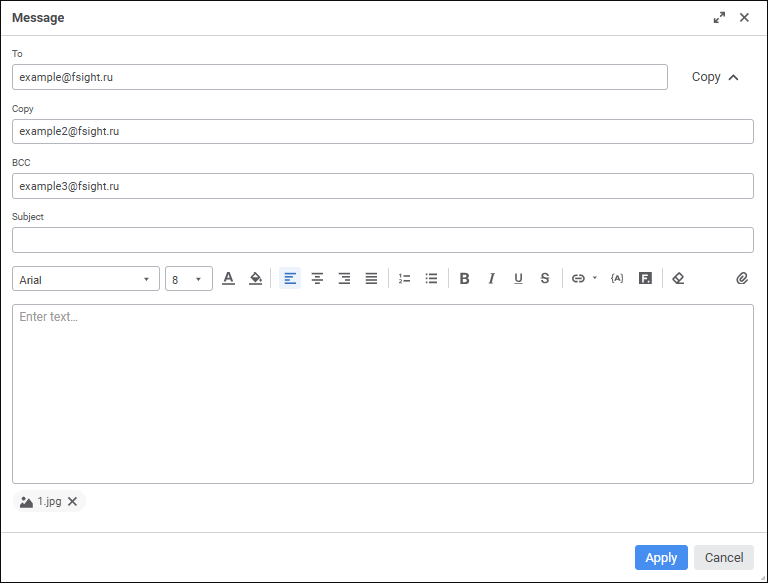
After the parameters are determined, click the Apply button.
Available parameters:
Text formatting settings:
 Text Color button.
 Text Background Color button.
 Left button in the Message dialog box. The text alignment option selection button looks like the last selected alignment option.
 .
.  .
.  .
.  Numbered List button in the Message dialog box. The list format selection button looks like the last selected list format.
 .
. Available operations:
 Insert Link button. The selection button looks like the last selected item.


 Add button.
 Edit button in the modal dialog box.
 Substitution button in the Message dialog box. Values of substitution variables are generated depending on unique parameters of each process instance:
 Attach button in the Message dialog box. A standard file selection dialog box opens.
 Attach Fore Handler button. The Attach Fore Handler dialog box opens: