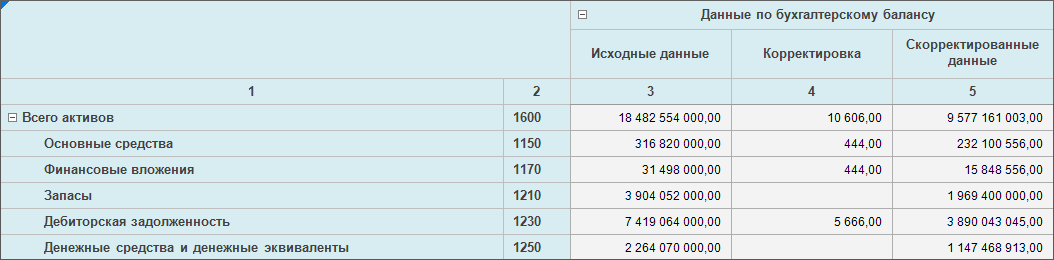
Example of multilevel heading use
When setting up indicators structure in the table area wizard of data entry form you can also set up heading display:
Set up multilevels for heading.
Set up columns numbering.
Set up display of indicators names.
Set up display of additional elements names of shared dimension.
To display dimension levels in different strings without repetition of parent elements in the heading, select the Multilevel Table Heading checkbox. On transposing a table, the setting is applied for dimensions in heading after transposing. If before transposing dimensions in heading were merged, then on transposing the merge setting will be reset. If dimension merging is repeated, the multilevel heading setting will be reset.
Example of multilevel heading use
To number heading columns, select the Numbering of Columns checkbox. By default, column numbers will be displayed in a new heading row after headers starting from corner. To set up numbering, click the  Edit button, and the Numbering dialog box opens. The setting is available when the Numbering of Columns checkbox is selected.
NOTE. Numbering by columns can be set up after creating a table area. To do this, select a cell or a cell range of table area and select the By Columns item of the ![]() Numbering button drop-down menu of the Table ribbon tab. For additional setup of numbering select the Set Up item in the drop-down menu of the
Numbering button drop-down menu of the Table ribbon tab. For additional setup of numbering select the Set Up item in the drop-down menu of the ![]() Numbering button on the Table ribbon tab, after which the Numbering dialog box opens.
Numbering button on the Table ribbon tab, after which the Numbering dialog box opens.
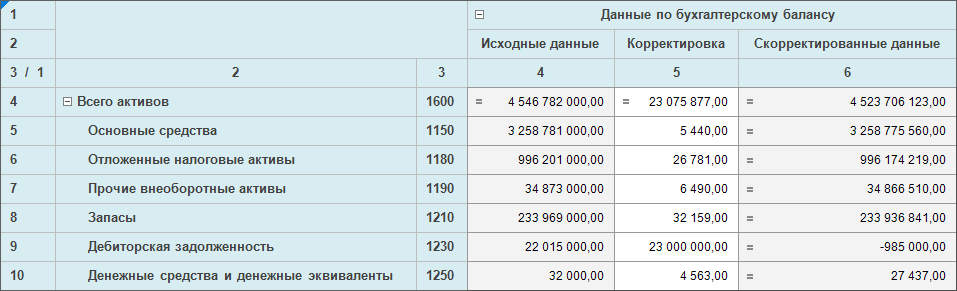
Numbering can be shown or hidden during the work with a ready data entry form.
Example of column numbering use
Set up indicator name displaying in the form heading. To do this, in the additional structure settings area in the Show Indicator Names drop-down list select checkboxes next to indicators. Click the  Search button to search for required indicator. The drop-down list contains the All Indicators checkbox and a list of indicators used in the heading. To show names of all indicators, select the All Indicators checkbox. To show names of some indicators, select checkboxes next to their names. The checkboxes are selected by default, and names of all indicators are displayed in the table area heading.
For details about options of setting up displaying of indicator names in the data entry form heading see the Examples of Use of Indicator Names Display Setup section.
Set up display of additional elements names in data entry form heading by selecting one or several attributes of shared dimension. To do this, in the Data Entry Form Indicators area:
Select shared dimension.
Select the Names item in the dimension's context menu.
Select the checkbox next to the attribute.
See also:
Getting Started with the Interactive Data Entry Forms Extension in the Web Application | Setting Up Table Area | Setting Up Indicators Structure | Advanced Settings of Heading Display