 To open the panel
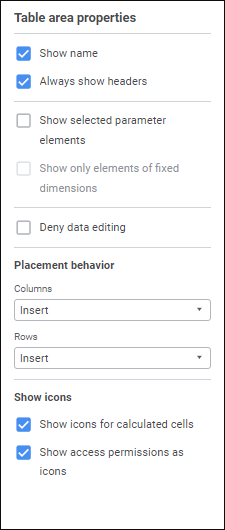
To set up basic properties of table area, use the Table Area Properties side panel:

To set up a tale area, set the parameters:
Show Name. Select the checkbox to display table area name on a sheet. Table area name will be displayed at the top of the data entry form sheet. The checkbox is selected by default.
Always Show Headers. Select the checkbox to display sidehead on a sheet if there is no heading dimension selection, and heading if there is no sidehead dimension selection. The checkbox is selected by default. The selection may be absent if sidehead or heading dimension is bound to the parameter.
Show Selected Parameter Elements. Select the checkbox to display the current values of data entry form parameters selected in controls. Make sure that parameters have been already created. When the checkbox is selected, parameter names and elements set in parameters are displayed above the data entry form. The checkbox is selected by default.
Show Only Fixed Dimension Elements. Select the checkbox to display on the sheet only elements that are not displayed in the table. The checkbox is deselected by default. It is available only when the Show Selected Parameter Elements checkbox is selected.
Deny Data Editing. Select the checkbox to deny editing data in the data entry form. When the checkbox is selected, table area data will be read-only. The checkbox is deselected by default.
Placement Behavior. If a table area is added on the data entry form sheet, the column and row behavior on the sheet can be different. Select the behavior in the Columns or Rows drop-down list:
Insert. A table area is added to the sheet with increasing the number of rows or columns on the sheet with offset. The number of rows or columns with offset will be equal to the number of rows or columns of added table area. For example, the information located in rows below will be offset to the bottom, and information located in columns to the right will be offset to the right.
Overwrite Columns to the Right/Overwrite Rows Below. A table area is added to the sheet into table sheet rows or columns of table sheet without offset of rows or columns. The position of information on the data entry form sheet will not change. It is recommended to use this behavior if a data entry form will be connected to a business process and the number of dimension elements will change within this process.
Show Icons. Set up displaying of icons for the cells which are read-only, using the checkboxes:
Show Icons for Calculated Cells. When the checkbox is selected, the cells with aggregated elements, calculated elements, elements calculated using a connected calculation algorithm, will display the  icon.
icon.
If elements are calculated using a connected calculation algorithm, the  icon is not displayed when the following conditions are satisfied:
In the calculation block a cube is set for data filtering.
The table, which fields are connected with cube dimension, contains empty values.
If a calculation algorithm with data filtering is used, the  icon is displayed if the calculated cell contains calculation data.
Show Access Permissions as Icons. When the checkbox is selected, the cells without access permissions for change will display the  icon.
icon.
The checkboxes are selected by default.
Next, set up table area structure.
See also: