In this article:
Filling Dictionary with Data
To fill an MDM dictionary/composite MDM dictionary with data, add elements or import data from table using an import schema.
If required, export dictionary data to table using an export schema.
NOTE. Working with elements is available when an MDM dictionary/composite MDM dictionary is opened for edit.
Adding an Element
To add an element, select the parent element in the element tree and execute one of the operations:
In the web application:
Click the
 Add Element button on the toolbar or select the Add Element item in the button's drop-down menu. The element will be added to the end of the element tree.
Select the Add Subelement item in the drop-down menu of the
 Add Element button on the toolbar. The element will be added as a child element of the selected parent element.
In the desktop application:
Click the
 Add button on the toolbar.
Select the Add item in the element's context menu.
Press the INSERT key.
NOTE. The command for adding an element is unavailable if the Elements have Access Permissions checkbox is selected, and the user is not included in any of the label groups that have effective permissions to add elements to the current dictionary.
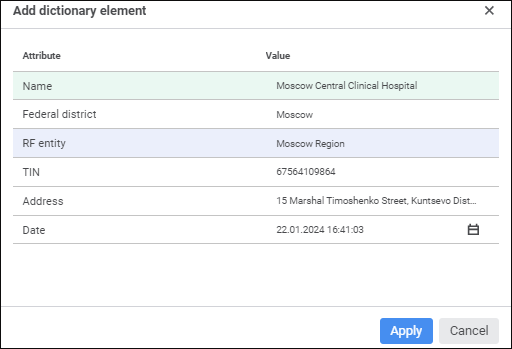
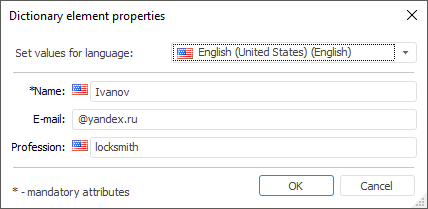
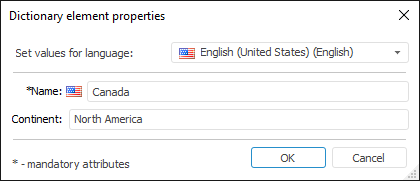
After executing the operations, the Add Dictionary Element dialog box opens in the web application or the Dictionary Element Properties dialog box in the desktop application.


The dialog box appearance depends on dictionary attributes and on dictionary display mode.
To add an element, determine attribute values if they are not hidden:
System Attributes. They are mandatory and highlighted with red.
Custom Attributes.
For details about changing appearance of the Dictionary Element Properties dialog box, see the Replacing Predefined Dialog Box View section.
To add an element from a source dictionary to a composite MDM dictionary:
In the web application click the
 Add Element to Composite Dictionary button in the data source selection string.
In the desktop application select element in the Source Dictionary Elements area and execute one of the operations:
Select the Add Element to Dictionary context menu item.
Click the
 Add Element button on the toolbar.
Drag the element to the composite MDM dictionary.
After executing the operation the element is added to the composite MDM dictionary.
 Features of working with string/text attribute value
Editing Element
To edit the selected element:
In the web application:
Click the
 Edit Element button. The Edit Dictionary Element dialog box opens.
Select the Edit item in the element's context menu.
In the desktop application:
Click the
 Edit button on the toolbar.
Select the Edit item in the element's context menu.
Press the ENTER key.
The Dictionary Element Properties dialog box opens.
Change attribute values specified on adding an element.
If the user is denied to edit one or several attributes, the Dictionary Element Properties dialog box displays these attributes but they are locked for edit. If the user does have permissions to edit elements, all attributes will be locked for edit.
NOTE. When editing dictionary element, one cannot change values of imported attributes and default calculated values.
Data Import
Data import means loading of data from a table to a dictionary. Data import is available only in the desktop application.
To import data, click the  Import Data button on the toolbar. Select import schema in the Select Import Schema dialog box. Import schemas are created on the Import tab of the dictionary editing window.
TIP. After importing data it is recommended to refresh the element tree.
Features of import taking into account access permissions:
If the user has a privilege to change permissions, all attributes including permission attributes are imported.
If the user does not have the privilege to change permissions and the import object contains attributes of access permissions, an error message is displayed.
If new elements are added during the import, the administrator and the administrators group get permissions to read, write and delete these elements.
Data Export
Data export means loading of data from a dictionary to a table. Data export is available only in the desktop application.
To export data, click the  Export Dictionary button on the toolbar. Select export schema in the Select Export Schema dialog box. Export schemas are created on the Export tab of the dictionary editing window.
The dictionary is exported considering access permissions. The user can export only the elements, which he is allowed to read.
Deleting Element
To delete the selected element:
In the web application:
Click the
 Delete button on the toolbar.
Select the Delete item in the element's context menu.
In the desktop application:
Click the
 Delete button on the toolbar.
Select the Delete item in the element's context menu.
After selecting the item the confirmation of deleting all elements of the selected dictionary element will be required.
NOTE. Parent elements are deleted with all child elements.
Deleting All Elements
To delete all elements, click the  Clear Dictionary button on the toolbar. Deleting all elements is available only in the desktop application.
A confirmation to delete all MDM dictionary/composite MDM dictionary elements will be requested. An information message is displayed after the dictionary is cleared.
If an error occurred during the clear, a dialog box with a corresponding message is displayed. Click the Details button to show the text of error. To skip deleting of the current element, click the Skip button. To skip deleting of the current element and all further elements, deleting of which may cause such errors, click the Skip All button.
Features of Dictionary Clearing
When clearing a dictionary, the dialog box, which contents depends on dictionary type and set parameters, opens. The dialog box can contain the checkboxes:
Define Parameter Values. If the checkbox is selected, one can define parameter values, by which elements are cleared. An appropriate editor is displayed for each dictionary parameter. The checkbox is displayed on clearing of:
Parametric dictionary.
Parametric version dictionary.
Specify Closing Date for Element. The checkbox is displayed only on clearing of version dictionary with manual control of periods. If the checkbox is selected, one can specify closing date for elements, which must be deleted. The current date is specified by default in the date editor. The checkbox can be selected only in the desktop application.
The checkbox is displayed on clearing of:
When clearing of a dictionary with configured forming of elements actual period a confirmation about clearing of the dictionary is required.

 .
.
 Set String button at the end of the attribute value edit box.