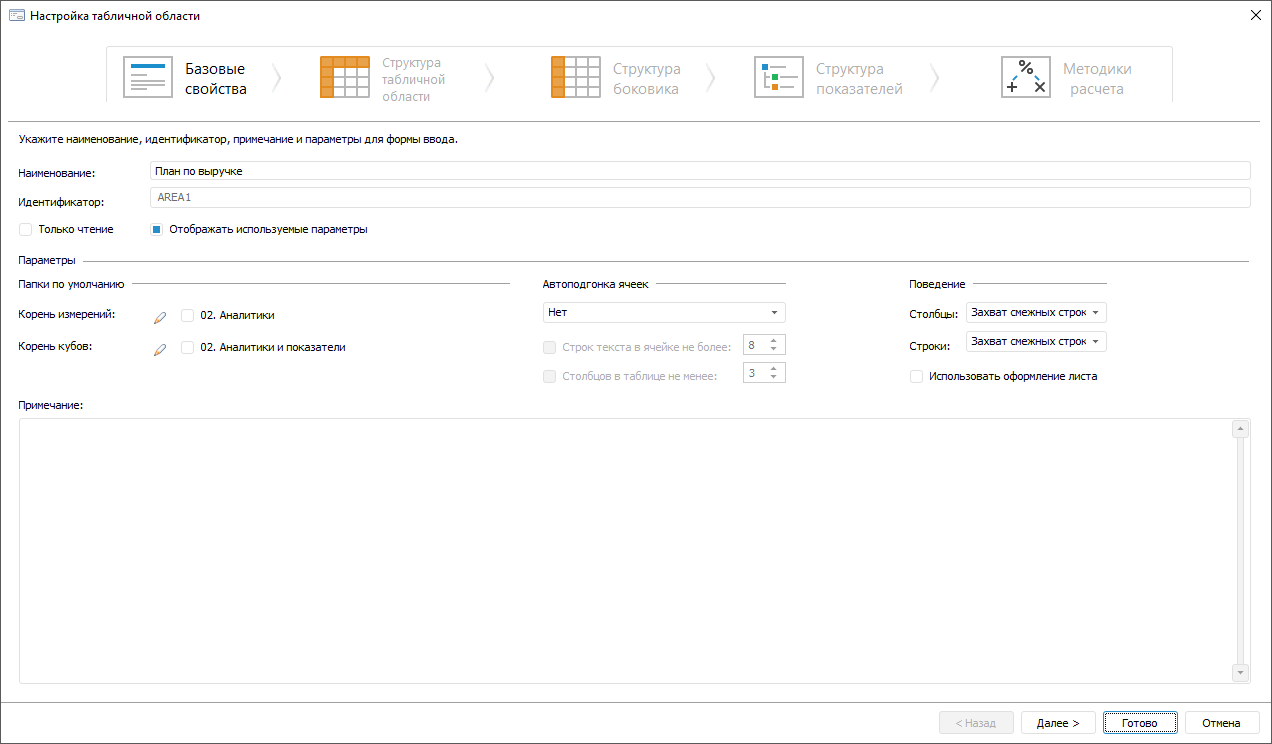
Basic properties include table area name and its general settings.
Basic properties of table area are set up on the Basic Properties page of the Table Area Wizard dialog box:

 Elements of the Basic Properties page
Determine:
Name. A table area name should be meaningful and explain its functionality.
Table area parameters. Settings to display, refresh, determine behavior, adjust and indicate cells for table area.
NOTE. Optional element. The note may contain any information as required by the user. The entered text can be displayed only in this window on creating or editing the form.
After basic properties of table area have been set up, go to the Setting Table Area Structure stage.
To set up table area, set the following parameters:
Show Name. To show data entry form name on the sheet, select the checkbox. After the checkbox is selected, name of the data entry form specified in the Name box will be shown above the data entry form. The checkbox is selected by default.
Show Selected Parameter Elements. To show current values of form parameters specified by the selection in controls on the sheet, select the checkbox. Make sure that parameters have been already created. After the checkbox is selected, parameter names and elements set in parameters will be shown above the data entry form. The checkbox is selected by default.
Deny Data Editing. To deny data editing on a form, select the checkbox. After the checkbox is selected, table area data will be available only for reading.
Use Virtual Cells. To speed up work with data entry form, select the Use Virtual Cells checkbox, then on opening it for edit, data in table area will not be shown by default. To show data, enable automatic data refresh in form, by selecting the Tools > Settings item and selecting the Refresh On Opening for Edit checkbox or refresh it manually.
NOTE. The setup is executed for each table area.
Always Show Headers. To show sidehead on the sheet when the selection by heading dimensions is absent and to show heading when the selection by sidehead dimensions is absent, select the Always Show Headers checkbox. The checkbox is selected by default. The selection absence is possible if sidehead or heading dimension is bound to the parameter:
Autofit Cells. To optimize cell size fit, select one mode in the drop-down list:
No. No autofit.
First by Width, Then by Height. Firstly, column size is autofit, then row size is autofit.
First by Height, Then by Width. Firstly, row size is autofit, then column size is autofit.
Width Only. The minimum required width is set to show text of the longest cell in the table column.
Height Only. The minimum required height is set to show text of the highest cell in the table row.
Automatically. Autofit is executed automatically according to the determined parameters:
Maximum Text Lines in Cell. If the checkbox is selected, column width is adjusted so that no more than N rows set in the appropriate value editor will be required to show text of the longest row in the cell column.
Minimum Columns. If the checkbox is selected, the table area will always display the minimum N columns specified in the appropriate value editor.
Simplified. This mode is set by default. Simultaneous autofit of width, height and visible data. Autofit is applied for 20 rows/columns from the beginning, middle and end of table area.
Behavior. If a table area is added on the data entry form sheet, the column and row behavior on the sheet can be different. Select the behavior in the Columns or Rows drop-down list:
Insert. A table area is added to the sheet with increasing the number of rows or columns on the sheet with offset. The number of rows or columns with offset will be equal to the number of rows or columns of added table area. For example, the information located in rows below will be offset to the bottom, and information located in columns to the right will be offset to the right.
Overwrite Rows Below. A table area is added to the sheet into table sheet rows or columns of table sheet without offset of rows or columns. The position of information on the data entry form sheet will not change. If a data entry form is connected to a business process and the number of dimension elements changes in this process, select the Overwrite Rows Below behavior on adding a table area.
To use formatting applied to table sheet, select the Use Sheet Formatting checkbox.
NOTE. Denying of data entry specified at the Indicators Structure stage will be unavailable if the Use Sheet Formatting checkbox is selected.
Cell Indication. To display icons for cells, which are read-only, select the checkboxes:
Select Cells with Calculated Elements. If this checkbox is selected in the cells with calculated elements the  icon is displayed:
![]()
Select Cells Without Access Permissions. If this checkbox is selected in the cells without access permissions to modify, the  icon is displayed:
![]()
The checkboxes are selected by default:
![]()
See also:
Building Data Entry Form| Inserting and Setting Up Table Area| Working with Ready Data Entry Form