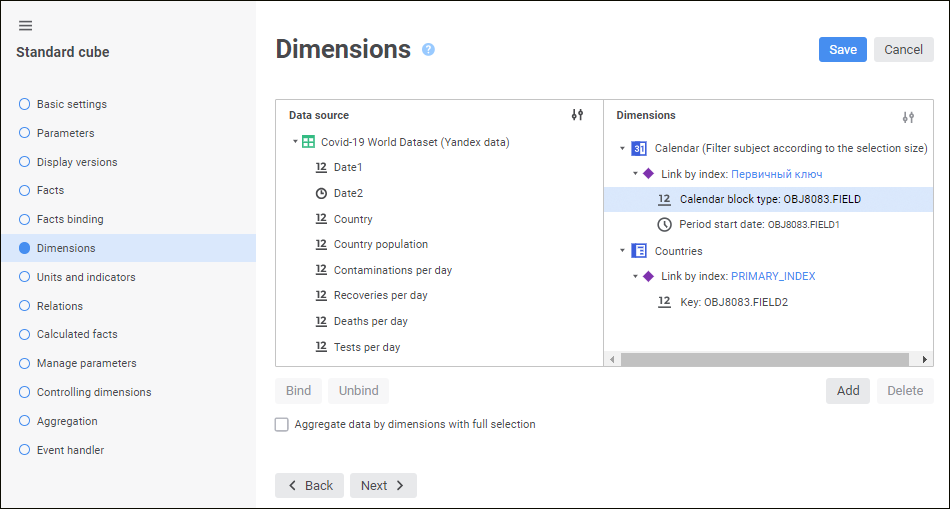
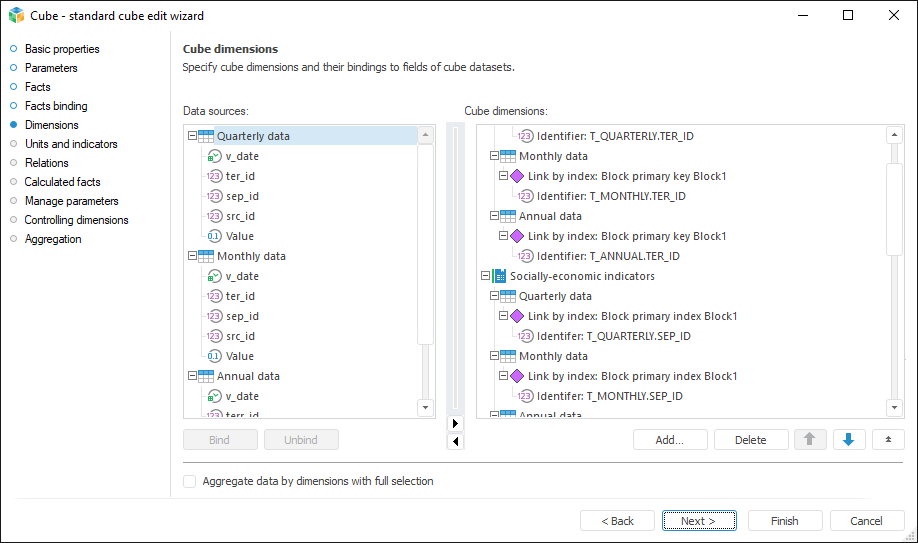
The Dimensions page is used to bind data source fields with cube dimensions.
Multidimensional cube structure consists of individual dimensions. Each dimension describes a cube cell in some way. Repository dictionaries are used as dimensions. Each dimension is bound to a data source containing information about coordinates of cube cells. Different dimension blocks can be bound to different data sources.
NOTE. When working with data analysis and building reports tools to save data to MDM dictionary with multiple attribute values, select the dictionary as a cube dimension and bind the Key attribute of the data source to the cube dimension index.
Dimensions must be bound to the same sources, to which cube facts were bound.


When a dimension is added to a cube, its structure is displayed as a tree in the Dimensions/Cube Dimensions area. The selected dictionary is a tree node. All data sources, to which cube facts were bound, are dictionary child elements. Source values are used to get coordinates of cube cells by this dimension.
NOTE. If cube facts binding is set only for one data source, this data source will not be displayed in the cube dimensions structure.
To add a dimension to the Dimensions/Cube Dimensions area:
In the web application:
Click the  Add button.
Select the dictionary in the Select Object dialog box.
To quickly select an object, enter object's name/identifier/key in the search box depending on display settings. Search is executed automatically while the searched text is entered into the search string. The list will display the objects, which names/identifiers/keys contain the entered text.
To set up displaying of repository objects, click the  Show Object button and select display option in the drop-down menu:
Name. Objects are displayed with their names. Default option.
Identifier. Objects are displayed with their identifiers.
Key. Objects are displayed with their keys.
Several options can be selected. Identifier and key will be specified in brackets.
To reset selection for selected objects, click the  Clear button.
In the desktop application:
Click the Add button and select the required dictionary.
Drag a dictionary from the object navigator to the Cube Dimensions area.
Select the Add Dimension item in the context menu of the Cube Dimensions area and select the required dictionary.
To delete the selected dimension, in the Dimensions/Cube Dimensions area:
In the web application click the  Delete button.
In the desktop application:
Click the Delete button.
Select the Delete Dimension item in the dimension's context menu.
Press CTRL+DELETE.
NOTE. If one of the data source fields is bound to the cube dimension, a confirmation dialog box opens on clicking the Delete button.
To rename a dimension in the Dimensions/Cube Dimensions area:
In the web application open the Dimension Properties dialog box and rename the dimension in the Name box.
In the desktop application:
Select the Rename Dimension item in the context menu of the required dimension.
Click the name of the selected dimension.
To move the selected dimension one position up:
In the web application click the  Up button.
In the desktop application:
Click the  Move Up button.
Select the Move Dimension Up item in the dimension's context menu.
To move the selected dimension one position down:
In the web application click the  Down button.
In the desktop application:
Click the  Move Down button.
Select the Move Dimension Down item in the dimension's context menu.
Going to object enables the user to select the dictionary in the object navigator that is a cube dimension. To do this, select the Go to Object item in the context menu of the selected dimension.
NOTE. Going to repository object is available only in the desktop application.
To open the object located in the Dimensions area, select the  Open Object item in the drop-down menu of the
  Actions button. The object opens for view in a new browser tab.
To edit an object, select the  Edit Object item in the drop-down menu of the
  Actions button. The object wizard opens in a new browser tab.
NOTE. Opening and editing object is available only in the web application.
To set up displaying of objects in the Data Source and Dimensions areas in the web application and the Data Sources and Cube Dimensions areas in the desktop application:
In the web application select the method of displaying objects in the drop-down menu of the  Show Object button:
Name. Default value. Only object names are displayed.
Identifier. Only object identifiers are displayed.
Name and Identifier. Object names and identifiers are displayed.
In the desktop application select the method of displaying objects in the field's context menu:
Show Names. Default value. Only object names are displayed.
Show Identifiers. Only object identifiers are displayed.
Show Names and Identifiers. Object names and identifiers are displayed.
To change dimension properties:
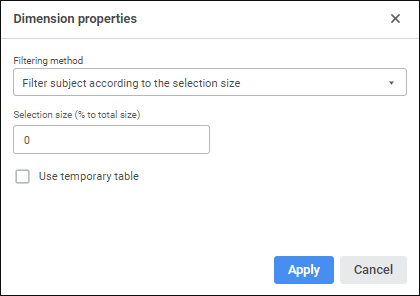
In the web application select the ![]() Dimension Properties item in the drop-down menu of the
Dimension Properties item in the drop-down menu of the  Actions button next to the dimension. The Dimension Properties dialog box opens:
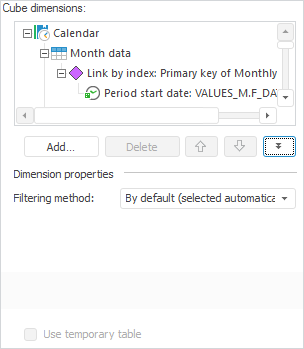
In the desktop application click the  Show Dimension Properties button in the Cube Dimensions area. The Dimension Properties additional panel opens:
Set the parameters:
Name. Rename the dimension if required. It is available only in the web application.
Filtering Method. Filtering method enables the user to determine how to form the part of query, which is responsible for the filtering elements by dimension (part of query, which follows right after the "Where" sentence). The selected filtering method is displayed in the dimension name in the Dimensions area. Available filtering methods:
By Default (Selected Automatically). Default value. When this option is selected, filtering is executed by means of the IN operator. The BETWEEN operator is used for calendar dimension in the following cases:
To filter elements of different levels if the calendar dimension is built using the primary common key (values of all levels are stored in one table). For example:
((a.LVL_TYPE BETWEEN 4 AND 5 OR a.LVL_TYPE IN (1)))
To filter the daily frequency elements. Example:
((a.LVL_DATE BETWEEN TO_DATE('1995-01-01','YYYY-MM-DD') AND TO_DATE('1995-01-20','YYYY-MM-DD')))
The IN operator is also replaced with the BETWEEN operator if:
The number of string identifiers is greater than 1024.
The number of numeric identifiers is greater than 8192.
Extract All Records Despite the Selection. If this method is used, all the records are extracted and filtered despite the selection. The query does not include any operators related to the dimension elements filtering.
Filter Subject According to the Selection Size. If this method is selected, specify the selection size in percentage to the common number of elements (dimension size). At the same time the query is formed in the following way:
Percentage of selected elements is less than the specified number: to filter using the IN operator.
Percentage of selected elements is equal to the specified number: to filter using the BETWEEN operator according to the first and last selected element.
Percentage of selected elements is greater than the specified number: to filter using the BETWEEN operator according to all selected elements.
Filter Subject According to the Number of Selected. If this method is selected, specify the number of selected dimension elements. At the same time the query is formed in the following way:
The number of selected elements is less than the specified number: to filter using the IN operator.
The number of selected elements is equal to the specified number: to filter using the BETWEEN operator according to the first and last selected element.
The number of selected elements is greater than the specified number: to filter using the BETWEEN operator according to all selected elements.
Filter by IN Condition. Elements are always filtered by means of the IN operator.
Use Temporary Table. The checkbox becomes available when the Filter Subject According to the Selection Size and Filter Subject According to the Number of Selected methods are used for filtering. The checkbox is deselected by default. Select the checkbox to use a temporary table to transfer the selection and fix formation of IN.
NOTE. The specified settings are applied to the cube dimension selected in the list.
Click the OK button to apply settings in the web application.
Click the  Hide Dimension Properties button to hide the Dimension Properties additional panel in the desktop application.

 Bind dimensions to data source fields
To bind a dimension with a data source field:
Select dimension index in the Dimensions/Cube Dimensions area. To do this:
In the web application expand the dimension structure and then click the Link by Index element. The popup panel is displayed, in which select dimension index. If a dimension contains unique index, it will be set automatically by default.
In the desktop application expand the dimension structure and then double-click the Link by Index element. The Select Index dialog box opens, in which select dimension index:
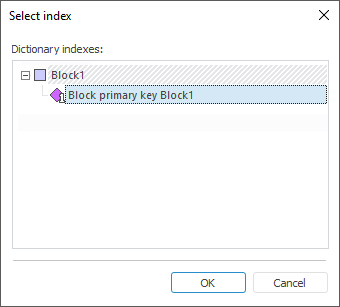
Attributes included in the index are displayed in the dimension tree.
Select dimension index in the drop-down list of the Link by Index element in the Dimensions area. Attributes included in the index are displayed in the dimension tree.
NOTE. If the dimension has only one index, this index is automatically selected for this dimension in the link by index. If the dimension includes several blocks and indexes, select the one, which contents corresponds to the data stored in the data source.
Select the data source field in the Data Source area and execute one of the operations:
Select the attribute, to which the field should be bound, in the Dimensions area and click the  Bind button.
Drag the field from the Data Source area to the attribute in the Dimensions area.
Dimensions and source fields can also be bound using the expression editor:
In the web application execute one of the operations:
Click the  Expression Editor button next to the required attribute.
Double-click the required attribute.
In the desktop application double-click the required attribute.
In the expression editor window that opens select the required data source field.
If the table field containing date and time is bound to the calendar dimension, only date is considered on creating a cube.
IMPORTANT. One source field can be bound to only one attribute of one dimension.
After binding dimension to the data source field, the dimension structure looks as follows:
In the web application:
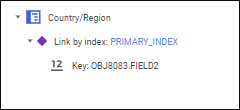
In the desktop application:

To unbind the dimension from the data source field, select the dimension attribute in the Dimensions/Cube Dimensions area and click the  Unbind button.

 Aggregate data by dimensions with full selection
The Aggregate Data by Dimensions with Full Selection checkbox determines whether the From Source Facts aggregation method is available for fixed dimensions in reports. The checkbox is deselected by default.
NOTE. Aggregation by the From Source Facts method will be applied if element selection of fixed dimension is full, otherwise aggregation will not be calculated.
If the From Source Dimensions aggregation method is selected, fixed dimensions are aggregated by the method selected for aggregation of cube facts.
IMPORTANT. It is not recommended to aggregate data by dimensions with a full selection, if data caching is enabled for the cube. In this case a cache instance is created for each dimension selection combination, which will increase the overall cache size and will influence negatively on operation speed.
NOTE. When data type changes in the columns used in dimension bindings, it is recommended to bind dimensions to data source fields again in the cube.
Formulas can be set up using the expression editor:
The expression editor in the desktop application is uniform for all platform tools and objects. The uniform expression editor is described in the Creating Formulas and Expressions document.
The expression editor in the web application differs depending on the configured tool or object.
The expression editor window for binding standard cube dimensions to data source fields in the web application looks as follows:
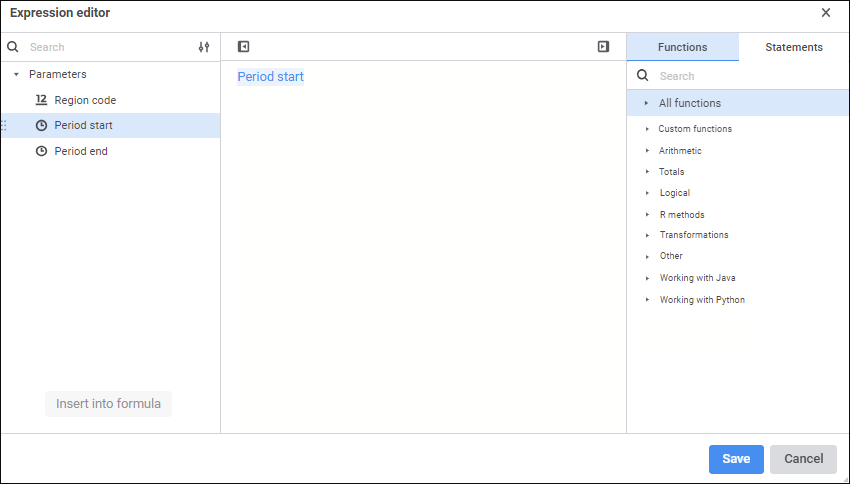
Create a formula for setting a link between data source field and cube dimension attribute.
Operands, arithmetic operations, functions, numbers, comparison characters and round brackets can be used in a formula. There are some features of use:
All element types, except for numbers, can be inserted both using the keyboard or special panels.
Numbers are inserted only using the keyboard.
Operands are displayed on the expression editor's operands panel:
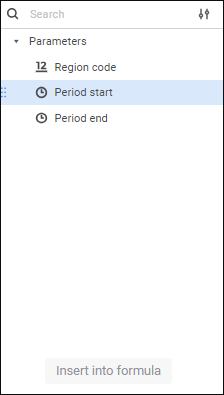
Data sources and cube parameters are used as operands.
To insert an operand to the formula area, execute one of the operations:
Using the operands panel:
Select the operand and click the Insert into Formula button.
Double-click the operand.
Drag the operand to the formula area.
Using the formula area:
Enter the operand name in the formula area.
Click in the formula area in the place where the operand should be inserted, press CTRL+SHIFT and select the required operand on the popup panel.
To quickly search for an operand, start typing partial or full name of the operand in the search string. After executing the operation the operands panel displays the operands, which names satisfy search conditions.
To set up displaying of the operands list, use items in the drop-down menu of the  Display Settings button:
Name. Default value. Only operand names are displayed.
Identifier. Only operand identifiers are displayed.
Name and Identifier. Operand names and identifiers are displayed in the format: <name> (<identifier>).
To hide the operands panel, click the  Hide Operands Panel button. To show the panel, click the
  Show Operands Panel button.

 Insert functions and statements
Functions and statements are displayed on the functions and statements panel on corresponding tabs:
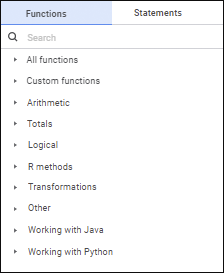
To insert a function or statement to the formula area, execute one of the operations:
Using the functions and statements panel:
Select a function or statement. The panel with description opens:
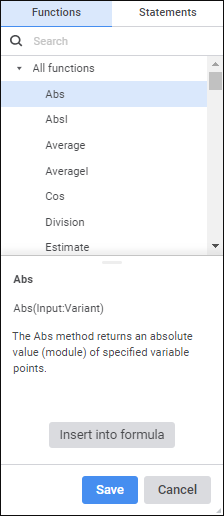
Click the Insert into Formula button.
Double-click the function or statement.
Drag the function or statement to the formula area.
Using the formula area:
Enter a function or statement in the formula area.
Click in the formula area in the place where the function or statement should be put, press CTRL+SHIFT and select the required function or statement on the popup panel.
To quickly search for a function or statement, start typing partial or full name of the function or statement in the search string. After executing the operation the functions and statements panel displays the functions or statements, which names satisfy search conditions.
To hide the functions and statements panel, click the  Hide Functions and Statements Panel button. To show the panel, click the
  Show Functions and Statements Panel button.
See also: