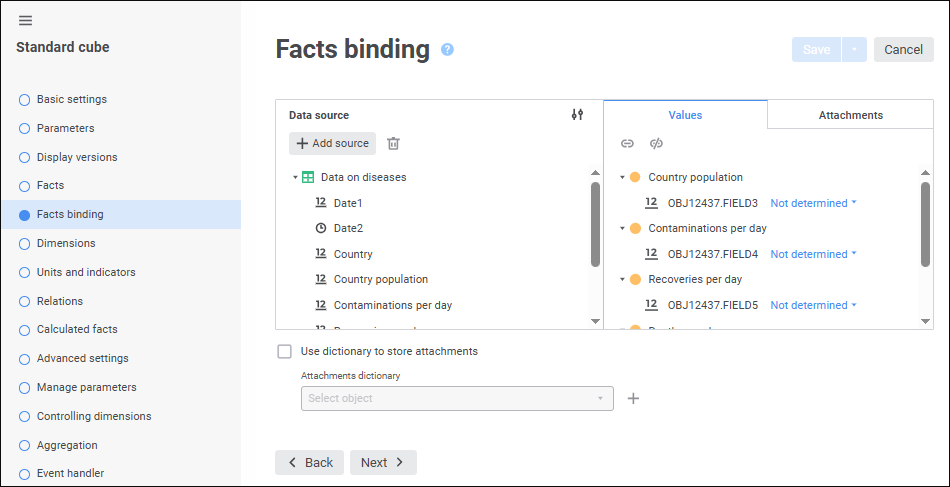
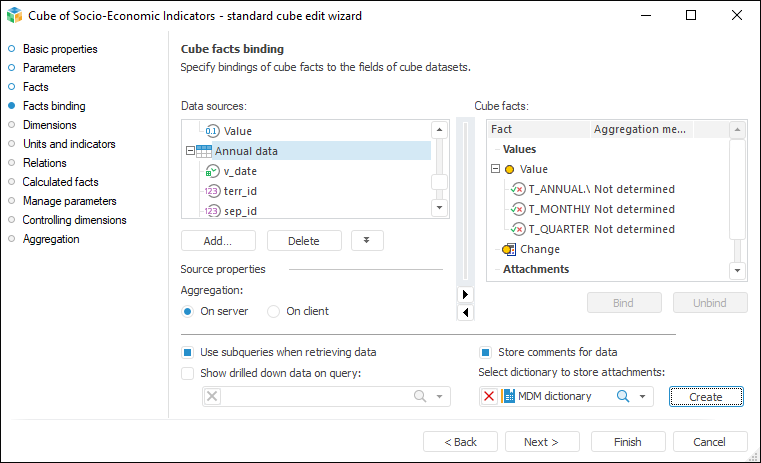
The Facts Binding page is used to bind data source fields with cube facts.
Cube data is stored in relational data sources. A data source stores the following cube cell records: a collection of fields that uniquely identifies cell position in a cube, and fields containing facts' data.
NOTE. When working with data analysis and building reports tools to save data to an MDM dictionary with multiple attribute values, select the dictionary as a data source and bind dictionary attributes with cube facts. The Key attribute must be linked with cube dimension.
To project cube structure to data source, bind cube facts and source fields. Different cube facts can be bound to fields of different data sources and different calendar levels.


To add a relational data source to the Data Sources area:
In the web application click the  Add Source button and select the required data source in the dialog box that opens.
To quickly select an object, enter object's name/identifier/key in the search box depending on display settings. Search is executed automatically while the searched text is entered into the search string. The list will display the objects, which names/identifiers/keys contain the entered text.
To set up displaying of repository objects, click the  Show Object button and select display option in the drop-down menu:
Name. Objects are displayed with their names. Default option.
Identifier. Objects are displayed with their identifiers.
Key. Objects are displayed with their keys.
Several options can be selected. Identifier and key will be specified in brackets.
To reset selection for the selected objects, click the  Clear button.
In the desktop application:
Click the Add button and select the required data source.
Select the Add Source item in the context menu of the Data Sources area and select the required data source.
Drag the required data source from the object navigator to this area.
To delete the selected data source from the Data Sources area:
In the web application click the  Delete button.
In the desktop application:
Click the Delete button.
Select the Delete Source item in the source's context menu.
Press CTRL+DELETE.
NOTE. If one of the data source fields is bound to the cube fact, a confirmation dialog box opens on clicking the Delete button.
To set up displaying of object tree in the Data Source/Data Sources box:
In the web application select the method of displaying data sources in the drop-down menu of the  Display Sources button in the Data Source area:
Name. Default value. Only object names are displayed.
Identifier. Only object identifiers are displayed.
Name and Identifier. Object names and identifiers are displayed.
In the desktop application select the method of displaying sources in the context menu of the Data Sources area:
Show Names. Default value. Only object names are displayed.
Show Identifiers. Only object identifiers are displayed.
Show Names and Identifiers. Object names and identifiers are displayed.
To determine fields binding:
Select a relational data source in the Data Sources area, expand its structure and select the field to bind with the cube fact.
Execute one of the operations:
Select the cube fact, to which the field should be bound, in the Values area in the web application or in the Values list in the Cube Facts area in the desktop application and click the  Bind button.
Drag the field from the Data Sources area to the cube fact in the Values area in the web application or in the Values list in the Cube Facts area in the desktop application.
Fields are bound to cube facts.
To unbind the cube fact, select the fact in the list and click the  Unbind button.
If the cube is used as a data source for a table, which cells will store attachments, first, select the dictionary to store attachments and then bind data source fields and cube fact in the Attachments area in the web application or in the Attachments list in the Cube Facts area in the desktop application. The attachment field is available for binding if the value field has been already bound to the fact. If aggregation is set up for facts, attachment fields cannot be bound.
NOTE. The field for storing attachment links should be created in the relational data source. The field should be numeric.

 Set up calculated expressions for bound facts
To set up expressions for bound facts:
In the Cube Facts area execute one of the operations:
In the web application:
Click the  Expression Editor button next to the required bound fact.
Double-click the required bound fact.
In the desktop application double-click the selected bound fact.
Set up fact calculation formula in the expression editor.
As a result, expressions are set up for bound facts.

 Set up aggregation of fact dimension
If any source fields are not bound to dimensions in the cube, it could happen that several fact values will be available by one cube coordinate. In this case, to present data unambiguously by fact, one can set aggregation that will be applied to get any one value. Aggregation is used to merge several values by means of various mathematical functions, for example, sum, arithmetic mean, and so on.
An individual aggregation method can be set up for each data binding. To do this, in the Values area in the web application or in the Cube Facts area in the desktop application:
Select a fact binding.
Select aggregation method in the drop-down list:
Not Determined. No aggregation, the last non-empty value is selected (the return order of values is selected by DBMS).
Sum. Fact values are summed up.
Number of Values. The number of fact values is determined.
Arithmetic Mean. The mean value of the fact is determined.
Minimum. The minimum value of the fact is selected.
Maximum. The maximum value of the fact is selected.
Standard Deviation Based on Sample. The standard deviation for fact values is calculated.
Median. The median for fact values is determined.
Standard Deviation Based on the Entire Population. The standard deviation for all fact values is calculated.
Number of Different Values. The number of fact unique values is determined.
To set up data aggregation by hierarchy of various cube dimension levels, go to the Data Aggregation page of the standard cube creation wizard.
NOTE. To use aggregation methods in fixed dimensions that are set for cube facts, select the Aggregate Data by Dimensions with Full Selection checkbox on the Dimensions page.
A fact dimension can be aggregated:
On server. Default value. It is executed by DBMS server during data extraction from cube data sources.
On client. It is executed using Foresight Analytics Platform on the client workstation after extracting all data from the server.
To change aggregation calculation location:
In the web application:
Select the ![]() Source Properties item in the drop-down menu of the
Source Properties item in the drop-down menu of the  Actions button located next to the data source. The Source Properties dialog box opens:
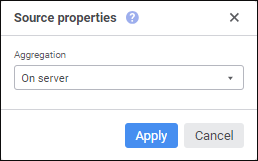
Select aggregation type in the drop-down list.
Click the Apply button.
In the desktop application:
In the desktop application click the  Show Source Properties button in the Data Sources area.
Select aggregation type using corresponding radio buttons in the Source Properties group.
The Source Properties area is hidden by default.
Features of work with configured aggregation of fact dimension:
The table provides drill down into relational data that displays all data source fields, which were used to get cell value.
When setting up output of totals by rows or columns based on source data, the Grand Total method of calculating totals is available for regular report data area.
If a query-based cube is used, select the Use Subqueries when Retrieving Data checkbox.

 Use subqueries when retrieving data
If a query-based cube is used, the Use Subqueries when Retrieving Data checkbox is mandatory to aggregate facts. The Use Subqueries when Retrieving Data checkbox is selected by default.
NOTE. The Use Subqueries when Retrieving Data checkbox on the Facts Binding page of the standard cube wizard is available only in the desktop application. In the web application one can enable the use of subqueries when retrieving data on the Advanced Settings page of the standard cube wizard.
Subqueries are relevant for use when cube sources are built on complex queries working with a big number of fields and executing calculations. In the cube one should use only some source fields and calculate and aggregate data.
To extract data on building a cube, the following query is formed:
Using subqueries:
select a.* from (select a.ID,a.VALUE,a.VDATE,... from <TableName> a) a where ((a.VDATE in (TO_DATE('1995-01-01','YYYY-MM-DD'),...))) and ((a.ID in (1,...))) and ...
Without using subqueries:
select a.ID,a.VALUE,a.VDATE,... from <TableName> a where ((a.VDATE in (TO_DATE('1995-01-01','YYYY-MM-DD'),...))) and ((a.ID in (1,...)))...
When executing subqueries, remember that each complementary subquery nesting level increases the time required to execute the whole query. The general nesting and the number of subqueries depend on the number of cube sources and dimensions.

 Show drilled down data based on query
If aggregation is set up for facts, when working with data in various Foresight Analytics Platform tools drill down of data is also available. If aggregation is not set up, drill down can be implemented by means of a custom SQL query.
To enable drill down into relational data, execute the following:
Select the Show Drilled Down Data on Query checkbox.
NOTE. The Show Drilled Down Data on Query checkbox on the Facts Binding page of the standard cube wizard is available only in the desktop application. In the web application one can show drilled down data based on query on the Advanced Settings page of the standard cube wizard.
Select the required query in the drop-down list.
The query must meet the following requirements:
Names of fields that can be obtained after query execution must match the identifiers of the fields that are bound to dictionary attributes and cube facts.
The number of fields that can be obtained after query execution must not be less than the number of source fields that are bound to dictionary attributes and cube facts.
If a parametric query is used, its parameters can be bound to cube parameters. Binding is executed on the Manage Parameters page.
To add comments for data, the user should have permissions to read and write data:
If the user has read permissions only, he can view comments.
If the user has write permissions, he can add and view comments.
To enable setting of comments for data with automatic fact binding, select the Store Comments for Data checkbox. An object for storing comments is created.
NOTE. The Store Comments for Data checkbox on the Facts Binding page of the standard cube wizard is available only in the desktop application. In the web application one can set up comments for data on the Advanced Settings page of the standard cube wizard.
To delete all comments for data, deselect the Store Comments for Data checkbox. After confirming the operation all comments are deleted together with the object for storing comments.
Before adding or deleting cube facts, changing binding between data source fields and dimensions, changing the number of cube dimensions, and changing dimension properties, the operation confirmation dialog box opens. After confirming the operation all comments are deleted together with the object for storing comments, and the Store Comments for Data checkbox is deselected.
Data comment storing settings and previously added comments are not included in the process of cube copying.
If the cube is used as a data source for a table, which cells will store attachments (files, links or repository documents), create a new MDM dictionary or select the existing one in the drop-down list.
IMPORTANT. Only the dictionaries created by means of standard cube creation wizard can be used as attachments dictionaries. It is prohibited to create and edit such dictionaries in the object navigator.
To create a new MDM dictionary to store attachments, click the  Create button.
The dictionary should contain system attributes and the following mandatory attributes:
FILE_NAME. Attachment file name.
URL. Attached URL.
TYPE. Attachment type.
TIMESTAMP. Attachment loading date or update date.
COMMENT. Attachment comment.
FILE_SIZE. Attachment file size.
USER_ID. Identifier of the user who added or updated attachment.
If one plans to store links to repository documents, create an additional attribute with a custom identifier and integer data type.
After selecting the dictionary bind facts with source fields, which will store keys of MDM dictionary with attachments. To do this, in the Data Sources area select the integer field, and in the Attachments area in the web application or in the Attachments subgroup in the Cube Facts area in the desktop application select facts and click the Bind button.
NOTE. The bound field that is used to store attachments should not be used in bindings of cube fact values and cube dimensions.
The dictionary is filled automatically when attachments are linked.
If several facts are set up in the cube, the common dictionary is set to store attachments.
One dictionary can be used for several cubes.
Further work with attachments will be executed in tables of various tools of Foresight Analytics Platform. For details see the Linking Attachments to Cells subsection.

 No binding of dimensions to fact table
If a fact is bound to more than one data source field, it is possible to not bind dimensions to data sources. Dimensions that are not bound to data source fields, are not used for sampling but they can be used to set up the cube, for example, act as controlling dimensions for other dimensions.
NOTE. The absence of binding leads to the fact that the data multiplies across the entire dimension. This is due to the fact that the selection in the dimension does not affect the data sampling. The data obtained from the selection from other dimensions will be placed on each element of the unbound dimension. In an unbound dimension, the data will be the same for each element.
If there are unbound dimensions in the cube, when you go from the Dimensions page to the next wizard page, you will see the message informing that not all dimension bindings are determined. The example of the message in the desktop application:
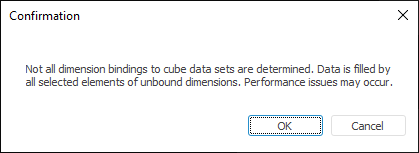
If there are unbound dimensions, it is recommended to determine aggregation method for facts.
If the facts have several bindings, and not all dimensions are bound, the cube cannot be saved. The example of the message in the desktop application:

NOTE. When data type changes in the columns used in fact bindings, it is recommended to bind facts to source fields again in the cube.
Formulas can be set up using the expression editor:
The expression editor in the desktop application is uniform for all platform tools and objects. The uniform expression editor is described in the Creating Formulas and Expressions document.
The expression editor in the web application differs depending on the configured tool or object.
The expression editor window for setting calculated expressions bound facts of standard cube in the web application looks as follows:
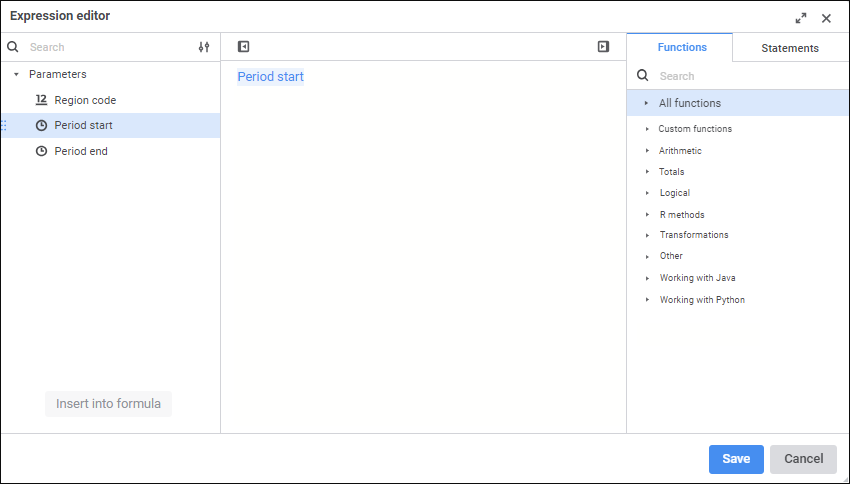
Create a calculated expression formula for bound cube fact.
Operands, arithmetic operations, functions, numbers, comparison characters and round brackets can be used in a formula. There are some features of use:
All element types, except for numbers, can be inserted both using the keyboard or special panels.
Numbers are inserted only using the keyboard.
Operands are displayed on the expression editor's operands panel:
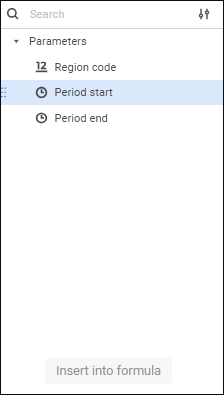
Data sources and cube parameters are used as operands.
To insert an operand to the formula area, execute one of the operations:
Using the operands panel:
Select the operand and click the Insert into Formula button.
Double-click the operand.
Drag the operand to the formula area.
Using the formula area:
Enter the operand name in the formula area.
Click in the formula area in the place where the operand should be inserted, press CTRL+SHIFT and select the required operand on the popup panel.
To quickly search for an operand, start typing partial or full name of the operand in the search string. After executing the operation the operands panel displays the operands, which names satisfy search conditions.
To set up displaying of the operands list, use items in the drop-down menu of the  Display Settings button:
Name. Default value. Only operand names are displayed.
Identifier. Only operand identifiers are displayed.
Name and Identifier. Operand names and identifiers are displayed in the format: <name> (<identifier>).
To hide the operands panel, click the  Hide Operands Panel button. To show the panel, click the
  Show Operands Panel button.

 Insert functions and statements
Functions and statements are displayed on the functions and statements panel on corresponding tabs:
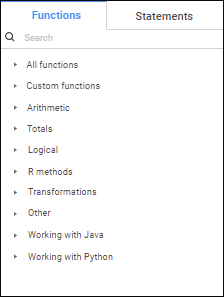
To insert a function or statement to the formula area, execute one of the operations:
Using the functions and statements panel:
Select a function or statement. The panel with description opens:
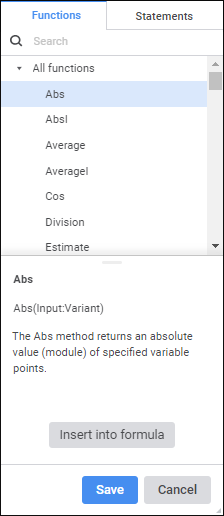
Click the Insert into Formula button.
Double-click the function or statement.
Drag the function or statement to the formula area.
Using the formula area:
Enter a function or statement in the formula area.
Click in the formula area in the place where the function or statement should be put, press CTRL+SHIFT and select the required function or statement on the popup panel.
To quickly search for a function or statement, start typing partial or full name of the function or statement in the search string. After executing the operation the functions and statements panel displays the functions or statements, which names satisfy search conditions.
To hide the functions and statements panel, click the  Hide Functions and Statements Panel button. To show the panel, click the
  Show Functions and Statements Panel button.
See also: