In this article:
Setting Up Calculated Indicators
Adding Private Dimensions of Indicators
Adding Calculated Indicators
When setting up indicators structure in the table area wizard of data entry form add calculated indicators to calculate and control data using value formulas based on dictionary initial values.
NOTE. Work with calculated indicators is available only if the Calculation Algorithms extension is installed.
Calculated indicator is an indicator including all sidehead dimensions and shared heading dimensions.
NOTE. When creating formulas for calculated indicators, one can use previously created indicators.
To add a calculated indicator, click the  Add button on the Calculated Indicators panel. After executing the operation the indicator with a calculated block is added:

By default, new indicators are added with the Indicator name to the end of the list.

 Change order of indicators calculation
 Move Up and
  Move Down buttons. If calculated indicator is calculated basing another calculated indicator, then it is required to place dependent calculated indicator below the indicator from which it depends.
 Delete button on the Calculated Indicators panel.
To display calculated indicators in heading, drag and drop them to the Data Entry Form Indicators area to any place of the list. Calculated indicator is added to the table area with the General number format. To change number format, use the drop-down list in the Number group on the Format ribbon tab.
On changing data in cells participating in calculated indicator calculation, the indicator value is recalculated.
Setting Up Calculated Indicators
To set up calculated indicators:
Adding Private Dimensions of Indicators
To add private dimensions of indicators, which values are to be used in calculation, select the Select Dimensions item in the indicator's context menu. The dialog box to select private indicators dimensions opens:
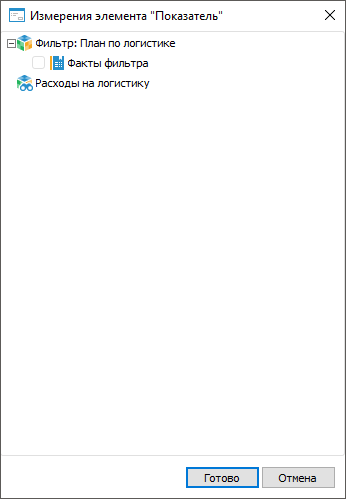
The dialog box displays all for indicators with private dimensions.
Select he checkbox next to the dimensions that will be used for calculation. If the same dimension is used in several indicators, the checkbox will be selected automatically to all indicators of this dimension where it is present. Finish dimension selection, click the Finish button.
The selected dimensions will be displayed under calculated indicators.
Setting Up Filtering by Dimensions
To limit the elements, by which calculation is to be executed, set filters by dimensions using the Filters by Dimensions item in the indicator's context menu. The dialog box for setting up data consumer dimensions filtering by elements opens:

By default, all dimensions of calculated indicator has full selection: formula of calculated element applies to all sidehead elements, general dimensions of heading and private dimensions, if they were added. To fix one dimension element, deselect the checkbox of the dimension. In the opened Fix Selection dialog box, select dimension element. Selected element can be changed on formula setting. If checkbox was deselected, then on its selection the warning message is displayed indicating that dimension selection defined in formulas will be deselected.
To set up filtering of selected data consumer dimensions:
Set dimension filtering by elements:
Click the Set Filter button.
Double-click the dimension.
The Set Up Filtering dialog box opens where filtering settings can be defined. For details see the Setting Up Consumer Dimension Filtering section.
Set up dimension filtering by attribute links. Click the Set Attribute Links button. The Filtering by Attribute Links dialog box opens where filtering settings can be defined. For details see the Setting Up Filtering by Attribute Links section.
Deselect the Multithreaded Calculation checkbox to speed up calculation block calculation that is calculated in one second or faster. When the checkbox is deselected, single-threaded calculation is executed. If calculation takes too long, select the Multithreaded Calculation checkbox to speed up calculation block calculation. Multithreaded calculation is available in systems with multicore processors (the number of threads is equal to the number of processor cores).
Setting Up Calculation Block
A calculation block is created automatically when an indicator is added. To set up calculation block formula, select the Formula Editor item in the block's context menu or double-click the block. The Formula Editor dialog box opens where the calculation formula can be set up. All indicators, including calculated indicators of table area, are available for use in formulas. All data entry form parameters are available in dimensions on setting up the selection. If dimension selection was fixed, dimension element specified on fixation can be changed in breadcrumb. For details see the Setting Up Calculation Formulas article.
NOTE. A calculated indicator can contain only one calculation block that cannot be moved or deleted.
To rename the calculation block, select the Rename item in the block's context menu or click the its name on the panel.
Adding Control Blocks
To add a control block in the calculated indicator, select the Add Control Block item in the indicator's context menu. There may be several control blocks, each of which containing a formula to control calculated data.
 Set Style button on the Calculated Indicators panel. The Formatting dialog box opens including the following tabs:
To rename the calculation block or control block, select the Rename item in the block's context menu or click the name of the selected block on the panel.
To set up control block formula, select the Formula Editor item in the block's context menu or double-click the block. The Formula Editor dialog box opens where the calculated data check formula can be set up. All indicators, including calculated indicators of table area, are available for use in formulas. All data entry form parameters are available in dimensions on setting up the selection. If dimension selection was fixed, dimension element specified on fixation can be changed in breadcrumb. For details see the Setting Up Calculation Formulas article.
Dimension Aggregation
To merge dimension data by levels, use data aggregation. To do this, select the Dimension Aggregation item in the calculated indicator context menu. The Dimension Aggregation dialog box opens where set up aggregation method:
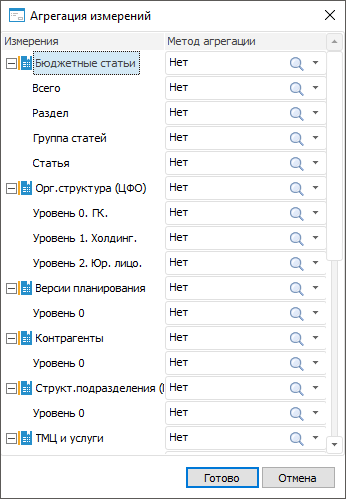
The dialog box displays all sidehead dimensions, shared indicators dimensions that were previously added, and their levels.
Set aggregation method:
For all dimension levels by specifying aggregation method next to dimension. The selected method will be displayed for all levels of this dimension.
For each level by specifying aggregation method next to level.
Select data aggregation method in the drop-down list of the Aggregation Method column:
Sum. Level elements are summed up.
Minimum. Minimum value is selected for level.
Maximum. Maximum value is selected for level.
Number of Non-Empty. The number of non-empty values is defined at the level.
Number of Empty. The number of empty values is defined at the level.
Number of All Children. The number of child elements is determined at the level.
Arithmetic Mean. The arithmetic mean of the level elements is defined, considering empty values.
Actual Mean. The actual mean value of the level elements is determined, not considering empty values.
First Actual. The first actual value is found at the level.
Last Actual. The last actual value is found at the level.
Root-Mean-Square Deviation. Determines series root-mean-square deviation based on the entire population.
Median. A median is defined for source level values.
Root-Mean-Square Deviation Based on Sample. Root-mean-square deviation is defined for row by sample data.
Number of Different Values. The number of different values is defined at the level.