In this article:
Step 1. Checking System Requirements
Step 2. Preparing DBMS Back End
Step 3. Installing DBMS Front End
Step 5. Installing Web Application Back End
Step 6. Creating a Metadata Repository
Step 7. Setting Up Repository Connection
Step 8. Creating a Service User of Security Subsystem
Step 9. Setting Up Web Application Configuration
Step 10. Setting Up Interaction between System Elements via the HTTPS/HTTP Protocol
Step 11. Foresight Analytics Platform Activation
Step 12. Opening Web Application
Advanced Installation of Web Application on Linux OS (PostgreSQL DBMS)
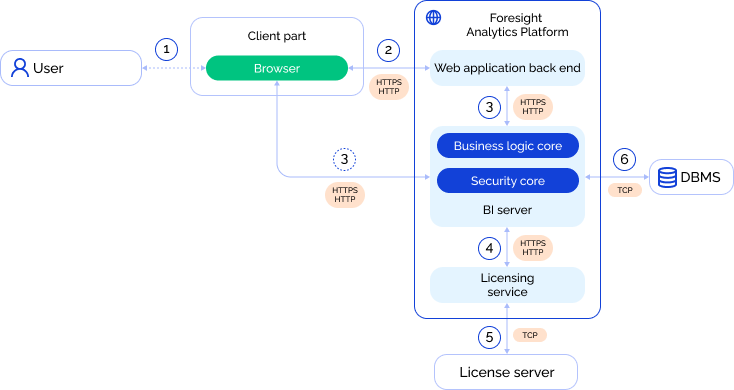
To work with the web application, the system must be formed using the software of Foresight Analytics Platform:
For details about system configuration see the System Configuration section.
The guide describes web application installation with the use of PostgreSQL DBMS for supported Linux OS family versions.
In case of issues related to installation and startup of Foresight Analytics Platform see the Solving Possible Problems in Foresight Analytics Platform section.
Installation of BI server (Step 4) and web application back end (Step 5) is executed using the distributions included in the software package of Foresight Analytics Platform:
| Linux OS family version | Distribution files for BI server installation | Distributions for installing web application back end |
| Astra Linux SE 1.7 | foresight-fp10.x-biserver_10.11.<build number>~astra~1.7_amd64.deb | foresight-fp10.x-webserver_10.11.<build number>~astra~1.7_all.deb |
| Astra Linux SE 1.8 | foresight-fp10.x-biserver_10.11.<build number>~astra~1.8_amd64.deb | foresight-fp10.x-webserver_10.11.<build number>~astra~1.8_all.deb |
| RED OS 7.3 | foresight-fp10.x-biserver_10.11.<build number>.redos7.3.x86_64.rpm | foresight-fp10.x-webserver_10.11.<build number>.redos7.3.noarch.rpm |
| Rocky Linux 8 | foresight-fp10.x-biserver_10.11.<build number>.rocky8.x86_64.rpm | foresight-fp10.x-webserver_10.11.<build number>.rocky8.noarch.rpm |
| ALT Linux 10 | foresight-fp10.x-biserver_10.11.<build number>.alt10.x86_64.rpm | foresight-fp10.x-webserver_10.11.<build number>.alt10.noarch.rpm |
Main configuration files:
settings.xml. The BI server configuration file located in the /opt/foresight/fp10.x-biserver/etc directory.
config.json. The web application back end configuration file located in the /opt/foresight/fp10.x-webserver/r/config directory.
Metabases.xml. The file with repository connection settings located in the /opt/foresight/fp10.x-biserver/etc directory.
Step 1. Checking System Requirements
Make sure to observe hardware and software requirements applied to system elements.
For primary assessment of the required hardware, contact technical support by sending a request to support@fsight.ru or use technical support services, which are available after registration at the website.
The table contains software requirements:
| Software | |
| Database server | PostgreSQL DBMS back end. |
BI server |
PostgreSQL DBMS front end. |
| Apache HTTP Server 2.4 web server with the worker (Apache2) module. | |
| Mesa 3D graphics library for the visualizers: Tree Map, Bubble Tree, Bubble Chart and Map. Library installation is required if hardware does not support OpenGL technology. | |
| Web Application Back End | Apache HTTP Server 2.4 (Apache2) web server. |
| License Server | To get system requirements, contact the Guardant technical support by sending an email to hotline@guardant.ru. |
| Client computers | Three latest browser versions are supported:
|
See also requirements for operating system settings and supported PostgreSQL DBMS versions.
Step 2. Preparing DBMS Back End
The preparation of DBMS back end consists in creating a database and a user who will be administrator of this database.
After executing all DBMS preparation operations, it is recommended to check user connection to the created database using DBMS means. If there will be any repository connection problems, it may also be necessary to check user access permissions and additional setup on DBMS level.
PostgreSQL server is prepared by the DBMS administrator.
IMPORTANT. To ensure system security, before preparing the PostgreSQL server check server access settings in the pg_hba.conf configuration file and settings of the lc_messages parameter in the postgresql.conf configuration file. The PostgreSQL message language should match with operating system language settings. Make sure that the standard_conforming_strings parameter is set to on.
To prepare the PostgreSQL server, execute scripts using any of the available methods, for example, via the pgAdmin application. Take into account the following features on executing the scripts:
The USER_NAME, DATABASE_NAME and SCHEMA_NAME parameters should be written in the upper case.
Parameter names are case sensitive and should be enclosed in quotation marks. If quotation marks are missing, parameter names will be converted to lower case during script execution.
Scripts should be executed by the DBMS administrator with the SUPERUSER privilege if the PostgreSQL server is prepared using the psql console.
TIP. To prepare a PostgreSQL server in Linux OS, use ready script. After executing the script the following is created: the NEW_USER database user with the NEW_USER password, the NEW_DATABASE database, the repository with the NEW_DATABASE identifier, and the SERVICE_USER service user with the SERVICE_USER password.
Creating a Database User
To create a database user, execute the script:
CREATE ROLE "USER_NAME" LOGIN ENCRYPTED PASSWORD 'USER_PASSWORD' NOSUPERUSER INHERIT NOCREATEDB NOCREATEROLE NOREPLICATION;
Where:
USER_NAME. Name of the created user.
IMPORTANT. The ADMIN user name must not be used.
USER_PASSWORD. Password for the created user.
Creating a Database
To create a database, execute the script:
CREATE DATABASE "DATABASE_NAME" WITH OWNER = "USER_NAME" ENCODING = 'UTF8' TABLESPACE = pg_default LC_COLLATE = default LC_CTYPE = default CONNECTION LIMIT = -1;
GRANT ALL ON DATABASE "DATABASE_NAME" TO "USER_NAME";
Where:
USER_NAME. Name of the previously created user.
DATABASE_NAME. Name of the created database.
Creating a database supports only the UTF-8 encoding.
IMPORTANT. A database is created via the postgres service database by default. To proceed with DBMS server preparation, connect to the created database.
Creating a Custom Schema in the Current Database
The public schema is used by default.
If the current database is supposed to use a custom schema, execute the script to create a schema:
CREATE SCHEMA "SCHEMA_NAME" AUTHORIZATION "USER_NAME";
Where:
USER_NAME. Name of the previously created user.
SCHEMA_NAME. Custom schema identifier.
After executing the operations a custom schema will be created. The user created at Step 1 will be a schema owner.
For details about working with custom, see the schemas PostgreSQL documentation.
Features of Working with PostgreSQL DBMS
The default configuration for PostgreSQL servers includes autovacuum, that is, clearing of space occupied by data deleted from tables using the VACUUM SQL command. The statistic that is used by scheduler to select query execution method is also updated. If an intensive work consisting in changing data in tables is supposed to be done, it is recommended to set up configuration in such a way that autovacuuming is executed in server low-load time (night, weekend). The feature can be set up according to the documentation at the developer website.
Step 3. Installing DBMS Front End
To install PostgreSQL DBMS front end, execute the command:
Astra Linux:
sudo apt-get install postgresql-client
Rocky Linux:
sudo yum install postgresql postgresql-libs
RED OS:
sudo dnf install postgresql postgresql-libs
ALT Linux:
sudo apt-get install postgresql14
After executing the operation, the PostgreSQL driver is installed that is used by Foresight Analytics Platform to interact with database server.
Alternatively, Postgres Pro client can be installed. For details see the official documentation Postgres Pro.
Step 4. Installing BI Server
To install BI server:
Make sure that you are connected to the Internet.
Update information about packages:
Astra Linux, ALT Linux:
sudo apt-get update
RED OS and Rocky Linux:
sudo yum update
Copy the foresight-fp10.x-biserver*.deb/rpm distribution file from the software package to the /home/<user name> home directory. Name of the distribution file depends on Linux OS version.
Install the copied BI server distribution file:
Astra Linux:
sudo dpkg -i foresight-fp10.x-biserver*.deb
Rocky Linux:
sudo yum localinstall foresight-fp10.x-biserver*.rpm
RED OS:
sudo dnf install foresight-fp10.x-biserver*.rpm
ALT Linux:
sudo apt-get install -y foresight-fp10.x-biserver*.rpm
Grant access permissions for the Apache2 user for the folder with installed BI server:
Astra Linux:
sudo chown -R www-data:www-data /opt/foresight/fp10.x-biserver
RED OS and Rocky Linux:
sudo chown -R apache:apache /opt/foresight/fp10.x-biserver
ALT Linux:
sudo chown -R apache2:apache2 /opt/foresight/fp10.x-biserver
Set missing dependencies for Astra Linux:
sudo apt-get -f install
The BI server distribution contains dependencies that initiate automatic download and installation of used libraries. The appropriate message is displayed on installing missing libraries. If required, update again information about packages.
Disable the AstraMode mode for the apache2-fp10.x instance in Astra Linux. To do this, replace the #AstraMode on string in the /etc/apache2-fp10.x/apache2.conf file with the following one:
AstraMode off
After executing the operations, the following is created:
/opt/foresight/fp10.x-biserver. Main files of BI server.
/etc/apache2-fp10.x. Configuration files of the Apache2 instance with BI server for Astra Linux.
/etc/httpd-fp10.x. Configuration files of the Apache2 instance with BI server for RED OS and Rocky Linux.
/etc/httpd2-fp10.x. Configuration files of the Apache2 instance with BI server for ALT Linux.
/etc/systemd/system/apache2-fp10.x. The apache2-fp10.x service for managing BI servers in Astra Linux.
/etc/systemd/system/httpd-fp10.x. The httpd-fp10.x service for managing BI server in RED OS, Rocky Linux.
/etc/systemd/system/httpd2-fp10.x. The httpd2-fp10.x service for managing BI server in ALT Linux.
The service is started right after distribution installation and works in the background mode.
Setting Up Logging
To track BI server performance and register various errors, enable system message logging if required. To do this, add environment variables in the file /opt/foresight/fp10.x-biserver/etc/envvars:
PP_LOG=1
PP_LOGTIME=1
By default, system messages are written to the file:
/var/log/apache2-fp10.x/error.log in Astra Linux.
/var/log/httpd/error-fp10.x.log in RED OS, Rocky Linux.
/var/log/httpd2/error-fp10.x.log in ALT Linux.
Managing BI Server
To work with the service and manage BI server, execute the command:
Astra Linux:
sudo systemctl start/restart/stop apache2-fp10.x
RED OS and Rocky Linux:
sudo systemctl start/restart/stop httpd-fp10.x
ALT Linux:
sudo systemctl start/restart/stop httpd2-fp10.x
The BI server is started at the 8810 port by default.
Step 5. Installing Web Application Back End
To install web application back end:
Make sure that you are connected to the Internet.
Copy the foresight-fp10.x-biserver*.deb/rpm distribution file from the software package to the /home/<user name> home directory. Name of the distribution file depends on Linux OS version.
Install the copied distribution of the web application back end:
Astra Linux:
sudo dpkg -i foresight-fp10.x-webserver*.deb
Rocky Linux:
sudo yum localinstall foresight-fp10.x-webserver*.rpm
RED OS:
sudo dnf install foresight-fp10.x-webserver*.rpm
ALT Linux:
sudo apt-get install -y foresight-fp10.x-webserver*.rpm
Disable the AstraMode mode for the apache2-fp10.x-web instance in Astra Linux. To do this, replace the #AstraMode on string in the /etc/apache2-fp10.x-web/apache2.conf file with the following one:
AstraMode off
After executing the operations, the following is created:
/opt/foresight/fp10.x-webserver. Main files of web application back end.
/etc/opt/foresight/fp10.x-webserver. The additional configuration file envvars of web application back end to set Apache2 environment variables.
/etc/apache2-fp10.x-web. Configuration files of the Apache2 instance with web application back end for Astra Linux.
/etc/httpd-fp10.x-web. Configuration files of the Apache2 instance with the web application back end for RED OS, Rocky Linux.
/etc/httpd2-fp10.x-web. Configuration files of the Apache2 instance with web application back end for ALT Linux.
/etc/systemd/system/apache2-fp10.x-web. The apache2-fp10.x-web service for managing web application back end in Astra Linux.
/etc/systemd/system/httpd-fp10.x-web. The httpd-fp10.x-web service for managing web application back end in RED OS, Rocky Linux.
/etc/systemd/system/httpd2-fp10.x-web. The httpd2-fp10.x-web service for managing web application back end in ALT Linux.
The service is started right after distribution installation and works in the background mode.
The following substitutions are used in the steps 9 and 12:
<web server>. IP address or name of the DNS server, on which web application back end is installed.
<port number>. Number of the port, via which web application back end is available. The following ports are used by default:
8110 when the HTTP protocol is used.
443 when the HTTPS protocol is used.
To determine server IP address, execute the command:
ip address
To determine DNS server name, execute the command:
hostname
To view the required ports, use the file:
/etc/apache2-fp10.x/ports.conf in Astra Linux.
/etc/httpd-fp10.x/conf/httpd-fp10.x.conf in RED OS and Rocky Linux.
/etc/httpd2-fp10.x/conf/ports-enabled/http-fp10.x.conf in ALT Linux.
Managing Web Application Back End
To work with the service and manage web application back end, execute the command:
Astra Linux:
sudo systemctl start/restart/stop apache2-fp10.x-web
RED OS and Rocky Linux:
sudo systemctl start/restart/stop httpd-fp10.x-web
ALT Linux:
sudo systemctl start/restart/stop httpd2-fp10.x-web
The web application back end is started at the 8110 port by default.
Step 6. Creating a Metadata Repository
To create a metadata repository on PostgreSQL DBMS server:
Change the current directory with the BI server installation folder:
cd /opt/foresight/fp10.x-biserver/bin
Install the additional package xvfb-run in ALT Linux:
sudo apt-get install xvfb-run
Start the RepoManager console application using the RepoManager_start.sh script with the specified parameters:
For the public schema:
./RepoManager_start.sh -ocreate-repo -tpostgres -sSERVER_DATABASE -pPORT -uUSER_NAME -wUSER_PASSWORD -dDATABASE_NAME -fRM_FILE -i
For the custom schema:
./RepoManager_start.sh -ocreate-repo -tpostgres -sSERVER_DATABASE -pPORT -uUSER_NAME -wUSER_PASSWORD -dDATABASE_NAME -mSCHEMA_NAME -fRM_FILE -i
Where:
SERVER_DATABASE. IP address or DNS name, under which the database server is registered.
PORT. DBMS server port. The parameter is optional if the DBMS server is available via the 5432 port used by default. If the default port was changed, specify the actual port number.
USER_NAME. Name of the user created during preparation of DBMS back end at Step 2.
USER_PASSWORD. Password of the user created during preparation of DBMS back end at Step 2.
DATABASE_NAME. Identifier of the database created during preparation of DBMS front end at Step 2.
SCHEMA_NAME. Identifier of the custom schema created during preparation of DBMS back end at Step 2.
RM_FILE. The path to the current.rm4 file with repository creation scripts. The default path: /opt/foresight/fp10.x-biserver/bin/rm/current.rm4.
After executing the operations a metadata repository will be created in the specified DBMS in the default public schema or custom schema with taking case into account. When preparing DBMS back end at Step 2, parameters are set in upper case that is why enabling of case sensitivity using the -i parameter is mandatory.
Step 7. Setting Up Repository Connection
To set up repository connection:
Create the Metabases.xml file in the BI server installation folder:
sudo nano /opt/foresight/fp10.x-biserver/etc/Metabases.xml
Fill in the Metabases.xml file:
<PP>
<Metabases>
<REPOSITORY_ID Name="REPOSITORY_NAME" Authentication="1" Driver="DRIVER_ID" Package="STANDARDSECURITYPACKAGE">
<LogonData DATABASE="DATABASE_NAME" SERVER="SERVER_DATABASE" CASESENSITIVE="true"/>
</REPOSITORY_ID>
</Metabases>
</PP>
Where:
REPOSITORY_ID. Unique repository identifier.
REPOSITORY_NAME. The repository name that will be displayed in the login dialog box. The name may match the identifier.
DRIVER_ID. PostgreSQL DBMS driver identifier – POSTGRES.
DATABASE_NAME. Identifier of the database created during preparation of DBMS back end at Step 2. If a custom schema is created, specify its identifier via a point after database identifier. For example: DATABASE_NAME.SCHEMA_NAME.
SERVER_DATABASE. IP address or DNS name, under which the database server is registered.
Depending on repository connection settings, a list of repositories is created in the login dialog box to log in to the system.
If required, download and unpack the Metabases.zip archive with the example of filled Metabases.xml file.
Restart the BI server:
Astra Linux:
sudo systemctl restart apache2-fp10.x
RED OS and Rocky Linux:
sudo systemctl restart httpd-fp10.x
ALT Linux:
sudo systemctl restart httpd2-fp10.x
After executing the operations the repository connection is set up. By default, password authentication is used to log in to the system.
To use another authentication type, change value of the Authentication parameter. Authentication type is selected depending on the required security measures. User credentials can be checked on DBMS server and/or in Foresight Analytics Platform. For details see the Foresight Analytics Platform Authentication section.
Step 8. Creating a Service User of Security Subsystem
A service user of security subsystem ensures:
System login.
Correct work of auditing and user locking.
Use of application role during the work with DBMS.
Use of password hashing.
To create a service user of security subsystem:
IMPORTANT. Database server supports only a single service user account. If database server contains several repositories, create a service user with equal credentials for each repository.
After executing the operations, a service user of security subsystem will be created on the database server and saved according to the selected method on the computer with installed BI server.
TIP. It is recommended to disable the mandatory periodic password change policy for an account of service user of security subsystem in DBMS.
Creating Service User Credentials
To create service user credentials, start the PP.Util utility located in the folder with installed BI server: /opt/foresight/fp10.x-biserver/bin with the following parameters:
sudo -E /opt/foresight/fp10.x-biserver/bin/PP.Util_start.sh /create_audit_user metabase_id login password audit_login audit_password db_login db_password
Where:
metabase_id. Repository identifier specified at Step 7. Mandatory parameter.
login. User name, who is the schema owner, for repository connection. Mandatory parameter.
password. Schema owner password. Mandatory parameter.
audit_login. Name of created service user. Mandatory parameter.
NOTE. The P4AUDIT server user name is reserved by the system and cannot be used.
audit_password. Password of created service user. Mandatory parameter.
db_login. Name of the database user who has privileges to create DBMS users. Optional parameter. If user name is not specified, it will be asked in interactive mode.
db_password. Password of the database user who has privileges to create DBMS users. Optional parameter. If the password is not specified, it will be requested in interactive mode.
Saving Created Service User Credentials
To save created service user credentials on the computer with installed BI server, start the PP.Util utility located in the folder with installed BI server: /opt/foresight/fp10.x-biserver/bin with the following parameters:
sudo /opt/foresight/fp10.x-biserver/bin/PP.Util_start.sh /save_audit_creds /ALG enc_alg realm|/DC login password
Where:
enc_alg. Encryption algorithm that is used to encrypt credentials:
gos. Default value. Encryption with the GOST 28147-89 algorithm is used.
sim. Credentials are saved unencrypted.
IMPORTANT. To ensure security during production operation of Foresight Analytics Platform, use the gos value.
Optional parameter. If the parameter is not set, the default value is used.
realm|/DC. Credentials scope of the service user. Select one of the methods:
realm. If the Metabase.xml file created at Step 7 contains more than one database server, and service user credentials should differ for each of them, create an identifier of the SERVER_DATABASE|TYPE type for a specific server, where:
SERVER_DATABASE. IP address or DNS name, under which the database server specified at Step 7 is registered.
TYPE. Type of the driver in use - POSTGRES.
For example: "127.0.0.1|POSTGRES".
NOTE. To avoid syntax errors, enclose the value in quotation marks.
/DC. If the Metabase.xml file created at Step 7 contains one or several database servers, but service user credentials should be equal for all servers, use this parameter without specifying additional settings.
Mandatory parameter.
login. Name of existing service user. Mandatory parameter.
password. Password of existing service user. Optional parameter. If the password is not specified, it will be requested in interactive mode.
After executing the operations service user credentials are saved in the settings.xml file on the BI server located at: /opt/foresight/fp10.x-biserver/etc.
Examples of command use:
sudo /opt/foresight/fp10.x-biserver/bin/PP.Util_start.sh /save_audit_creds "10.30.210.10|POSTGRES" SERVICE_USER_NAME SERVICE_USER_PASSWORD
sudo /opt/foresight/fp10.x-biserver/bin/PP.Util_start.sh /save_audit_creds /DC SERVICE_USER_NAME SERVICE_USER_PASSWORD
Step 9. Setting Up Web Application Configuration
To set up web application configuration:
Open the config.json file located in the directory: /opt/foresight/fp10.x-webserver/r/config. The file contains the following structure by default:
{
"targetRepo": "",
"serviceUrl": "http://<current IP address>:8110/fp10.x/app/PPService.axd",
"locale": "ru",
"locales": ["ru"], "title": "FAP10",
"baseUrl": "http://<current IP address>:8110/fp10.x/"
"themes": ["fap10"]
}
Set main fields in the JSON format:
targetRepo. Specify identifier of the repository specified at Step 7.
serviceUrl. Specify address of the PPService.axd request handler during the interaction between the browser and the BI server via web application back end:
http://<web server>:<port number>/fp10.x/app/PPService.axd
To provide interaction between the browser and the BI server by bypassing web application back end, see the Setting Up Interaction between Browser and BI Server section.
baseUrl. Specify web application URL for opening the security manager:
http://<web server>:<port number>/fp10.x/
NOTE. To work with the security manager, change the default parameters determined in the PP.xml file.
If required, set additional fields.
Restart the web application back end:
Astra Linux:
sudo systemctl restart apache2-fp10.x-web
RED OS and Rocky Linux:
sudo systemctl restart httpd-fp10.x-web
ALT Linux:
sudo systemctl restart httpd2-fp10.x-web
The example of the config.json file:
{
"targetRepo": "WAREHOUSE",
"serviceUrl": "http://10.7.0.100:8110/fp10.x/app/PPService.axd",
"locale": "ru",
"locales": ["ru"],
"title": "Foresight",
"baseUrl": "http://10.7.0.100:8110/fp10.x/"
"themes": ["fap10"]
}
Step 10. Setting Up Interaction between System Elements via the HTTPS/HTTP Protocol
To set up interaction between system elements via the HTTPS protocol see the Setting Up Web Application Work via HTTPS section.
If interaction between the browser and the BI server by bypassing web application back end is set up at Step 9, to use the HTTP protocol:
Set the SecureSession parameter with the 0 value in the /opt/foresight/fp10.x-biserver/etc/settings.xml file:
<Key Name="System">
<Session SecureSession="0"/>
</Key>
Restart the BI server:
Astra Linux:
sudo systemctl restart apache2-fp10.x
RED OS and Rocky Linux:
sudo systemctl restart httpd-fp10.x
ALT Linux:
sudo systemctl restart httpd2-fp10.x
The SecureSession parameter is set to 1 by default and prevents attacks of the XSS type. In this case the connection between the browser and the BI server must be set up via the HTTPS protocol.
Step 11. Foresight Analytics Platform Activation
Foresight Analytics Platform and platform-based applications check license when running.
NOTE. To get a license, contact technical support by sending a request to support@fsight.ru or use technical support services, which are available after registration at the website.
To activate a product:
Install and set up the Guardant license server.
Install the licensing service.
Activate the license obtained as a serial number in Guardant License Wizard.
Step 12. Opening Web Application
To open the web application, use the supported browser and specify URL in the connection string:
http[s]://<web server>:<port number>/fp10.x/r/
After executing the operation, the login dialog box opens. By default, the connection is established to the repository specified in the config.json file at Step 9. To connect to a different repository, use the Repository drop-down list in the login dialog box or specify its identifier in the address field:
http[s]://<web server>:8110/fp10.x/r/#/login?repo=<repository identifier>
The list of available repositories is created in the Metabases.xml file created at Step 7.
If interaction between the browser and the BI server by bypassing web application back end is set up at Step 9, logging in to the system may result in errors caused by CORS policy restrictions. Make sure that required CORS mechanism settings are determined in the file:
/etc/apache2-fp10.x/apache2.conf in Astra Linux.
/etc/httpd-fp10.x/conf/httpd-fp10.x.conf in RED OS and Rocky Linux.
/etc/httpd2-fp10.x/conf/httpd2-fp10.x.conf in ALT Linux.
Example of Ready PostgreSQL DBMS Script
The example contains all parts of selected scripts for the PostgreSQL DBMS given at Steps 2, 6, 8:
Download and unpack the Script_example_public.zip archive if the public schema is used.
Download and unpack the Script_example_custom_scheme.zip archive if a custom schema is used.
Removing BI Server
To remove BI server files without removing configuration files, execute the command:
Astra Linux, ALT Linux:
sudo apt-get remove fp10.x-biserver
RED OS and Rocky Linux:
sudo yum remove fp10.x-biserver
After executing the operation the BI server files are removed. Configuration files in the folders /etc/apache2-fp10.x and /etc/opt/foresight/fp10.x-biserver, as well as new files not included in the setup package in these folders and in /opt/foresight/fp10.x-biserver will be saved and can be used on the next distribution file installation. If it is required to delete dependencies set automatically together with BI server, use the autoremove command instead of remove.
To delete BI server with configuration files, execute the command:
Astra Linux:
sudo apt-get purge fp10.x-biserver
RED OS and Rocky Linux:
sudo yum purge fp10.x-biserver
ALT Linux:
sudo apt-get remove --purge fp10.x-biserver
After executing the operation, the BI server will be deleted with configuration files. In this case, new files that are not included into the setup package are saved.
Removing Web Application Back End
To remove web server files without removing configuration files, execute the command:
Astra Linux, ALT Linux:
sudo apt-get remove fp10.x-webserver
RED OS and Rocky Linux:
sudo yum remove fp10.x-webserver
After executing the operation, web server files will be removed. Configuration files in the folders /etc/apache2-fp10.x-web and /etc/opt/foresight/fp10.x-webserver, as well as new files not included in the setup package in these folders and in /opt/foresight/fp10.x-webserver will be saved and can be used on the next distribution file installation. If it is required to delete dependencies set automatically together with web application back end, use the autoremove command instead of remove.
To delete web server with configuration files, execute the command:
Astra Linux:
sudo apt-get purge fp10.x-webserver
RED OS and Rocky Linux:
sudo yum purge fp10.x-webserver
ALT Linux:
sudo apt-get remove --purge fp10.x-webserver
After executing the operation, the web server will be deleted with configuration files. In this case, new files that are not included into the setup package are saved.