Users and administrators can be authenticated by the default platform or by external LDAP system. LDAP ensures efficient use of data stored in the directory at several servers and uses various information synchronization methods.
To set up interaction with external LDAP system, use the LDAP Settings subsection.

To set up LDAP authentication:
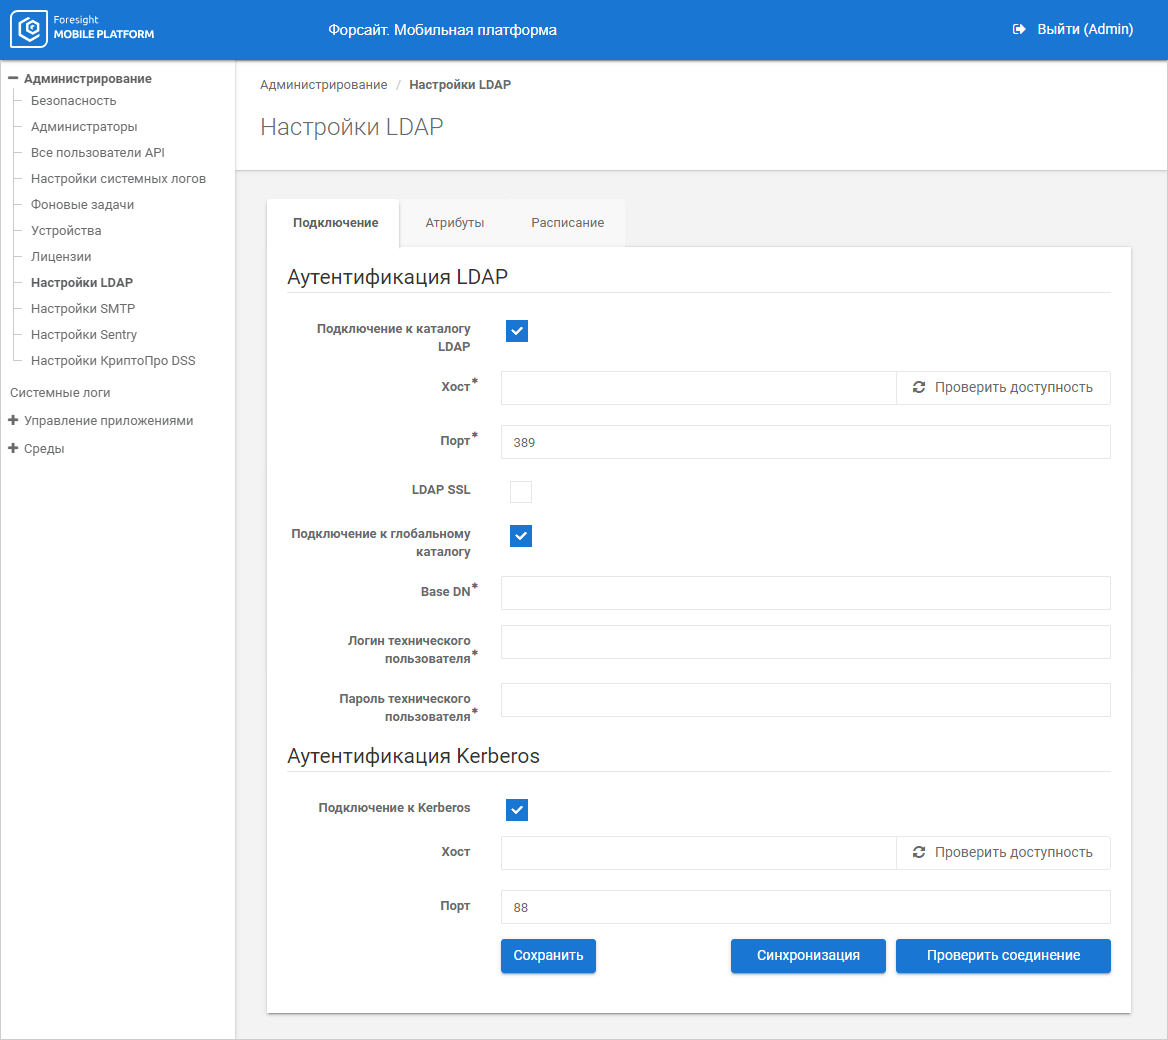
Set LDAP connection parameters on the Connection tab:
Connect to LDAP Directory. Select the checkbox to further connect to LDAP directory.
Host. Specify IP address or DNS name, by which LDAP server is available. To check connection, click the Check Availability button. If the answer is yes, the Response Received green button is displayed; if the answer is no, the Unavailable red button is displayed. If the host is unavailable, check internet connection or server connection settings for the specified host.
Port. Specify TCP port, by which LDAP service is available. To connect to LDAP using SSL protocol, specify port 636 and select the LDAP SSL checkbox.
LDAP SSL. Select the checkbox to connect to LDAP using SSL protocol and make sure that port 636 is specified. An SSL certificate must be installed on the domain controller.
Connect to Global Directory. Select the checkbox to connect to global directory and make sure that port 3268 is specified. When connecting to global directory, it is available to import users from all domains connected to the global directory. To easily determine user domain, the user login is displayed as follows: <domain\login>.
Base DN. Specify branch of the LDAP directory, from which the platform searches for LDAP users.
Technical User Login. Enter technical user login in the LDAP system, who has permissions to read from LDAP directory.
Technical User Password. Enter technical user account password.
The boxes are mandatory.
Click the Check Connection button to check specified LDAP connection parameters. If the answer is yes, the Connected green button is displayed; if the answer is no, the Connection Error red button is displayed. If a connection error occurred, check internet connection or LDAP connection parameters.
Click the Synchronization button to exchange information about existing users between LDAP and the platform. If the answer is yes, the Successful green button is displayed; if the answer is no, the Unsuccessful red button is displayed. If a synchronization error occurred, check internet connection or LDAP connection parameters. An automatic information exchange schedule can be set up for synchronization.
The following information about users is updated during synchronization:
Indicates whether the user exists.
Indicates whether the user is locked.
NOTE. If the user is locked by the LDAP server, the Locked for Security Reasons checkbox is automatically selected. To unlock the user in the mobile platform, unlock the user in the LDAP directory.
User login and password (if the Do not Store LPDAP User Passwords checkbox is deselected in project settings).
User full name.
Indicates whether the user is a member of a group.
To automatically synchronize group members, use the Automatically Synchronize Group Members checkbox on adding or editing a group.
Click the Save button.
After executing the operations the LDAP directory connection is established and Kerberos authentication setup is available.
When Kerberos authentication type is selected in connection settings of the data sources 1C, SOAP, JSON, WEB set up Kerberos authentication.
To set up Kerberos authentication:
Make sure that LDAP directory connection is set up.
Set Kerberos connection parameters:
Connect to Kerberos. Select the checkbox for further Kerberos connection.
NOTE. The parameter is available only when the Connect to LDAP Directory checkbox is selected.
Host. Specify IP address or DNS name, by which Kerberos server is available. To check connection, click the Check Availability button. If the answer is yes, the Response Received green button is displayed; if the answer is no, the Unavailable red button is displayed. If the host is unavailable, check internet connection or server connection settings for the specified host.
Kerberos Port. Specify TCP port, by which Kerberos service is available. The default value is 88.
Click the Save button.
After executing the operations the Kerberos connection is established. If this authentication type is used, user credentials are checked via Kerberos using ticket-granting ticket (TGT). TGT is assigned to each user and allows for accessing data sources.
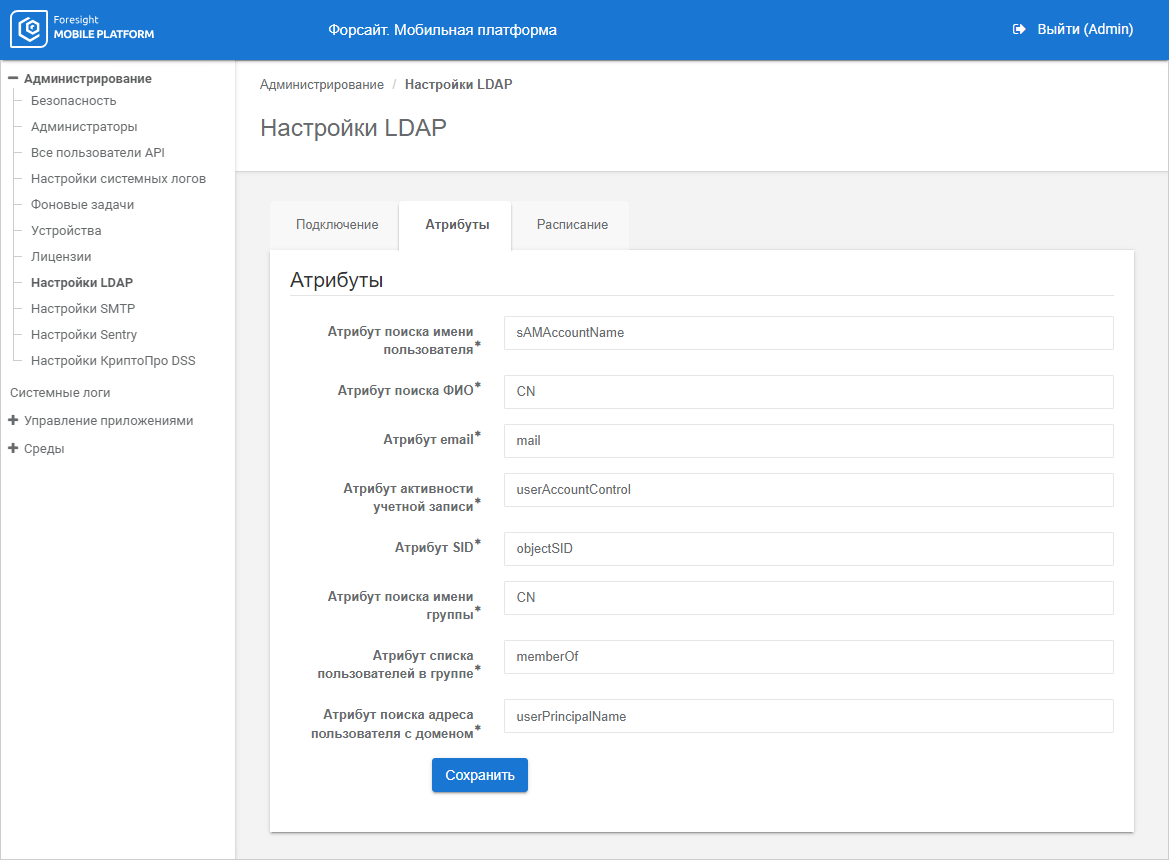
To enter LDAP directory attributes:
Set attributes on the Attributes tab:

Click the Save button.
After executing the operation, the attributes are added, from which the platform can get necessary data.
NOTE. The user is saved as follows: <user domain name>\<user name>, for example, fsight\ivanov. The user domain is synchronized using the Active Directory attribute - "distinguished name" from the first RDN DC of this attribute. The user name is created from the SamAccountName attribute.
To set up synchronization schedule:
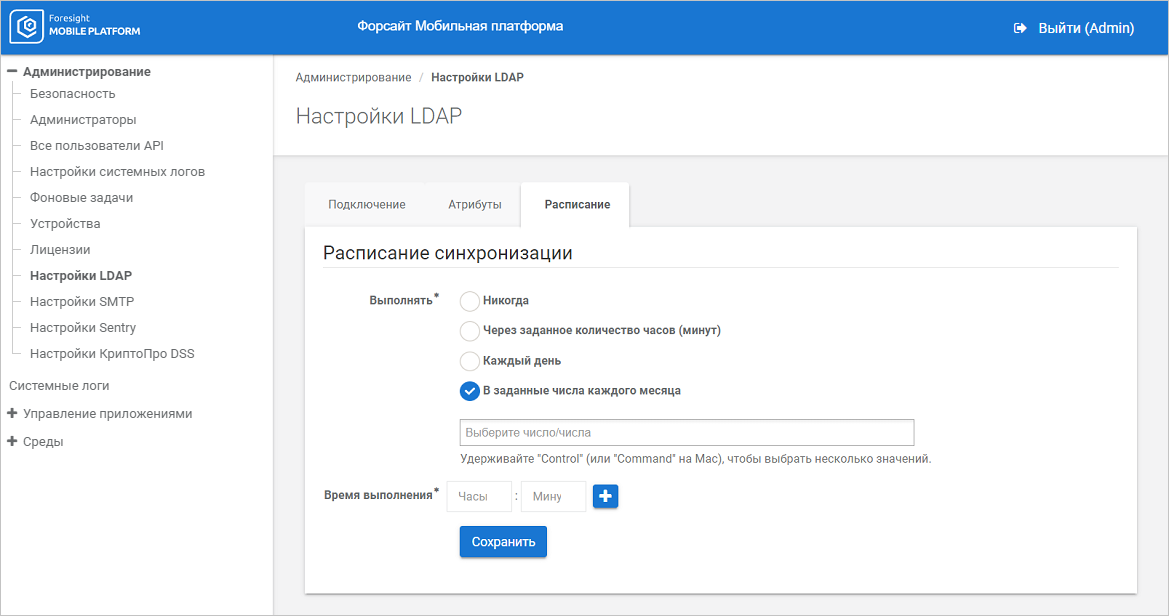
Go to the Schedule tab:

Set the parameters:
Execute. Select one of the synchronization period options:
Never. Select the checkbox to disable synchronization by schedule.
NOTE. To manually synchronize user information between LDAP and the platform, use the Synchronization button.
In Specified Number of Hours (Minutes). Select the checkbox and set synchronization repetition interval as follows: <hours : minutes> in the Execution Time box that is displayed.
NOTE. The synchronization period counts after clicking the Save button.
Daily. Select the checkbox and set daily synchronization time as follows: <hours : minutes> in the Execution Time box that is displayed.
Specified Days of Each Month. Select the checkbox and set synchronization time as follows: <hours : minutes> in the Execution Time box that is displayed and month days in the empty box.
TIP. When selecting synchronization period take into account possible increase in mobile platform server loading and decrease of speed of mobile applications work if synchronization is executed too frequently.
Repeat Every. Set synchronization time as follows: <hours : minutes> for the In Specified Number of Hours (Minutes) synchronization period option.
Execution Time. Set synchronization time as follows: <hours : minutes> for the Daily and the Specified Days of Each Month synchronization period options. If required, set several synchronization times using the ![]() button.
button.
Click the Save button.
After executing the operations the schedule is set for exchanging information about existing users between LDAP and the platform. The exchange is one-way, LDAP is a data source.
To manually synchronize data, use the Synchronize button on the Connection tab.
To automatically synchronize group members, use the Automatically Synchronize Group Members checkbox on adding or editing a group.
To disconnect LDAP directory:
Deselect the Connect to LDAP Directory checkbox on the Connection tab.
Click the Save button.
Select disconnection option:
Disconnect from LDAP Server. All administrators, users, and groups of users who use the specified LDAP server as an authentication server are disconnected from the authentication server.
Disconnect from LDAP Server and Delete Users. All administrators, users, and groups of users who use the specified LDAP server as an authentication server are disconnected from the authentication server and deleted.
If the administrator who disconnects LDAP server is authenticated via this server, the server will not be disconnected. The administrator must be authenticated without applying this LDAP server or execute the operation under the administrator who is not linked to this authentication server.
After executing the operation the LDAP directory is disconnected.

 Delete LDAP user passwords from project
To delete LDAP user passwords from a project, select the Do not Store LDAP User Passwords checkbox for higher security requirements.
NOTE. When the checkbox is selected, user TGT are not deleted.
See also:
Setting Up System Security | Setting Up Digital Signature