In this article:
Inserting Operand Based on Dimension Selection
Setting Up Filtering of Operand Aggregated Values
Inserting Operand Based on Dimension Attributes
Generating Calculation Formula
A calculation formula is generated in the formula area and is used to convert data from source to consumer.
A formula may contain operands, functions, arithmetic operators, numbers, comparison characters, and round brackets.
An operand is a data element from data source that is the object of operations during formula calculation. A function is a sequence of operations executed with an operand on formula calculation.
Operands and functions can be inserted on the side panel. Numbers, comparison characters, and round brackets can be entered from the keyboard.
Available types of operands:
Based on dimension elements selection. It is used if the formula must use the data value obtained by the specified dimension elements selection.
Based on dimension attributes. It is used if the formula must use the value of the specified attribute obtained by the specified dimension selection.
Calendar frequency of operands must match the formula's calendar frequency. If a formula requires operands with the calendar frequency that is different from the formula's calendar frequency, use aggregation. They enable the user to cast the calendar frequency of operands to the formula's calendar frequency.
 Example of using aggregation function

Inserting Operand Based on Dimension Selection
Operand calculation results in the data value obtained by specified selection of dimension elements.
Select the Operands radio button and Value from Source radio button on the side panel.
Select the data source used by the operand in the drop-down list. Tabs with selected data source dimensions will be displayed. For example:
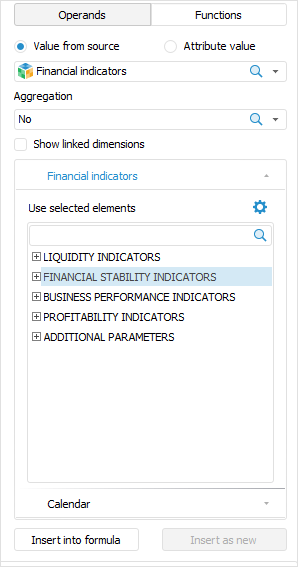
If an operand must execute aggregation, select aggregation method in the Aggregation drop-down list.
Aggregation enables the use of several values of operand dimension aggregated by the selected method in the formula. Aggregation can be set up by any operand dimension, except the calendar one.
TIP. After the operand is created, aggregation calculation can be set up by the dimension values that correspond with specific rules. For details see the Setting Up Filtering of Operand Aggregated Values section.
If an operand must contain linked data source dimensions, select the Show Linked Dimensions checkbox. Dimension links can be set when calculation block data sources are being selected.
Select the element, based on which the operand is created, for each dimension. If the operand should execute aggregation, select several elements to be aggregated.
To change element display type by existing dimension attributes select the Names item in the context menu of the list of elements and select one or several attributes. Hidden attributes cannot be used. If several attributes are selected, their values are separated via the | character. By default, the formula area and the list of elements on the side panel display element names. The element display type can be changed only on the side panel.
To sort dimension elements, select the Sorting item in the context menu of the list of elements and select a sorting method:
 . Ascending.
 . Descending.
By Attribute. In the drop-down list select one of the dimension attributes, by which elements will be sorted.
To reset the configured element sorting, select the Sorting > Reset item in the context menu of the list of elements.
To expand the hierarchy of the list of elements, select the  Expand All item in the context menu of the list of elements.
To collapse the hierarchy of the list of elements, select the  Collapse All item in the context menu of the list of elements.
If a data source contains controlling dimensions, when the controlling dimension element is selected, the elements are updated on the controlled dimensions tabs.
To set up a method for selecting elements, click the  Setup button on the dimension tab. The Set Up Element Selection dialog box:
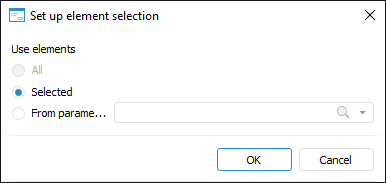
Set element selection option:
All. All elements will be selected. The option is available if an operand executed aggregation.
Selected. Default value. The elements selected by the user will be selected.
From Parameter. Element value is set by a parameter selected in this dialog box. Once can select own parameters of calculation block or calculation algorithm parameters added to the block. Parameters must have the Selection type.
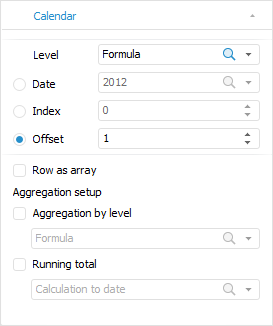
If calendar settings are required for the operand that are different from the formula, go to the Calendar tab:
NOTE. The tab is absent, if calendar is used as a standard dimension in data consumer.
Determine operand calendar settings:
Select operand calendar frequency in the Level drop-down list. The Formula element is selected by default, and operand calendar frequency matches with the formula calendar frequency.
NOTE. If operand calendar frequency differs from calculation formula calendar frequency, after the formula is calculated, data will be calculated by formula calendar frequency.
Select a method for getting calendar data:
Date. It is used if it is required to fix the date, on which operand data is taken. For example, data for 2018.
Index. It is used if it is required to fix the row point, on which operand data is taken. For example, the third point from row start.
Offset. It is selected by default. It is used if all operand data must be offset forward or backward by the specific number of points in the time period relative to the entire formula. For example, the formula uses data starting from 2000, and the operand with the offset will use data starting from 2003.
Set a method for sending operand to calculation using the Row as Array checkbox:
Checkbox is deselected. Default value. The operand point used in the formula depends on the date, on which calculation is executed.
For example, the formula has annual frequency and is calculated from 2000 to 2018. The 2000 operand value will be used to calculate the formula for 2000, the 2001 operand value will be used to calculate the formula for 2001, and so on.Checkbox is selected. All operand values in the formulas are presented as an array, and not as a point. When inserting this type of operand to the equation use the handler that transforms operand to one value. The handler can be a statistical, mathematical, or custom function.
For example, the minimum {X} operand value should be used in the formula. To do this, select the Row as Array checkbox and use the function for getting minimum: Min({X}).
Determine calendar aggregation settings for the operand:
Aggregation by Level. Select the checkbox if operand calendar frequency must be increased. In the corresponding drop-down list select the frequency, which should contain operand data.
For example, the formula has annual frequency, and the formula operand has monthly frequency. To correctly use the operand in the formula, select the Aggregation by Level checkbox and select the Formula or Year frequency.Running Total. Select the checkbox if the operand must be calculated with running total. In the corresponding drop-down list select the period, from which running total is calculated.
Calculation of the operand with running total enables the user to take into account previous period data in the current period. For example, there is an operand with the following values: 2015 - 3, 2016 - 5, 2017. - 9, 2018. - 4. If the Running Total checkbox is selected, and the From Calculation Start period is selected, the following operand values will be used on calculation: 2015 - 3, 2016 - 8, 2017. - 17, 2018 - 21.
In the formula area put the cursor to where the operand should be placed and click the Insert into Formula button on the side panel. One can also copy the selected dimension elements and paste them to the formula area using the Copy and Paste context menu items or pressing CTRL+C, CTRL+V.
The operand based on dimensions selection is inserted into the formula. For example:
{ Financial indicators! FINANCIAL SOUNDNESS INDICATORS | As of accounting date of accounting period[t] }
The operand text starts with the data source name ended with an exclamation mark. Then it is followed by names of elements selected in dimensions.
If the Set Up Element Selection dialog box specifies that dimension selection is set by parameter, parameter name will be enclosed in figured brackets. For example:
{ Financial indicators! LIQUIDITY INDICATORS, BUSINESS ACTIVITY INDICATORS | {Accounting date}[t] }
Aggregation settings influence the displaying of operand text:
If aggregation is set up for operand, the operand text starts with the ∑ character, for example:
{ ∑ Financial indicators! LIQUIDITY INDICATORS | As of accounting date of accounting period[t] }
If two elements are aggregated, they are specified via comma. For example:
{ ∑ Financial indicators! LIQUIDITY INDICATORS, BUSINESS ACTIVITY INDICATORS | As of accounting date of accounting period[t] }
If three or more elements are aggregated, only the first and the last elements are specified via the … character. For example:
{ ∑ Financial indicators! LIQUIDITY INDICATORS...ADDITIONAL PARAMETERS | As of accounting date of accounting period[t] }
If the Set Up Element Selection dialog box specifies that all dimension elements are selected for aggregation, the All text is displayed instead of the list of selected elements. For example:
{ ∑ Financial indicators! All | As of accounting date of accounting period[t] }
If filtering is set up for aggregated dimension, the operand text for filtered aggregated dimension is added with the Filter word, and its filtered elements are enclosed into round brackets. For example:
{ ∑ Financial indicators! Filter(LIQUIDITY INDICATORS...ADDITIONAL PARAMETERS) | As of accounting date of accounting period[t] }
[t] at the end of the operand means full selection by calendar dimension that is used by default. The [t] character is added or changed depending on specified calendar settings:
If the calendar frequency that is different from formula calendar frequency is selected in the Level drop-down list, it is displayed before the t character separated with a period. For example, semi-annual frequency is selected:
{ Financial indicators! LIQUIDITY INDICATORS | As of accounting date of accounting period[Half-years.t] }
If the specific value is specified in the Date box, it will be displayed at the end of the operand in square brackets. For example, 2018 year is specified:
{ Financial indicators! LIQUIDITY INDICATORS | As of accounting date of accounting period[2018] }
If the series point, on which operand data is taken, is fixed in the Index box, this point will be displayed at the end of the operand in square brackets. For example, on the third point from the series start:
{ Financial indicators! LIQUIDITY INDICATORS | As of accounting date of accounting period[3] }
If the offset that is other than zero is set in the Offset box, its size is specified in square brackets together with [t]. For example, the -1 value is specified in the Offset box:
{ Financial indicators! LIQUIDITY INDICATORS | As of accounting date of accounting period[t-1] }
Setting Up Filtering of Operand Aggregated Values
If data aggregation is used for operand based on dimension selection, one can set up filtering of aggregated values and aggregate only by the dimension values that correspond to specific conditions.
To set up filtering:
Click the operand in the formula area.
Select the Operands radio button on the side panel and make sure that aggregation method is selected for the operand in the Aggregation drop-down list.
Go to the tab of the dimension, for which filtering of aggregated values is set up, and click the
 button in the tab title. The Advanced Filter dialog box opens:
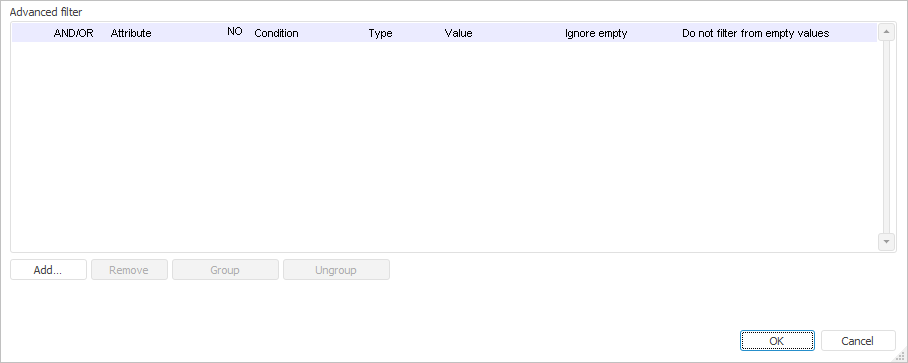
If filtering has been already set up for the dimension, the  button is displayed in the title. Clicking the button opens the Advanced Filter dialog box, in which the current dimension filtering conditions can be viewed and changed.
Set conditions for filtering aggregated values. For details about setting conditions, see the Setting Up Filtering by Attribute Values section.
If required, similarly set up filtering for the next dimension. As a result, filtering of operand aggregated values is set up.
Inserting Operand Based on Dimension Attributes
Operand calculation results in the value of the specified attribute obtained by the specified dimension selection.
Select the Operands and Attribute Value radio buttons on the side panel.
Select the data source dimension used by the operand in the drop-down list. The lists with selected dimension elements and attributes will be displayed. For example:
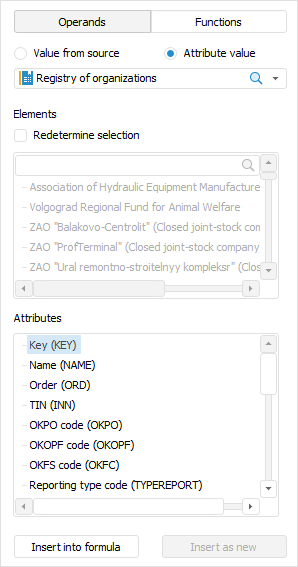
If it is required to redetermine dimension element selection specified at the stage of adding a data consumer and data sources, select the Redetermine Selection checkbox and set selection in the Elements list.
To change element display type by existing dimension attributes select the Names item in the context menu of the list of elements and select one or several attributes. Hidden attributes cannot be used. If several attributes are selected, their values are separated via the | character. By default, the formula area and the list of elements on the side panel display element names. The element display type can be changed only on the side panel.
To sort dimension elements, select the Sorting item in the context menu of the list of elements and select a sorting method:
- . Ascending.
- . Descending.
By Attribute. In the drop-down list select one of the dimension attributes, by which elements will be sorted.
To reset the configured element sorting, select the Sorting > Reset item in the context menu of the list of elements.
To expand the hierarchy of the list of elements, select the Expand All item in the context menu of the list of elements.
To collapse the hierarchy of the list of elements, select the Collapse All item in the context menu of the list of elements.
To display a group of elements or an alternative hierarchy in the list, use the appropriate items in the context menu of the list of elements.
Select the attribute in the Attributes list, based on which values an operand is generated.
In the formula area put the cursor to where the operand should be placed and click the Insert into Formula button on the side panel. One can also copy the selected dimension elements and paste them to the formula area using the Copy and Paste context menu items or pressing CTRL+C, CTRL+V.
The operand based on dimension attributes is inserted into the formula. For example:
{Financial indicators!BUSINESS ACTIVITY INDICATORS.Name}
The operand text starts with the data source name ended with an exclamation mark. Then it is followed by the dimension name or the selected element name if the dimension elements selection has been redetermined. Then it is followed by the selected attribute name separated with a period.
If pointwise calculation of the whole algorithm and/or a specific formula is supposed to be used and the formula contains elements of the version dictionary attribute, then on calculating the algorithm, elements values will be fixed to the calculation start date for each calendar point. To rebuild elements values to the current calculation date for each calendar point, create the MsUseRDSVersions parameter of the REG_DWORD type with the 1 value in the registry key HKEY_LOCAL_MACHINE\SOFTWARE\Foresight\Foresight Analytics Platform\10.0\Debug on local computers of all users.
IMPORTANT. The parameter use decreases performance and algorithm calculation takes more time.
Inserting Operand Based on Already Existing Operand
Click the operand in the formula area. Operand settings are displayed on the side panel without the ability to change a data source.
Change operand settings.
In the formula area put the cursor to where the operand should be placed and click the Insert as New button on the side panel.
The operand based on the already existing operand is inserted into the formula.
Inserting Parameters
To insert a parameter:
Put the cursor to where the parameter should be placed in the formula area.
Enter the opening figured bracket "{". A tooltip is displayed showing all calculation block parameters.
Select the required parameter and enter the closing figured bracket "}".
The parameter is inserted into the formula. One can also press SPACE+CTRL to show a tooltip for inserting parameters.
Inserting Functions
Select the Functions radio button on the side panel. The list of functions available to be used in the formula is displayed.
To insert a function:
Select the formula on the side panel.
In the formula area put the cursor to where the operand should be placed and click the Insert into Formula button on the side panel or double-click the function.
The function is inserted into the formula area. Press ALT+ENTER to show a tooltip with function parameters.
Set function parameters.
The function is inserted into the formula. One can also press SPACE+CTRL to show a tooltip for inserting formulas.
NOTE. To improve performance of Foresight Analytics Platform, use the ?: conditional operator instead of the Iif function.
To get description of available functions, see the Functions Available in Expression Editor section.