 Show grid
Some information is displayed as a list. See below possible settings of list display.
The setting is available only in the Users security manager section in the desktop application.
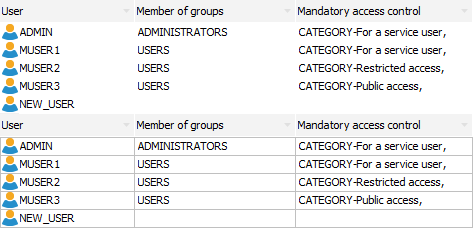
To enable or disable gridlines, select or deselect the Show Grid checkbox in the View main menu. By default, the users list is displayed without a grid. See below an example of displaying with and without a grid:

The desktop and web application enable the user to resize column header on hovering the mouse cursor on the border between columns  . A column header can be resized in the sections: Navigator, Users, Groups, Privileges, Mandatory Access Control, Security Levels, Object Classes, Access Protocol, Security Violation Monitoring.
To enable or disable row resizing, select or deselect the checkbox in the main menu next to the View > Allow Row Resizing item. It is available only for the Users, Groups sections in the desktop application.
Setup of column display is available in the sections:
In the desktop application: Navigator, Users, Groups, Object Classes, Access Protocol and Security Violation Monitoring.
In the web application: Navigator, Users, Groups, Privileges, Mandatory Access Control/Security Levels, Object Classes, Access Protocol, Security Violation Monitoring.
To set up column display:
In the desktop application:
Open the Specify Columns to Display dialog box:
Using the View > Select Columns main menu item (available for the Access Protocol and Security Violation Monitoring sections).
Using the Select Columns context menu item for column header (available for the Users, Groups, Access Protocol and Security Violation Monitoring).
Open the context menu for the column header. To enable or disable displaying of a column with corresponding information, select or deselect the checkbox next to it (available for the Users, Groups, Access Protocol and Security Violation Monitoring sections).
Click the  button at the end of the row with column headers (available for the Navigator and Object Classes sections).
In the web application:
Click the  button at the end of the row with column headers and select or deselect the checkbox next to it.
NOTE. When information security administrator and application administrator roles are separated, the list of available columns is not full only for the application administrator. Availability of options corresponds to user properties displayed on the General Properties tab.
Column view may vary depending on the selected section and security manager settings.
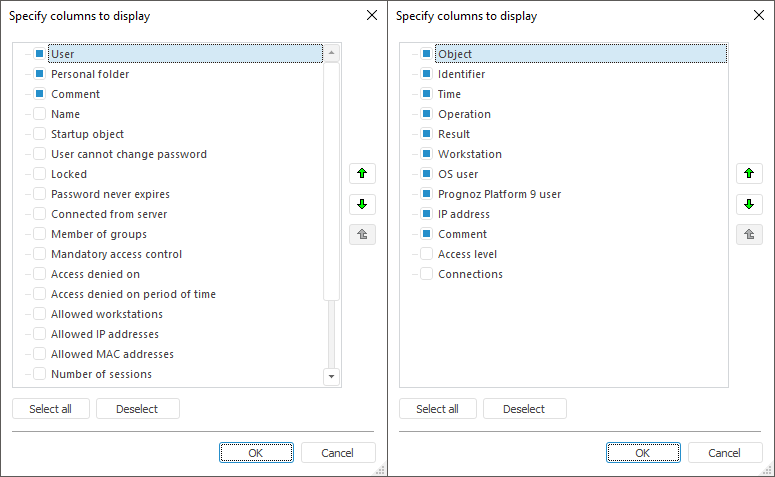
When the Select Columns item is selected in the desktop applications, the Specify Columns to Display dialog box opens (left - for the Users section, right - for the Access Protocol section):

To enable or disable the column that contains required information, select or deselect checkbox next to it. To select or deselect all selected checkboxes, use the Select All or Deselect All button. Use the  and
and  buttons to set the order of columns in the list.
NOTE. Column displaying settings are reset for administrators on toggling the mode of separation of roles between the information security administrator and application administrator. In this case default settings are applied.
Filter is used to shorten the list and exclude unnecessary information from consideration.
NOTE. Filtering setup is available only in the desktop application.
To allow of deny filtering:
Select the checkbox in the View > Autofilter main menu in the Users, Groups, Access Control and Security Violation Monitoring section.
The Autofilter checkbox in the protocol's context menu in the Access Protocol and Security Violation Monitoring sections.
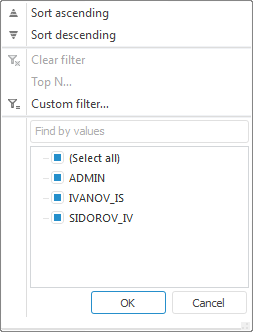
To filter a column, click the  button next to the right column border, which opens the following list:

All elements selected in the list formed from all values of filtered rows will be displayed in the list.
NOTE. The Set Up Filter item is only available in the Groups section.
The first two rows contain sorting methods: Ascending and Descending. When the sorting is enabled, sorting direction is displayed in the corresponding column header.
The next three rows contain standard autofilter options:
Clear Filter. The operation is used to display all rows.
Top N. The operation is used to display the specified number of list elements. The number of elements is specified either directly or in percentage of total amount of filtered elements:

The following attributes can be adjusted in this dialog box:
Number of rows. The edit box that is used to specify the number of displayed rows.
Attribute. It determines whether least or greatest elements are displayed.
Selection Condition. It determines whether the number of elements is specified directly or in percentage.
NOTE. This filter is available if there are numeric values in filtered rows.
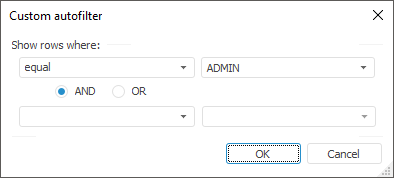
Custom Filter. The operation that is used to determine filtering conditions in the Custom Autofilter dialog box:

The following attributes can be adjusted in this dialog box:
Selection condition. The drop-down list that determines the condition for displaying elements (equal, not equal…).
Value. The drop-down list that determines the condition value for displaying elements. This list of elements includes all values of autofilter range sorted without taking the case into account. The case is taken into account only when the values match.
Filtering conditions. The radio button determining the order of using two conditions.
There are two options of use of condition combinations:
When the AND radio button is selected, the rows, which meet both conditions, are displayed.
When the OR radio button is selected, the rows which meet at least one of the selected conditions are displayed.
Sorting is used for graphic displaying of a list. Elements are not sorted by default.
Click the column header to enable or edit sorting. An arrow that shows sorting direction appears in the column header:
 . In ascending order or alphabetically depending on the type of data contained in the column.
 . In descending order or in reverse alphabetical order depending on the type of data contained in the column.
No arrow. Sorting is not used.
After you click once, column data is sorted alphabetically or in ascending order. Further clicks on the header change sorting type.
In the Navigator section, sorting can be additionally set or changed by means of the Arrange item in the View drop-down menu of the main menu.
To sort multiple columns, hold down the CTRL key and click headers of the required columns one after another. The sorting order is as follows: the column, which header is clicked last, is sorted last.
In the Navigator section, sorting can be additionally set or changed by means of the Sorting button on the toolbar:
By name.
By identifier.
By date modified.
By object type.
By comment.
Without sorting.
Sorting direction can be set:
Ascending.
Descending.
List export is available in the Navigator, Users, Policies Editor, Access Protocol, Security Violation Monitoring sections.
To execute export:
In the Navigator section, select the Tools > Export Access Permissions > By Object Type or By Folders; By Object Type main menu item.
In the Users section, select the Tools > Export User List main menu item.
In the Policies Editor section, select the Tools > Export Security Policy Settings main menu item.
In the Access Protocol section, select the Access Protocol > Save to File > Full Protocol or Current View main menu item.
In the Security Violation Monitoring section, select the Tools > Export main menu item.
Executing this command opens a standard dialog box where you need to specify file name and path.
On default export, the following file name is suggested: <Export section name> <repository name> for <date>.
Only the displayed information is saved into a CSV file (*.csv), therefore take into account configured column display and filter settings in use.
NOTE. The full version of access protocol is saved into a PPLOG file (*.pplog).
After the export is completed, the system suggests to open the generated file.
List export is available in the Users and Access Protocol and Security Monitoring sections.
To export click the  Export toolribbon button. After that the whole information about selected section will be saved to CSV(*.csv).
On exporting the file is saved with the name: <Export section name> <repository name> on <date>.
See also:
Getting Started with Security Manager