Setting Up Object Display
The update manager enables the user to change the view, mode and order of displaying update objects:
Setting Up Object Display
To set up displaying of objects in the update structure:
In the web application click the  Show Objects button and select the display option in the drop-down menu.
In the desktop application select the View item in the update structure's context menu and select the checkbox next to the required display option.
Display options:
Name. Default value. Objects are displayed with their names.
Identifier. Objects are displayed with their identifiers.
Name and Identifier. Objects are displayed with their names, object identifiers are displayed in brackets.
To change the type of repository object display in the desktop application, select the required radio button and checkboxes in the context menu on the Repository tab:
Show Names. If the radio button is selected, only object names are displayed in the object tree.
Show Identifiers. If the radio button is selected, only object identifiers are displayed in the object tree.
Show Names and Identifiers. If the radio button is selected, object names and identifiers are displayed in the object tree.
Show Tooltip. If the checkbox is selected, the tooltip is displayed on hovering cursor over the object which contains the following information: name, identifier, change date and object type.
Show Empty Folders. If the checkbox is selected, the list of objects displays folders without objects.
Changing Object Display Mode
To change object display mode, use the  Method of Displaying an Objects List button on the toolbar. Click the button to change the display mode or click the button arrow to open a menu to select a mode:
In Update Order. The order corresponds to the order, in which objects have been added to the update. The Update Objects root item is displayed in this mode.
In Repository Order. Update objects are displayed with their owner containers, such as folders or MDM repository. The appearance will correspond to the tree on the Repository tab. If this mode is selected, the number of objects is not displayed for the Update Objects element.
Reordering Objects
Object order is important when creating an update. Add or place added objects in the update structure starting with parent objects or sources, which are absent in the target repository, and finishing with objects that were created on their basis.
Before saving the update, the dialog box prompting to confirm object sorting opens. If the answer is positive, objects will be automatically sorted, otherwise the object order remains the same.
To reorder objects:
By Type. Objects are arranged by type.
By Dependency. The option arranges objects on the panel in the order of their dependency not breaking folders composition (contents). Repository objects and object deletion are arranged. Repository objects are arranged in the following order: first, basic objects, then the objects created on their basis (for example, tables, dimensions, cube). Deletion objects are arranged in the reverse order: first, independent objects based on other objects, then objects included into the earlier listed objects (for example, cube deletion, dimension deletion, table deletion). Comments, SQL operators, security subjects and special objects are not arranged.
Allow Structure Violation. The option arranges objects on the update panel in the order of their dependency, breaking their structure. Objects are arranged similarly to the By Dependency option, but if required, objects can be placed outside folders, in which they are located. This rule does not cover container objects, for example, modeling container, their child objects cannot be placed outside their borders.
Select the Up, Down, One Level Up, Arrange Objects items in the update object's context menu. It is available only in the desktop application.
Use Drag&Drop. It is available only in the desktop application.
Showing/Hiding columns
To show or hide columns in the update structure:
Execute one of the operations:
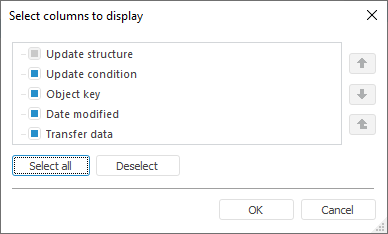
Select or deselect columns:
Update Object Type. Available values: Folder, Repository Object, SQL Command, Delete Repository Object, Comment, Security Subject, Special Object, Access Attributes. Update object type is determined automatically. It is available only in the web application.
Object Class. It is available only in the web application.
Object Key.
Object Identifier. It is available only in the web application.
Object Version. It is available only in the web application.
Date Modified.
Transfer Data. Available value: Partial. Column value is displayed to determine whether object is partially updated.
Update Condition. Available value: update condition formula specified on the object update options panel in the web application or on the Update Options tab in the desktop application.
The values specified in the columns: Object Class, Object Key, Object Identifier, Object Version, and Date Modified correspond with object properties.
After executing the operations the selected columns are displayed in the update structure.
To reorder columns in the desktop application, select the column in the Select Columns to Display dialog box and use the  and
and  buttons.
See also:
Creating an Update
 Move Update Object Up,
  Move Update Object Down, or
  Move Update Object One Level Up buttons on the toolbar. The
  Arrange objects by Dependency button on the toolbar: