 Insert columns
The following operations with regular report sheet columns are available:
There are two ways to insert a column:
Insert to the Left. A new column is added to the left of the current one. The new column width is the same as the width of the column to the left of the current one.
Insert to the Right. A new column is added to the right of the current one. The new column width is the same as the width of the current one.
NOTE. Adding columns is not available if a new column is in the data source table range.
To add a new column, select an existing column, or any cell in the column, and execute one of the following operations:
Select the  Insert Column Left context menu item or the
  Insert Column Right item in the column header.
Select the  Insert >
  Insert Column Left or
  Insert >
  Insert Column Right item in the context menu of the cell contained in the column.
Press ALT+T to insert a column left.
NOTE. If before adding a column conditional formatting was set up for the range, it is also applied for a new column.
The columns to the right of the new column are shifted one position to the right. When a column is inserted to the left, all the columns, starting from the selected one, are shifted. When a column is inserted to the right, the selected column stays in its place, and the columns to the right of it are shifted.
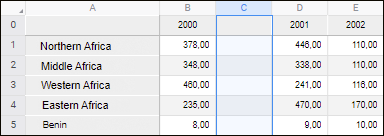
The example of inserting a column to the left when the C column is selected:

Multiple columns can be added at the same time. In this case, the number of inserted columns matches the number of initially selected columns.
There are several ways to change column width:
Changing Width Manually. To manually change column width, hover the cursor to the column's right border in the header area, click the border, hold down the cursor and drag it to the required distance. The actual column width is displayed in the tooltip.
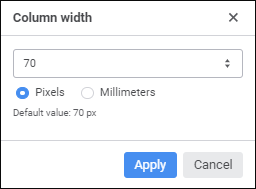
Exact Width Change. To set precise column width value, select the  Resize Column item in the selected column's or column header's context menu. In the Column Width dialog box change column width value in pixels or millimeters:

Quick column width fit. To quickly fit column width, execute one of the operations:
Select the  Fit Column Width context menu item of the selected cell or column header.
Click the  Fit Column Width button on the View toolbar tab.
Select the View > Fit Column Width item in the selected cell's or column header's main menu.
Double-click the right border of the column header.
Each of these methods can be applied to a single column or a group of columns. The changed size is applied to each column in the group.
Column hiding can be used when columns contain intermediate results. The data stored in hidden columns is not shown in the screen or on a printed sheet.
To hide a column, select the column (or any cell contained in the column) and select the  Hide item in the column header's context menu.
After executing the command the selected column is hidden. The column at its right takes place of the hidden column.
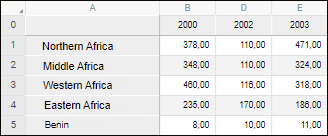
The example of hiding the C column:

Multiple columns can be hidden at the same time.
To unhide the column, select two column: to the left and to the right of the hidden column, then select the  Show item in the selected columns header's context menu.
After this, the hidden columns between the selected columns are shown.
If there are several hidden columns between the selected columns, after selecting the  Show item all hidden columns will be shown.
NOTE. Setting minimum column width and hiding column are different operations.
To delete a column, select an existing column, or any cell in the column, and execute one of the following operations:
Select the  Delete Column item in the column header's context menu.
Select the  Delete > Delete Column context menu item of the cell contained in the column.
NOTE. The column is deleted even if only a single cell has been selected in this column.
After executing this command the selected column is deleted and all the columns to the right of it shift one position to the left.
NOTE. Deleting columns is not available if the deleted range includes a data source table.
Multiple columns can be deleted at the same time. To do this, before executing the operation select the range including at least one cell of each of the deleted columns.
Variables in formulas are replaced in the following way:
When a column is deleted, all values that contain name of this column in their name, are replaced with "#REF!" in the formula. The cell values, which formulas contain references to the deleted column, are replaced with "#REF!".
All values that have in their names a letter, which is closer to the beginning of alphabet than the deleted column letter, remain unchanged.
All values that contain a letter that is closer to the end of the alphabet, than the deleted column letter, are shifted one letter closer to the A (F1 is replaced with E1, E1 is replaced with D1, and so on).
When columns are deleted, the system corrects formulas that include deleted (moved as a result of adding) cells located on other sheets of the regular report.
To fix the leftmost column in the report area on scrolling, freeze column.
See also:
Working with Report Sheet Elements