
 Create a data area
How to display repeated information on each page for multi-page printing?
Quite often when multi-page printing is used, it may require to display repeated information on each page.
For example, printing a report requires to:
Display report name and the current date on the first page.
Display data area title, dimension selection and the current page number on each even page.
Display dimension selection, the current date and time and the current page number on each odd page.
On printing, data area header, heading and sidehead must be displayed.
The data area and the chart built based on the data area are taken as source data.
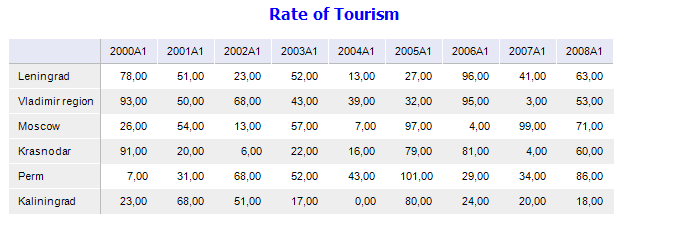
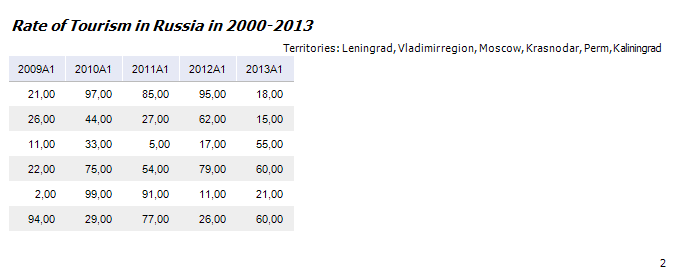
On printing data area is displayed on several pages:
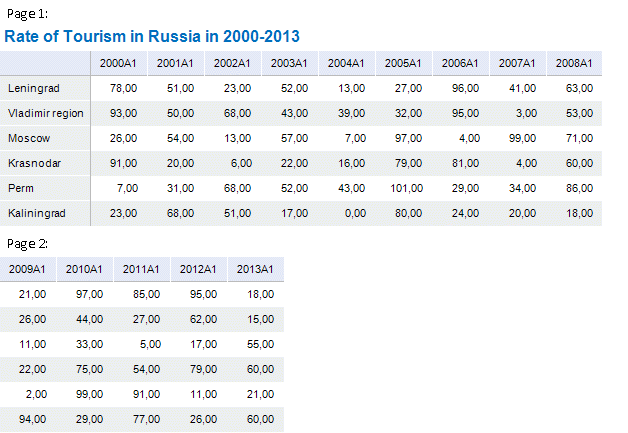
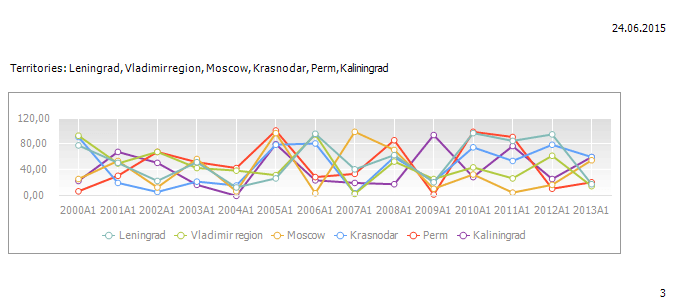
The chart is displayed on the third page.
On printing the report the following information must be displayed:
The first page - report name and the current date.
Each even page - data area title, dimension selection and the current page number.
Each odd page - dimension selection, the current date and current page number.
On printing, data area header, heading and sidehead must be displayed.
To show additional information on each printed report sheet, determine the following page settings: headers and footers, pass-through columns and rows.
As the table header is displayed as a footer or a header, it needs to be deleted. To do it, select the header cell and press the DELETE key.
To show displaying options when printing headers and footers, select the Report > Print > Page Settings main menu item.
In the Page Settings dialog box that opens go to the Header/Footer tab:
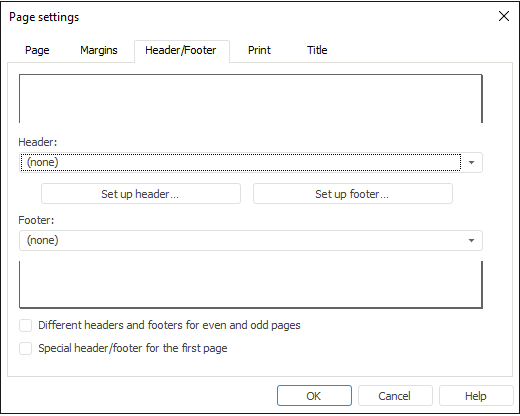
Select the Different Headers and Footers for Even and Odd Pages and the Special Header/Footer for the First Page checkboxes.
Click the Set Up Header button. Set the following header parameters in the dialog box that opens:
Put the cursor to the Center Part area on the First Page Header/Footer tab and click the  button.
Therefore, report name is displayed in the left part of the header. If required, set up text format by clicking the  button.
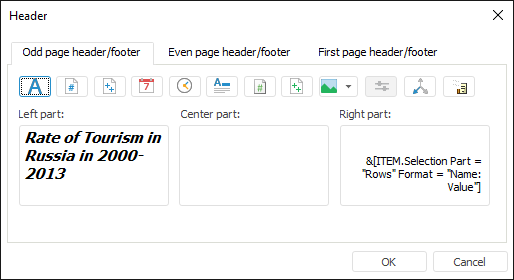
On the Odd Page Header/Footer tab:
Put the cursor to the Left Part area and click the  button. In the Selection Output dialog box that opens select the Dimensions in Rows checkbox. If required, set up output text format by clicking the button.
Put the cursor to the Right Part area and click the  button.
After executing these actions, dimension selection is displayed on odd pages in the central part of header or footer, the current date is displayed in the right part of header or footer.
On the Even Page Header/Footer tab:
Put the cursor to the Left Part area and enter data area header using the keyboard.
Put the cursor to the Right Part area and click the button. In the Selection Output dialog box that opens select the Dimensions in Rows checkbox. If required, set up text format by clicking the button.
After executing these actions, the data area header is displayed in the left part of header or footer, the dimension selection is displayed in the central part on even pages.
Example of the filled Even Page Header/Footer tab of the Header dialog box:
Save header formatting parameters.
Click the Set Up Footer button and determine identical settings. Put the cursor to the Right Part area and click the  button on the Odd Page Header/Footer and the Even Page Header/Footer tabs.
The current page number is displayed as a footer for all pages except for the first one.
Save footer formatting parameters.
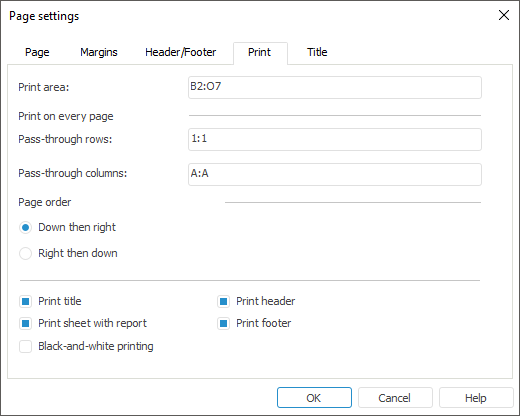
Print Area. Select the data area range to print.
Pass-Through Rows. Select the range of rows to print on each page. In this case select the row that contains data area heading - 1:1.
Pass-Through Columns. Select the range of columns to print on each page. In this case select the column that contains data area sidehead - A:A.
After the edit boxes are filled, the Page Settings dialog box looks as follows:
Save determined print options.
After these settings are applied, the printed report looks as follows:
Page 1:
Page 2:
Page 3:
Thus, the page settings are determined to print headers and footers, and also data area heading and sidehead on each printed page.
See also:
Questions and Answers | Setting Up Pixel-Perfect Report | Report Preview and Print | Preview