
The Selecting Source page is used to select a data source. Page appearance depends on the source type selected on the start page of data import wizard.
If a source is an existing file, the page for source selection looks as follows:
Before selecting a source file get familiar with the requirements for imported files.
Click the Browse button and select a data file in the dialog box that opens. The file extension and contents is used to determine the file type, its structure and to download the first 100 records. Identified fields and records are shown in the table.
Determine mandatory settings that depend on the selected file type:
Excel. Each file sheet is shown as a spreadsheet tab. Go to the corresponding tab to select the sheet to import data from.
Microsoft Access. Specify the query to database tables in the SQL Query additional box and click the Run button. After the query is executed, imported data is obtained and displayed.
XML. Specify the query in the XPath Query additional box and click the Run button. After the query is executed, the first 100 records of imported data is obtained and displayed.
JSON. Specify the query in the JSONPath Query additional box and click the Run button. After the query is executed, the first 100 records of imported data is obtained and displayed.
Click the Advanced Settings button if table contents does not correspond to assumed source structure. In the Advanced Settings dialog box that opens change settings used on data authentication.
Click the Next button to determine advanced import options.
If the Crosstab checkbox is deselected, the user is moved to the page for data correction.
If the Crosstab checkbox is selected, additional pages of the wizard are displayed where the user can set up and identify data in the crosstab. A crosstab is a summary table where headers can be located both by rows and columns, which enables the user to show the relation between two or more variables.
Click the Import button to finish the import using default settings. This creates all the necessary objects and a standard cube that can be used to work with the imported data. The objects are saved in the current folder of the object navigator.
If other source is selected, the page to select the source looks as follows:
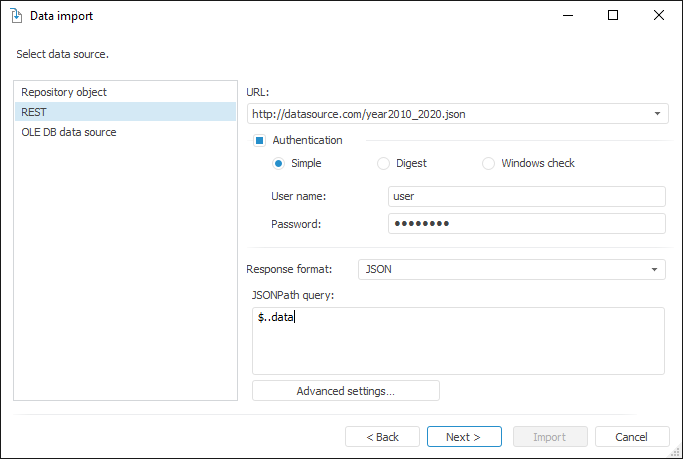
Use the URL box to specify URL of the REST service that provides data (the current implementation enables connection to REST services that provide data only in the JSON and XML formats). If user authentication is required to connect to REST service, select the Authentication checkbox and select user check method. Specify user credentials in the User Name and Password boxes. The specified parameters are passed to the core, appropriately processed and used on connection to REST service.
IMPORTANT. If Internet connection is required to connect to REST service, and it is provided via proxy server, the proxy server address should be primarily specified in repository parameters.
NOTE. Using the Fore language one can limit the list of available REST services. For details see description of the
In the Response Format list select the format of the data received from REST service. Depending on the selected format, determine advanced settings:
JSON. Specify the JSONPath query in the JSONPath Query box, according to which imported data is selected.
XML. In the Format box select how data is stored in XML file (data fields are presented as node attributes or single child nodes). Specify the query in the XPath Query box, according to which imported data is selected.
NOTE. When creating various conditions in a query take into account the specified data type. Implicit type conversion is not supported. A detailed information on how to create JSONPath and XPath queries can be obtained in additional guides, such as MSDN. The specified file should be in UTF-8 encoding.
Clicking the Advanced Settings button opens a dialog box with advanced settings used on data authentication.
Clicking the Next button opens a page to correct data, which was automatically recognized and downloaded from the source.
See also:
Data Import without Preparation