 Set Handler item in the drop-down menu of the
  Handler button on the Data toolbar tab. The Set Handler dialog box opens:
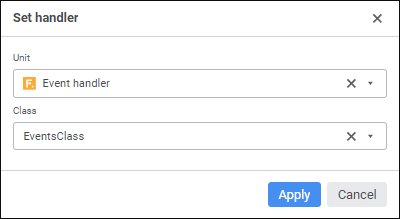
To set up handling of the events generated during user work with data entry forms, use event handler.
An event handler is a unit created in the Fore language. An event handler enables the user to set actions when particular event occur extending functionality of data entry forms.
After links between forms or form elements are set up, if required, follow the step:
To connect an event handler, select the Set Handler item in the drop-down menu of the Handler button on the Data toolbar tab. The Set Handler dialog box opens:
Set:
Unit. Select the unit in the drop-down list with repository objects or start typing unit name in the search string. One unit can be selected.
To quickly select an object, enter its name/identifier/key in the search box depending on display settings. Search is executed automatically while the searched text is entered into the search string. The list will display the objects, which names/identifiers/keys contain the entered text.
To set up displaying of repository objects in the list, click the  Display Object button and select display option in the drop-down menu:
Name. Objects are displayed with their names. Default option.
Identifier. Objects are displayed with their identifiers.
Key. Objects are displayed with their keys.
Several options can be selected. Identifier and key will be specified in brackets.
Class. Select a class, which contains an event handler, in the drop-down list. One class can be selected. The list becomes available after the unit is selected, if it has the described class inherited from the ReportEvents class and containing implementation of methods for handling data entry form events.
Event handler class can have the constructor called at each class initialization. The designer must not contain parameters. If the class has several constructors without parameters, the first constructor is called that is located above the others in the code.
NOTE. Event class is initialized each time an action is executed in the data entry form. In this case wither one event or a chain of events can be generated.
Finish the selection by clicking the Apply button. The button becomes available after the class is selected.
To undo the event handler use, select the  Reset item of the Handler button on the Data toolbar tab.
To execute the example, create a unit. Add links to the Drawing, Express, Report, and Tab system assemblies.
Class EventsClass: ReportEvents
Public Sub OnAfterRecalcSheet(Sheet: IPrxSheet);
Var
Tab: ITabSheet;
Range: ITabRange;
Style: ITabCellStyle;
Begin
// Get data entry form sheet table
Tab := Sheet As ITabSheet;
// Select cell range for drawing
Range := Tab.Cells(0, 0, 10, 5);
// Set formatting style for selected range
Style := Range.Style;
// Set green color as cell background color for selected cell range
Style.BackgroundBrush := New GxSolidBrush.Create(GxColor.FromName("Green"));
End Sub OnAfterRecalcSheet(Sheet: IPrxSheet);
End Class EventsClass;
As a result, when the event occurs that follows data entry form sheet calculation, background of the A0:F10 cell range is filled with green color.
See also:
Building Data Entry Form | Working with Ready Data Entry Form