 Rename process
A process can be edited in the Set Up Business Process dialog box. On editing the process, stages or steps are added or deleted and the execution order also changes.
To edit a single step, use the step wizard.
The following operations are available when editing a process:
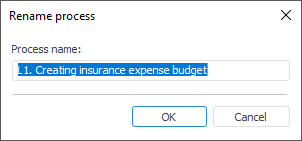
To rename a process:
Double-click the process name in the working area.
Select the Edit Title context menu item.
Select process name and press F2.
The Rename Process dialog box opens, in which set a new process name:
To rename a stage/step, execute one of the operations:
Select the Rename item in the stage/step's context menu. The Rename Stage/Rename Step dialog box opens, in which set a new stage/step name.
Select stage/step name and press F2. The Rename Stage/Rename Step dialog box opens, in which set a new stage/step name.
Double-click the stage name in the working area and set a new stage name.
NOTE. A step can also be renamed in the step edit mode.
To edit a step, double-click its name in the working area. The step wizard opens. Make necessary changes on the wizard pages. To save changes, click the Finish button.
NOTE. The step can be edited using context menu items.
 Change step startup option: manual/automatic
To change step start option, execute one of the operations:
Select the Automatic Step Execution context menu item.
NOTE. Changing step startup option via context menu is available only for steps with manual and automatic execution, for example, Calculation and Subprocess Call. For steps that have only automatic or only manual startup mode, the command is unavailable.
Double-click the step name in the working area. The step wizard opens. On the Manage Parameters wizard page set step startup option. Click the Finish button to save changes.
To copy and paste process step or stage:
Select the block to copy in the working area or in the process tree.
Click the  Copy button on the Process ribbon tab or select the same context menu item. The
  Paste operation becomes available on the toolbar and in the context menu.
Select the block, after which the copied block must be pasted, in the working area or in the process tree.
Click the Paste button or select the same context menu item. The name of the pasted block will have the (Copy) suffix:
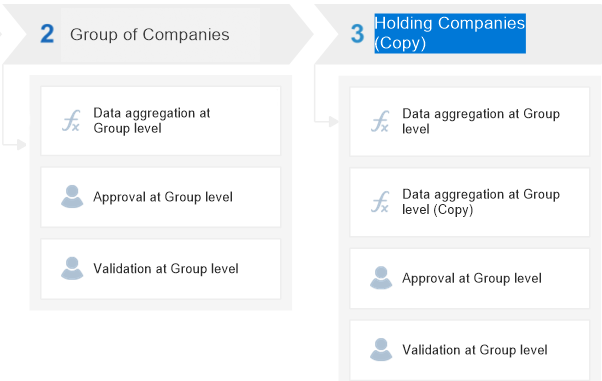
NOTE. The step is copied with all its steps.
If the initial block must be deleted after copying, click the  Cut button.
If required, edit copied blocks by double-clicking the block name or using context menu items.
To save changes, click the  button on the quick access toolbar or select the Business Process > Save main menu item. To undo changes, close the window without saving changes.
NOTE. For copy, paste and cut operations, the standard shortcuts are: CTRL+C, CTRL+V, CTRL+X.
After executing the operations, the process step or stage is copied and pasted.
To reorder process steps or stages:
Select the stage or step in the working area or in the process tree.
Execute one of the operations:
Click the  Move Up or
  Move Down button on the Process ribbon tab.
Select the same context menu items.
Press CTRL+UP or CTRL+LEFT to move the element up, CTRL+DOWN or CTRL+RIGHT to move the element down.
NOTE. When moving steps, their sequential or parallel execution is taken into account. If two steps were executed in parallel, then on changing order within stage, parallel execution will be replaced by sequential and inversely. When moving the step to another stage, the parallel gateway is used by default.
After executing the operations the stage or step order is changed.
To delete stage or step:
Select the stage or step in the working area or in the process tree.
Execute one of the operations:
Press the DELETE key.
Click the  Delete button on the Process ribbon tab.
Select the Delete context menu item.
NOTE. Before a stage or step is deleted, the dialog box opens to confirm deletion.
After executing the operations the selected stage or step is deleted.
Include and exclude step from execution
To include or exclude a step from process execution, select the step in the working area and change step state using the Step is Enabled command on the Debug ribbon tab:
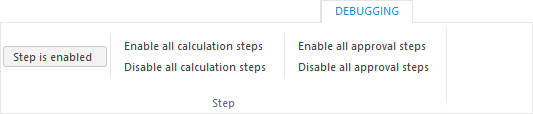
The Enable All Calculation Steps and Enable All Approval Steps commands enable all disabled steps of corresponding types.
The Disable All Calculation Steps and Disable All Approval Steps commands disable all enabled steps of corresponding types.
NOTE. A step can also be included or excluded from execution using the Step is Enabled context menu item.
The disabled step is highlighted with gray color, and the Skip step status is set. For example, the step used in the process (left) and the step excluded from the process (right):

To view process properties, including its objects, use the Process Properties context menu item. The Object Properties dialog box opens:
The Consists Of tab displays all objects that are included in the current process.
The Included In tab displays all processes, to which the current process is included, for example.
For example, properties of the L1. Creating Insurance Expenses Budget process:
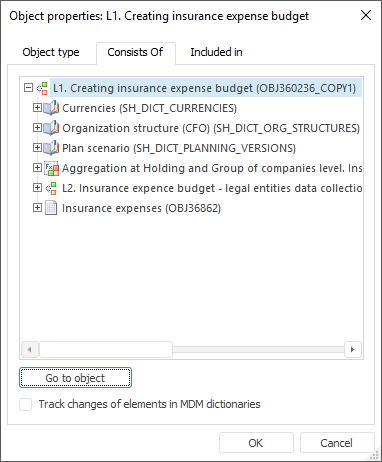
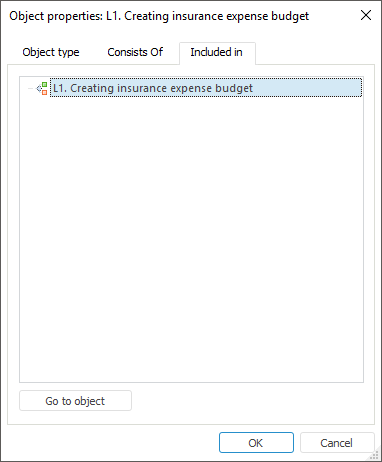
To view objects included in the process, select the object and click the Go to Object button.
See also:
Building Process | Starting Process Execution