In this article:
Checking Foresight Analytics Platform Integrity
Controlling Foresight Analytics Platform and Metadata Integrity
Foresight Analytics Platform and repository metadata integrity is controlled during:
Checking Foresight Analytics Platform Integrity
Foresight Analytics Platform integrity is checked, is the Check Sums Every Time Platform Starts checkbox was selected:
On installing desktop application of Foresight Analytics Platform.
On installing BI server of Foresight Analytics Platform in Windows OS.
NOTE. If on installing the web application or the desktop application, checksum verification was not activated, then to activate it, restart the installer and select the Check Sums Every Time Platform Starts checkbox.
Checksums for executable files are verified during loading. Every time Foresight Analytics Platform start, the minimum set of executable files is loaded and while calling any functionality, additional libraries required for work are loaded. If integrity violation is detected, the user receives the corresponding message with description of corrupted files. The following work with Foresight Analytics Platform is locked.
To restore program integrity, the administrator’s involvement is required.
Executed files or their contents can be corrupted due to:
Malicious acts.
User errors.
Viruses.
Other reasons.
NOTE. Checksums are verified only on starting the desktop application or when BI server installed on Windows OS is working. In Linux OS checksums are verified by operating system means.
Checking Repository Metadata Integrity
To check repository metadata integrity, the checksums are calculated based on object contents. A checksum changes after object metadata modification. To verify checksum, it has to be initially performed. After checking the object for the second time, the previous checksum is compared to the current one. If the checksum has been changed, this means that the object was changed.
Checking repository objects metadata integrity is available:
In the web application only in the update manager.
In the desktop application in the security manager and the update manager.
IMPORTANT. Repository metadata integrity check must be executed only within one repository.
Performing Checksum
Performing checksums in the desktop and the web application differ.
To perform checksum in the web application in the update manager select the Perform Checksums item in the update objects' context menu.
After selecting the item, the Perform Checksum dialog box as in the desktop application will not open. The checksum will be performed for all objects in the update and it will be saved to the file named Checksum.crc in the Downloads local computer folder. Move file to another folder if required.
To perform checksum in the desktop application:
Open the Performing Checksums dialog box using one of two ways:
In the security manager select the Repository > Perform Checksums main menu item.
In the update manager and select the Update > Perform Checksums main menu item.
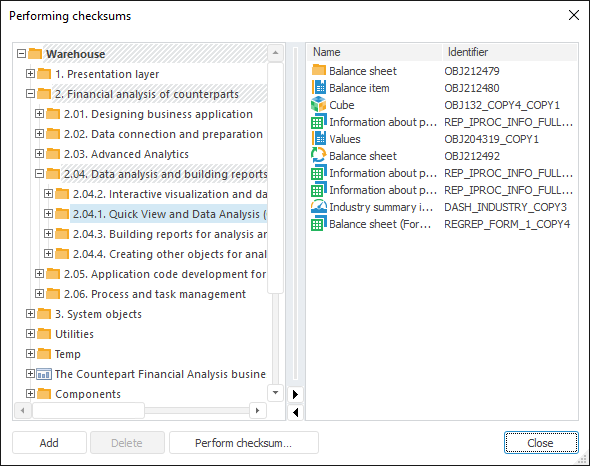
After executing the actions, the Performing Checksums dialog box opens:

Create a list of objects for which the checksum will be performed.
To add the object selected in the object tree to the list:
Click the Add button.
Select the Add Object context menu item.
Drag and drop object to the right part.
To set up displaying of objects in the context menu of the object tree, select the radio button:
Show Names. Only object names are displayed.
Show Identifiers. Only object identifiers are displayed.
Show Names and Identifiers. Object names and identifiers are displayed.
To search object in the object tree:
Select the Search item in the object's context menu.
Press CTRL+F.
After executing one of the operations the standard search dialog box opens.
To delete the selected objects from the list, click the Delete button; a confirmation dialog box opens.
After executing the action, the list of objects for checksum performing will be generated in the right part of the dialog box.
NOTE. If the dialog box opened in the update manager, the right part of the dialog box displays the objects contained on the Update panel.
Perform checksum for selected objects using the Perform Checksum button.
After executing the actions, the checksum will be performed for selected objects and a standard dialog box to save file will open. Clicking the Save button saves the file with the *.crc extension.
Verifying Checksums
To verify checksums:
Open standard dialog box to select a file:
In the web application in the update manager select the Verify Checksums item in the update objects' context menu.
In the desktop application:
In the security manager select the Repository > Verify Checksums main menu item.
In the update manager Select the Update > Verify Checksums main menu item.
Select file with the *.crc extension containing previously stored checksum.
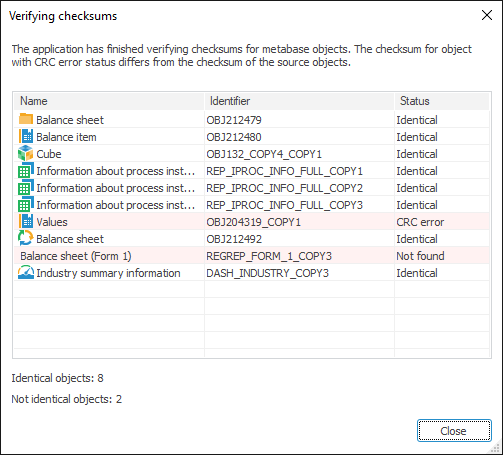
After executing the actions, a dialog box opens with the results of verifying the previous checksum with the current one, for example:

The dialog box displays a table with results of verifying the previous checksum with the current one. Identifiers, names and verification status are displayed for objects.
Available status of checksums verification:
Identical. Object's checks was not changed.
Not Found. The object is absent in the repository.
CRC Error. Objects checksum modified.
Checking User Audit Correctness
To check the service user required for correct user auditing, the system checks locking of the users. A service user is created in the repository manager. In case of incorrect creation of the service user, schema reinstallation or malicious actions, the security system might function with errors.
NOTE. Checking user locking mechanism is available only in the desktop application. The use of user locking mechanism check at system login increases startup wait time of Foresight Analytics Platform.
To check user locking mechanism on each administrator login in the security manager, select the Check at Login checkbox in the Service section:

In case of errors an appropriate message is displayed. Checkbox status remains the same for the current OS user.
To check user locking mechanism now, click the Check Now button. A message containing information about the check is displayed upon completion.