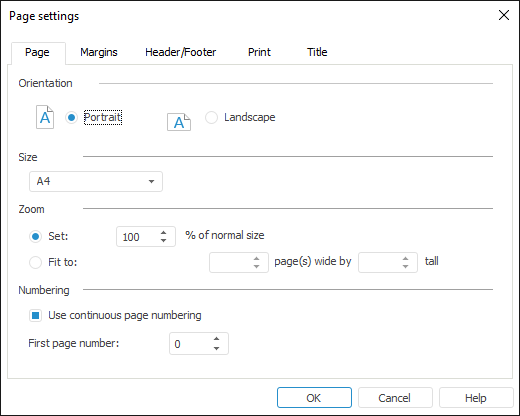
Quick and advanced setup is available for general page settings.
NOTE. Parameters for quick and advanced setup are different.
To execute advanced setup of general page settings:
Open the Page Settings dialog box using the main menu command:
Report > Print > Page Settings in regular reports.
Data Entry/Output Form > Print > Page Settings in data entry forms.
Go to the Page tab:

Set page parameters:
Orientation. Select page orientation using the radio buttons:
Portrait.
Landscape.
Size. Select page size in the drop-down list. The drop-down list contains predefined paper size options, for example, A4, A5, and so on.
Zoom. Select page zoom using the radio buttons:
Set. Set zoom as percentage of real page size.
Fit To. Use the value boxes to specify the limit on the number of pages according by width and/or height of print page. If you set value only in one of the boxes and leave the other blank, the limit of the number of print sheets is made only for the specified box.
Numbering. Select the Use Continuous Page Numbering checkbox for continuous page numbering. Custom page numbering is used for sheets with deselected checkbox. Page numbers with the selected checkbox are recalculated deselecting the checkbox of the page.
In the First Page Number box specify the number, with which sheet pages numbering starts. Parameter value is considered for each report sheet even if continuous numbering is used. For continuous numbering of several sheets, specify the value in the First Page Number box for the first report sheet with the selected Use Continuous Page Numbering checkbox. Specify the '0' value in the First Page Number box for the rest of sheets with the selected Use Continuous Page Numbering checkbox.
NOTE. This numbering parameter affects only headers and footers with the &[Page] tag. Continuous numbering cannot be applied to headers and footers with the &[Pages], &[Sheet.Page] and &[Sheet.Pages] tags.
After executing the operations the general page settings are determined for print.
See also:
Getting Started with the Reports Tool in the Web Application | Setting Up Pixel-Perfect Report | Building Report | Working with Ready Report