This conditional formatting type is used to format the cells with values greater or less than the average.
To set up formatting for the cells with value greater or less than the average, use the Conditional Formatting group of parameters on the side panel.

 Open the Conditional Formatting group of parameters
To open the Conditional Formatting group of parameters:
Select a cell or cell range.
Press the  Settings button on the toolbar. The side panel is hidden by default.
Select the Data area type in the drop-down menu of the side panel title.
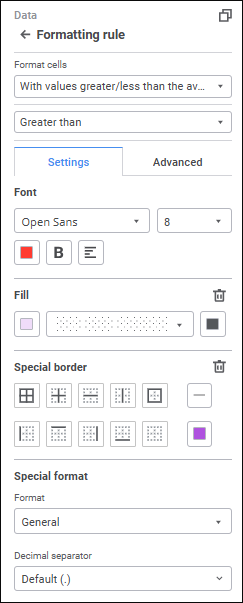
Select the type of formatted values: greater or less than the average.
Determine the settings on the Settings tab in the Conditional Formatting group of parameters:
Set font options:
Font. Select one of the available fonts in the drop-down list.
Font Size. Set the required font size. Size is set in points, it can be entered manually or using the keyboard. The range of available values: [6; 36].
Font Color. Select font color in the drop-down palette. One can select standard and custom colors. The palette contains only standard colors by default.
To create a custom color:
Click the  Add Color button. The advanced color palette opens.
Select a color in the advanced color palette, use color picker to select color on a browser page, or set color code in the RGB or HEX format.
After executing the operations the custom color is created and added to the palette.
To delete custom color from the palette, select the Delete item in the selected color's context menu.
NOTE. The maximum possible number of custom colors in the a palette is 23.
Font Style. Select font style in the button's drop-down menu:
B. Bold.
I. Italic.
U. Underline.
When the button is pressed, the corresponding font style is used. Several styles can be used simultaneously, for example, pressed B and I buttons result in bold italic font style.
Text Alignment. Select a text alignment option in the button's drop-down menu:
 . Left.
 . Center.
 . To the right edge.
Set up fill:
No Fill. Fill is not used.
Solid Fill. Select solid fill color for the plot area in the drop-down palette. If required, specify fill opacity percent.
Two-Color Fill. Select start and end colors of two-color gradient in the drop-down palette. If required, specify tilt angle and fill opacity percent.
Hatching Fill. Execute the operations:
Select solid fill color in the drop-down palette. If required, specify fill color and hatching color transparency percent.
Select texture option in the Hatching drop-down list.
Select hatching color in the drop-down color palette.
Select the borders to be displayed:
All borders.
Inner borders.
Horizontal border between cells.
Vertical border between cells.
Outer border of selected element.
Border is set to the left from the selected element.
Border is set to the top from the selected element.
Border is set to the right from the selected element.
Border is set to the bottom from the selected element.
No borders.
Select border style type in the Line button's drop-down menu. The Without Line option is selected by default, and border is not displayed.
Select border color in the drop-down color palette. If required, specify border fill opacity percent. One can select standard and custom colors. The palette contains only standard colors by default.
Select the format of displayed values in the Format drop-down list. Depending on the selected format, advanced settings of displaying values are available:
When the Number, Currency, Percentage or Exponential value format is selected, in the Decimal Places box determine the number of displayed decimal places using the value editor or the keyboard.
When the Number or Currency value format is selected, in the Negative Numbers drop-down list select the required negative number display option.
When the Currency value format is selected, in the Symbol drop-down list select the required currency.
When the Number value format is selected, select the Thousands Separator checkbox to separate digit groups.
When the Date, Time, or Additional value format is selected, in the Type drop-down list select the required type of displaying values of the selected format.
When the Custom value format is selected, in the Type box select the proper method of displaying values.
Determine the settings on the Advanced tab in the Conditional formatting group of parameters:
Set value alignment option in the Alignment box:
Horizontal. Available options:
By Value. Alignment depends on the cell(s) contents. If a cell contains only numbers (including thousands separators, decimal separators, and the percent sign), it is right-aligned; otherwise, it is left-aligned. Default value.
Left. The value is aligned to the left border.
Center. The value is aligned at the same distance from the left and right cell border taking into account defined margins.
Right. The value is aligned to the right border.
By Width. The value is aligned to fit cell width.
Vertical. Available options:
Top. The value is aligned to the top border.
Center. The value is aligned at the same distance from the top and bottom border taking into account defined margins.
Bottom. The value is aligned to the bottom border. Default value.
Set element margins from cell borders in the Margins group: set margin size from the corresponding cell border in each box.
Determine cell text position settings in the Text Rotation group. To set the angle value, use values between -180° and 180°. Text is always rotated from the standard text position in the cell (rotation angle is 0°), regardless of its actual position at the moment of rotation. If the angle value is positive, text is rotated counter-clockwise; if the value is negative, it is rotated clockwise.
Select cell text wrap option in the Wrap Text group of elements:
Do not Hyphenate. The text is not wrapped. The entire text is displayed as a single line.
By Words. Cell text is wrapped by words. Cell width determines where line breaks occur.
To reset the settings and restore the default style, click the  Delete button.
In the Other group set text contents for cells with empty or zero values.
To reset the settings and restore the default style, click the Delete button.
See also:
Setting Up Conditional Formatting