In this article:
Step 1. Save Technological Account to Connect to DBMS
Step 2. Set Up OAuth/OpenID Connect Protocol Parameters
Step 4. Prepare and Open Web Application
Extended Scheme of Interaction between Web Application and External Service
OAuth 2.0 or OpenID Connect
To authorize users on logging in to repository, the web application can use the OAuth 2.0 or OpenID Connect protocol. User authentication is executed using accounts of the services that support this protocol.
If the external service's user account is contained in the security manager, the repository connection is established and the object navigator opens using this user account.
If the external service's user account is not contained in the security manager, a temporary user is created and added to groups from the list of the attribute specified in userinfo. If the attribute is not set, the temporary user is added to the USERS built-in group.
DBMS connection is executed using technological account.
If required, see the extended scheme of interaction between web application and external service.
Step 1. Save Technological Account to Connect to DBMS
To connect to the repository under the specific user authorized on the external server, determine the settings described in this step for each user and for each repository. Repeat this step on all work cluster nodes.
To set up repository connection:
Start the PP.Util utility located in the folder with installed Foresight Analytics Platform, using command line as an administrator. Below are commands for setting up repository connection. Use PP.Util_start.sh to execute the command in Linux OS, and PP.Util.exe to execute the command in Windows OS instead of PP.Util.
NOTE. When saving the encrypted password of technological account in Linux OS, the AnalyticsPlatform feature is requested. Study the methods for specifying the LSFORCEHOST or LSHOST system variable before executing PP.Util_start.sh.
If it is assumed to authenticate on database server using a common technological account for all external server users, in the security manager one does not need to add all external users but one must add the user whose credentials are used to connect to DBMS as a technological account. In this case, credentials of a common technological account should be saved using the command:
PP.Util /save_creds <repository identifier> /DC <repository (technological account) user name> <user password>
The example of saving data of a common technological account for all users of the external service:
PP.Util /save_creds REPOSITORY_ID /DC TECHNO_ACCOUNT TECHNO_PASSWORD
If authentication is assumed on database server using different technological accounts corresponding to external server user, in the security manager one does not need to add all external users but one must add the users whose credentials will be used to connect to DBMS as corresponding technological accounts. In this case data of each technological account for corresponding external users should be saved using the command:
PP.Util /save_creds <repository identifier> <repository (technological account) user name> <repository (technological account) user password> <repository (external service) user name>
The example of saving data of different technological accounts:
PP.Util /save_creds REPOSITORY_ID TECHNO_NAME1 TECHNO_PASSWORD1 USER1
PP.Util /save_creds REPOSITORY_ID TECHNO_NAME2 TECHNO_PASSWORD2 USER2
PP.Util /save_creds REPOSITORY_ID TECHNO_NAME2 TECHNO_PASSWORD2 USER3
The TECHNO_NAME1, TECHNO_NAME2 users, whose credentials are used as technological accounts, must be added in the security manager. The USER1, USER2, USER3 external service users can be added in the security manager and can be temporary users.
NOTE. The user used as a technological account should have the privileges, which include privileges of corresponding external service users, for which it was saved.
When connecting to repository the system searches for the saved technological account to connect to DBMS:
First, the system searches for the saved technological account corresponding to the external service user.
If such account is not found, the uniform account saved with the /DC parameter by default is used to connect to DBMS.
If there is no uniform account saved with the /DC parameter and the account corresponding to external service user, a connection error occurs.
NOTE. When the user logs in to the system user name obtained from the external service is checked taking into account the format specified in the PPUserNameFormat parameter.
After executing the operations the repository connection is set up.
Step 2. Set Up OAuth/OpenID Connect Protocol Parameters
When authentication via external services is executed, one should set up connection between the client and the BI server via the HTTPS protocol. The state parameter is checked by default to protect from potential CSRF attacks on getting authorization code. If the connection between the client and the BI server is set up via HTTP protocol, create the StateCheckOff parameter and set it to 1 in the registry key [HKLM\SOFTWARE\Foresight\Foresight Analytics Platform\10.0\PP\BIS\System\OAuth] or in the corresponding section of the settings.xml file to disable the check.
For the OAuth or OpenID Connect protocol set subsections with service names and determine registry settings in the key [HKLM\SOFTWARE\Foresight\Foresight Analytics Platform\10.0\PP\BIS\System\OAuth\<service name>] or in the corresponding section of the settings.xml file with the following parameters:
AuthUrl. Authentication server URL, at which a user authentication query will be executed. The user will be redirected at the obtained URL to enter credentials in external service. The URL should contain additional parameters according to protocol specification. Specify the openid value in the scope parameter for the OpenID Connect protocol.
ConsumerKey. Registered application key.
ConsumerSecret. Secret code of the registered application.
Icon. An icon that will be displayed on the repository login button using the OAuth/OpenID Connect authentication service. If the parameter is not set, the button displays only service name. The string with the image in the base64 format is specified as a parameter value.
PPUserNameFormat. The template that will be used to create an identifier of a new temporary user or to search for the existing user in the repository. The template can contain only Latin letters, numbers, characters supported by repository DBMS, and the %s substitution. The %s substitution will be replaced with the user identifier obtained from external service from the attribute specified in UserIdAttr. For example, if the tmp-usr-%s template is used, and after the ivanov.ivan identifier is obtained from external service, the user is searched, or the tmp-usr-ivanov.ivan temporary user is created.
RequestTokenUrl. Authentication service URL, at which token is requested.
UserDataUrl. Authentication service URL, at which user data will be requested after getting the token. It is relevant only for OAuth protocol.
UserIdAttr. Attribute name or path to the attribute in userinfo that will be used as a unique user identifier. For example, the attribute name given_name or the path /path/to/given_name.
UserNameAttr. Attribute name or oath to the attribute in userinfo that will be used as displayed user name. For example, name of the name attribute or the path /path/to/name. Attribute value will be applied only for temporary users.
UserRolesAttr. Attribute name or path to the attribute in userinfo that will be used to get the list of user groups and to add the user temporarily to the obtained groups. It is used if the user account is not created in the security manager, and the required user groups are created in the security manager. For example, name of the groups attribute or the path /path/to/groups. If the UserRolesAttr parameter is not specified, the temporary user is added to the USERS built-in group.
IMPORTANT. The list of user groups must not contain the ADMINISTRATORS built-in group. If this group is in the list, an exception is thrown during the connection.
When setting up repository connection under the specific user authorized on the external server, values of the UserIdAttr and the UserNameAttr parameters may match.
Unique identifier and user name obtained on working with external service using the UserIdAttr and UserNameAttr attributes are recorded:
To the /var/log/apache2-fp10.x/error.log file in Debian based distributions.
To the /var/log/httpd/error-fp10.x.log file in RedHat based distributions.
To the file /var/log/httpd2/error-fp10.x.log for ALT Linux.
Values specified in the ConsumerKey and ConsumerSecret parameters will be obtained after registering developed application on the required OAuth/OpenID Connect authentication server. These parameters are required in order that BI server can check after authorization on OAuth/OpenID Connect server and authorize the corresponding user in the repository.
If the ConsumerKey and ConsumerSecret parameters are not specified, internal settings of the BI server are used; the OAuth/OpenID Connect server must contain registered application based on Foresight Analytics Platform web application.
The example of filling in parameters is given in the System section for the settings.xml file.
NOTE. In the designer of business applications one can set up automatic redirection to user authorization via the OAuth/OpenID Connect protocol when logging in the web application. To do this, in the DBA.config.json file set the OAuth value in the authentication field and specify authorization services determined on setting up parameters for the OAuth or OpenID Connect protocol, in the allowOauthProviders field.
Step 3. Preparing BI Server
Interaction between BI server and external services is executed by means of the libcurl third-party library. To read about library purpose, functions and constraints, see the official website. BI server should work via the HTTPS protocol.
To prepare BI server, check if Internet access is allowed on the server with installed BI server, and make sure that access to services websites is allowed.
If proxy server is used for internet connection, create the system variables:
CURLOPT_PROXY. Set the proxy.sever.ru:8080 value to the variable where proxy server URL and port used for connection are specified.
CURLOPT_PROXYUSERPWD. Set the login:password value to the variable where user name and password for internet connection are specified.
In Linux OS environment variables are contained in the file /opt/foresight/fp10.x-biserver/etc/envvars and are added in the format: <variable name>=<value>.
The environment variables are read on BI server startup with the Apache2 instance. For details about adding environment variables in Linux OS, see the Configuration and Setup section.
NOTE. To track executed operations and get debug info, create the PP_LOG and CURLOPT_VERBOSE environment variables with the 1 value.
If an external service is available via the HTTPS protocol, copy the *.crt root certificate that was used to sign the external service security certificate, to BI server and execute the following operations:
In Linux OS:
Debian-based distributions:
Create the fp-extra-certs folder and move the external service root certificate to it:
sudo mkdir /usr/share/ca-certificates/fp-extra-certs
sudo cp <path to folder>/<certificate name>.crt /usr/share/ca-certificates/fp-extra-certs/fp-extra-ca.crt
After executing the operations the folder /usr/share/ca-certificates/fp-extra-certs with the fp-extra-ca.crt external service root certificate is created.
Open the /etc/ca-certificates.conf file for edit and add a string to the end of the file:
sudo echo "fp-extra-certs/fp-extra-ca.crt" >> /etc/ca-certificates.conf
Apply configuration changes:
sudo update-ca-certificates -v
RedHat-based distributions and ALT Linux:
Copy the external service root certificate to the folder /etc/pki/ca-trust/source/anchors:
sudo cp <path to folder>/<certificate name>.crt /etc/pki/ca-trust/source/anchors/fp-extra-ca.crt
After executing the operations the folder /etc/pki/ca-trust/source/anchors contains the fp-extra-ca.crt root certificate of external service.
Apply configuration changes:
sudo update-ca-trust
In Windows OS import the external service root certificate to a trusted root certification authority store using operating system tools:
Double-click the *.crt root certificate. The Certificate dialog box opens.
Click the Install Certificate button. The certificate import wizard opens.
Select the Current User store location and click the Next button.
Select the Place All Certificates to the Following Store radio button, select the Trusted Root Certification Authorities certificate store in the Select Certificate Store dialog box and click the Next button.
After executing the operations the root certificate is imported to the trusted root certification authority store.
Step 4. Prepare and Open Web Application
The web application should work via the HTTPS protocol. To prepare the web application, use the Metabases.xml file, add the Authentication attribute with the 7 value and fill in the OAuthService section with the attributes:
Providers. The array of authorization service names, which accounts can be used to log in to the web application. Available values are determined by the services specified on setting up OAuth/OpenID Connect protocol parameters and are specified via a semicolon. Mandatory attribute.
AutoStartProvider. Index of the authorization service specified in the Providers parameter array. On an attempt to log in to the web application using the OAuth or OpenID Connect protocol, the system automatically redirects to the selected service. Optional attribute.
If the service that is not contained in the Providers parameter is used as a parameter value, automatic redirection is not executed.
The example of the Metabases.xml file:
<PP>
    <Metabases>
        <REPOSITORY_ID Name="REPOSITORY_ID" Authentication="7" Package="STANDARDSECURITYPACKAGE">
            <OAuthService AutoStartProvider="0" Providers="Google"/>
            <LogonData DATABASE="DATABASE_NAME" CASESENSITIVE="true" SERVER="SERVER_DATABASE"/>
        </REPOSITORY_ID>
    </Metabases>
</PP>
An alternative method of preparing the web application is adding identical parameters to the registry section:
[HKEY_CURRENT_USER\SOFTWARE\Foresight\Foresight Analytics Platform\10.0\Metabases\<repository identifier>] - specific repository settings for the current user, regardless of the system bitness.
[HKEY_LOCAL_MACHINE\SOFTWARE\Foresight\Foresight Analytics Platform\10.0\Metabases\<repository identifier>] - specific repository settings when bitness of Foresight Analytics Platform matches with that of the operating system. For all users.
After making changes restart the BI server and open the web application. The login dialog box will display system authorization buttons using by means of the OAuth or OpenID Connect protocol:
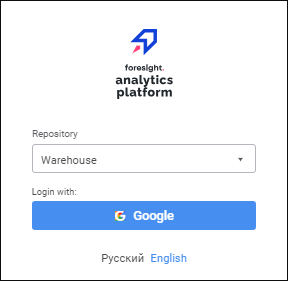
Select the repository and click the button of one of the authorization services. Then the corresponding service account page opens, for example, Google. Enter user name and password on the service page. If authorization is successful, the object navigator opens.
Extended Scheme of Interaction between Web Application and External Service
Scheme of interaction between web application and external service:
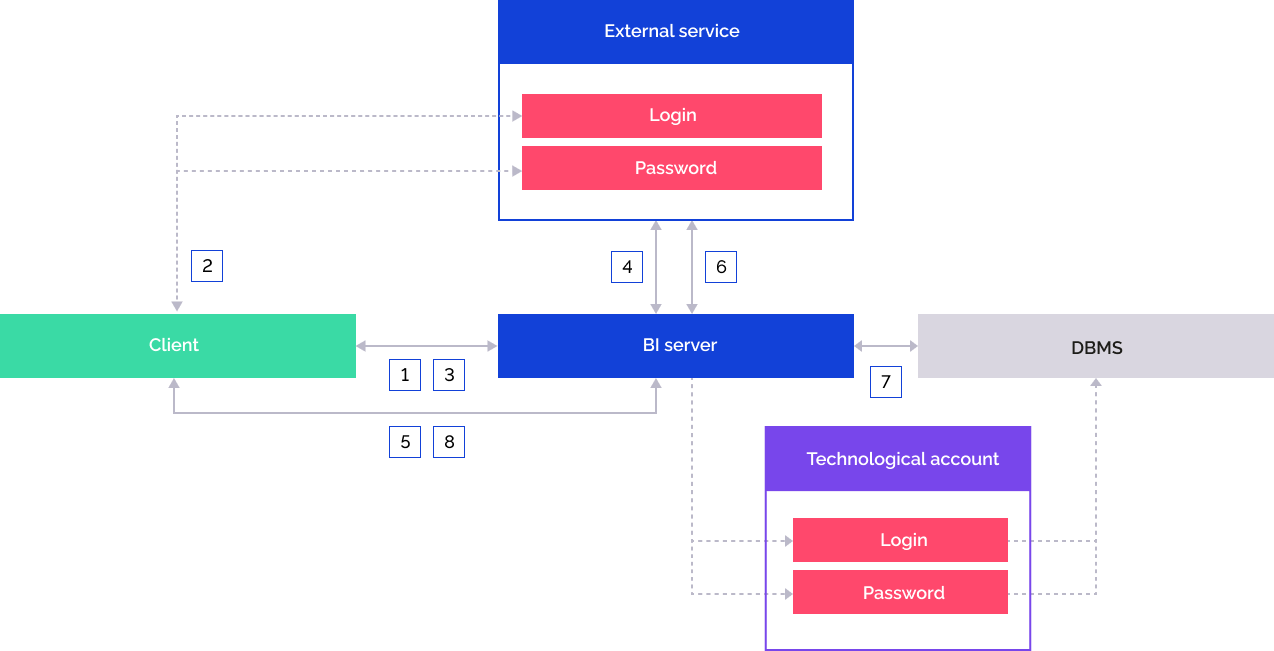
The user selects the repository configured to work with an external service:
BI server handles the request to send external service settings and to display corresponding buttons in the login dialog box.
The user clicks the buttons of corresponding external service in the login dialog box, and the authorization page opens. The user enters login and password.
If the user is successfully authenticated, the user is redirected to the web application, and the client gets authorization confirmation code.
The client sends the request to BI server to get external service authorization token. The request contains the authorization confirmation code and web application URL.
The BI server sends request to the external service to get the authorization token. The request is executed via the authorization service URL specified in the RequestTokenUrl parameter. The external service handles the request using the authorization confirmation code and returns the data:
access_token. Authorization token.
id_token. Identification token, if the scope additional parameter is set in the AuthUrl parameter for the OpenID Connect protocol.
refresh_token. Token for periodic refresh of the authorization token.
expires_in. Authorization token expiration time. During the opened repository session, a request to refresh access_token and refresh_token is executed after the authorization token is expired. If the user session is inactive on the external service or the server is unavailable, the repository connection will be interrupted.
The obtained data determines the current authorization state. The following is used as the authorization states storage:
State server. The saved data is automatically deleted after server records store time is expired.
BI server RAM. The saved data is automatically deleted on BI server restart.
The BI server creates a unique key of the current authorization state in the storage and sends its to the client. The client sends request to the BI server to connect to repository. The BI server sends the unique key of the current authorization state.
The BI server sends request to the external service to get authorized user data. The external service handles the query based on the value of the UserDataUrl parameter and returns information about the user, including user name that will be displayed in the object navigator and security manager.
The BI server addresses the DBMS by means of the previously saved technological account.
The BI server returns session moniker to the client. The user is redirected to the object navigator.