 Insert button in the Header or Footer groups of parameters on the side panel and select the Image option.
To enhance the clarity of reports, one can insert images from file or repository.
Only one image can be added to the current header or footer section.
To insert an image to header or footer, click the Insert button in the Header or Footer groups of parameters on the side panel and select the Image option.
A standard file selection dialog box opens after executing the command. Select the required image file and click the Open button. Images of the following formats can be used in headers and footers: JPEG, PNG, GIF, BMP and TIF.
After the image is inserted from file or repository, the header or footer editing dialog box displays the text &[Picture]:
To set up the image inserted to header or footer, use the Image group of settings:
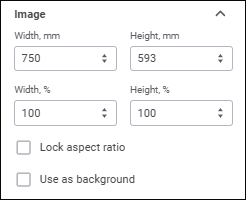
Set image options:
Size. Using the keyboard or the Width (mm) and Height (mm) value editors, set image height and width in millimeters. The values match the image width and height by default.
Zoom. Using the keyboard or the Width (%) and Height (%) value editors, set image zoom relative to its original size. Default values are set to 100%.
Lock Aspect Ratio. If the checkbox is selected, the image can be resized with its proportions unchanged.
Use as Background. When the checkbox is selected, the image can be used as the background for the header or footer section text.
All changes in image options are reflected in the preview area.
NOTE. Export of images in headers and footers is available only to PDF and RTF documents.
See also: