 To open the dialog box
Custom buttons are displayed on the toolbar and are used for manual execution of Fore units or JavaScript functions (JS-functions), opening repository objects and starting calculation algorithms.
Available operations:
Custom buttons can be set up using corresponding tabs in the Custom Button Settings dialog box.
Select the  Set Up Toolbar item in the toolbar's context menu.
Select the custom tab on the toolbar in the list.
Select the button, after which the new button should be placed. It this is the first button that is added to the tab, skip this step.
Select the Add > Custom Button item in the button's drop-down menu.
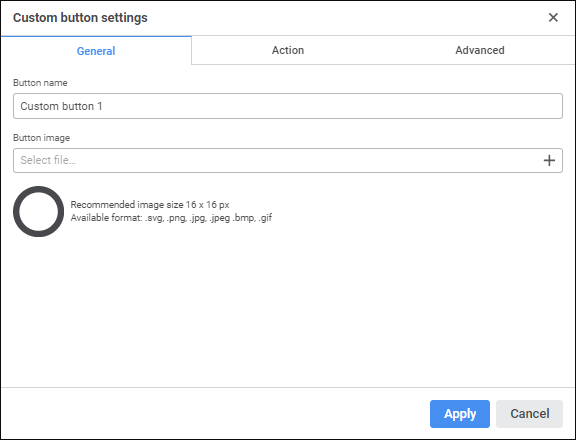
Determine general button settings:
Button Name. Enter a custom button name. By default: Custom button N, where N - button number.
Custom button name can be saved in different languages depending on the current language selected in the login dialog box, or using the resource included in object contents. For details see the Setting Up Multilingual Options section.
Button Icon. Select a button icon that will be displayed on the toolbar. To do this, click the Load Icon button and select an image in the dialog box that opens. Supported image formats: SVG, PNG, JPG, BMP and GIF. The default button icon is  .
.
NOTE. It is recommended to use images with the size 16x16 pixels as button icons. If image size is larger than 16x16 pixels, it is automatically resized to fit the recommended size.
To reset the specified image and set a default icon, click the  Reset Icon button.
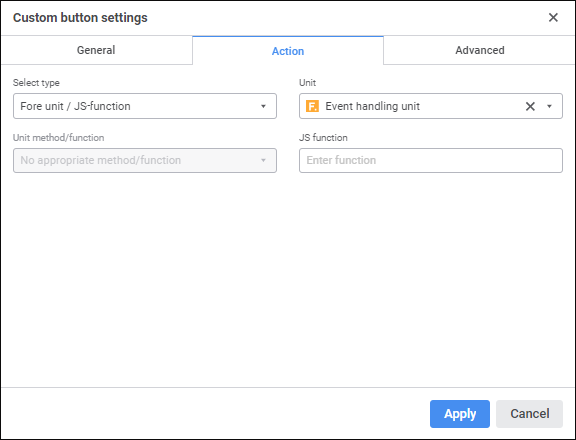
Select button type in the Select Type drop-down list.
 Set up repository object opening
If the Open Repository Object type is selected, determine the additional settings:
Open Repository Object. Select in the drop-down list the repository object that will open on button click:
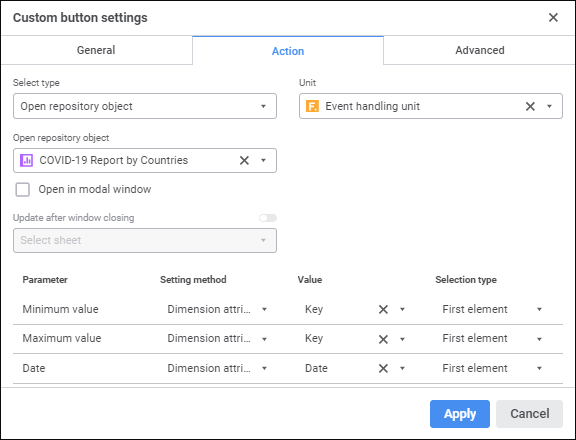
The following can be selected as a repository object: data entry form, regular report, web form or MDM dictionary.
To quickly select an object, enter its name/identifier/key in the search box depending on display settings. Search is executed automatically while the searched text is entered into the search string. The list will display the objects, which names/identifiers/keys contain the entered text.
To set up displaying of repository objects in the list, click the Display Object button and select display option in the drop-down menu:
Name. Objects are displayed with their names. Default option.
Identifier. Objects are displayed with their identifiers.
Key. Objects are displayed with their keys.
Several options can be selected. Identifier and key will be specified in brackets.
NOTE. The object used in a custom button is included in the hierarchy of data entry form objects. To view the hierarchy of data entry form objects, use the Consists Of tab of the Object Properties window in the object navigator.
Unit. If required, select the Fore unit in the drop-down list. The unit can be used for prehandler, posthandler, for managing button activity, which can be set up on the Advanced tab. Only one unit can be set for the button.
Select the checkbox if required:
Open in Modal Window. The checkbox is deselected by default. When the checkbox is selected, work with parent data entry form is locked during object opening.
The switch becomes active after the Open in Modal Window checkbox is selected. The switch becomes active after the Open in Modal Window checkbox is selected. In the drop-down list select the sheets to be updated after closing the object.
NOTE. Saving data in the opened modal dialog window is mandatory for updating sheets after closing the object.
Set parameters for objects with parameters:
Setting Method. In the drop-down list select:
Do not Send. Default value. Nothing is sent to the parameter on object opening.
Object Parameter. The data entry form or report parameter value is sent to the parameter on opening the object.
Dimension Attribute. Value of the first element attribute or all elements of the selected dimension from the selected table area is sent to the parameter on object opening.
Manually. The specified value is sent to the parameter on object opening.
Value. Box contents depends on the selected value sending method:
If the Do Not Send value sending method was selected, the box is disabled.
If the Object Parameter value sending method was selected, select the parameter in the drop-down list. The list displays available data entry form parameters. The list of data entry form parameters is filtered by object parameter type. Only one parameter can be selected.
If the Dimension Attribute value sending method was selected, select the attribute in the drop-down list. The list displays all available attributes of all table area dimensions in the data entry form. Only one attribute can be selected.
If the Manually value sending method was selected, the Value box displays the editor corresponding to parameter type. Only one element can be selected.
Selection Type. The drop-down list is available if the Dimension Attribute value sending method was selected. In the drop-down list select:
First Element. The selected attribute of the first dimension element from selection is sent to the parameter.
All Elements. Values of the selected attribute of all dimension elements from selection are sent to the parameter.
If a web form opens on custom button click, the system registers the active regular report, with which the web form is linked, within the user session. The active report is returned by the PrxReport.ActiveReport static property that is available in the Fore language. If several web forms are used, which are called from different reports, the active report will be the one, from which the last web form was called until its closing, within the same session.
If there are several simultaneously opened regular reports and web forms, the PrxReport.ActiveReport property can work incorrectly because it returns the last report, from which the web form was opened. The active report can be changed using the SetActiveReport operation.
To work with a report from web form, one should save the active report to the global variable declared at the web form class level. The active report should be written to the variable in the onShow event:
Class TESTWebForm: WebForm
activeRep: IPrxReport;
activeSheet: IPrxSheet;
Sub TESTWebFormOnShow;
Begin
activeRep := PrxReport.ActiveReport;
activeSheet := activeRep.ActiveSheet;
// Further work with report
End Sub TESTWebFormOnShow;
End Class TESTWebForm;
If the Algorithm Calculation type is selected, determine the additional settings:
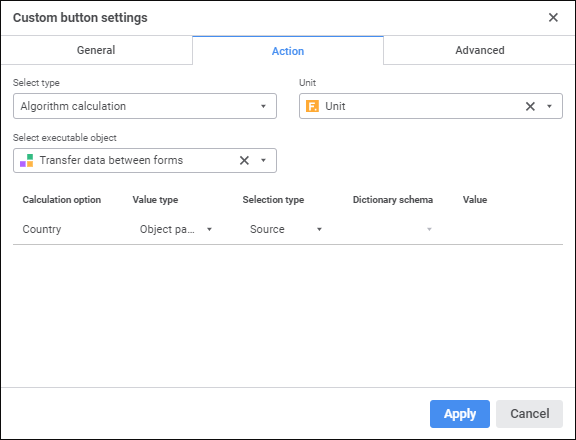
Select Executable Object. In the drop-down list select the calculation algorithm that will be executed on button click:
To quickly select an object, enter its name/identifier/key in the search box depending on display settings. Search is executed automatically while the searched text is entered into the search string. The list will display the objects, which names/identifiers/keys contain the entered text.
To set up displaying of repository objects in the list, click the Display Object button and select display option in the drop-down menu:
Name. Objects are displayed with their names. Default option.
Identifier. Objects are displayed with their identifiers.
Key. Objects are displayed with their keys.
Several options can be selected. Identifier and key will be specified in brackets.
NOTE. The calculation algorithm used in a custom button is included in the hierarchy of data entry form objects. To view the hierarchy of data entry form objects, use the Consists Of tab of the Object Properties window in the object navigator.
Unit. If required, select the Fore unit in the drop-down list. The unit can be used for prehandler, posthandler, for managing button activity, which can be set up on the Advanced tab. Only one unit can be set for the button.
Set parameters for calculation algorithms with parameters:
Value Type. Determine the values that are used on algorithm calculation:
Object Parameter. Calculation uses object parameter value.
Constant Value. Calculation uses a constant value.
Selection Type. Depending on the selected value type:
If the Object Parameter type is selected, select the selection type in the drop-down list. Available values: Source, First Element, Last Element, Source+Child, Source+Child (recursive), Child, Child (recursive).
If the Constant Value type is set, selection type is unavailable.
Dictionary Schema. Select selection schema of dictionary used as algorithm parameter in the drop-down list. If selection schema is not set up for the dictionary, the list will be empty.
NOTE. Dictionary selection schema has a higher priority than selection type.
Value. Depending on the selected value type:
If the Object Parameter type is selected, determine report parameter or parameter attribute by selecting it in the drop-down list.
If the Constant Value type is selected, set the constant value.
If the Fore/JS-Function Unit type is selected, determine the additional settings:
Unit. Select the Fore unit in the drop-down list. Only one unit can be set for the button.
To quickly select an object, enter its name/identifier/key in the search box depending on display settings. Search is executed automatically while the searched text is entered into the search string. The list will display the objects, which names/identifiers/keys contain the entered text.
To set up displaying of repository objects in the list, click the Display Object button and select display option in the drop-down menu:
Name. Objects are displayed with their names. Default option.
Identifier. Objects are displayed with their identifiers.
Key. Objects are displayed with their keys.
Several options can be selected. Identifier and key will be specified in brackets.
Unit Method/Function. Select unit method or function in the drop-down list. The function should have the required signature:
Public Sub <Function name>(<Report>: IPrxReport);
Begin
…
End Sub <Function name>;
Parameter:
Report. The regular report is sent to the parameter in the IPrxReport format. When working with this object, all properties and methods of the IPrxReport.
NOTE. If the unit does not contain methods and functions satisfying the required signature, the Unit Method/Function list is disabled.
The example of function:
Sub SubButtons(Report: IPrxReport);
Var
TSheet: ITabSheet;
Begin
TSheet := (Report.ActiveSheet As IPrxTable).TabSheet;
TSheet.Cell(0, 0).Value := DateTime.Now.ToString;
TSheet.Recalc;
End Sub SubButtons;
JS Function. Specify function name in the JavaScript language that should be started after the button action is executed. The signature to enter function name:
javascript:<Function name(custom parameters, callback, args)>
NOTE. Using angle brackets when specifying function name with parameters is mandatory.
Parameters:
Custom parameters. Custom button values according to the signatures of the called function. Optional parameter.
callback. Callback function. Mandatory parameter.
args. Function arguments generated by the platform. Optional parameter that allows for getting access to the object, from which JS-function was executed.
The examples of specifying function name:
javascript:<Test(callback)> - simple JS-function call without sending parameters to it.
javascript:<CalculateAB(100, "200", callback)> - JS-function call with sending two values of different types.
javascript:<Check(callback, args)> - JS-function call with the ability to access the object, from which the function was called.
If JS-function and Fore function are specified, Fore function is firstly executed and then JS-function.
The web application contain various resources that can be used in JS function code.
For details about signature and connecting JS-function to data entry form see the Connecting Custom JS-Function section.
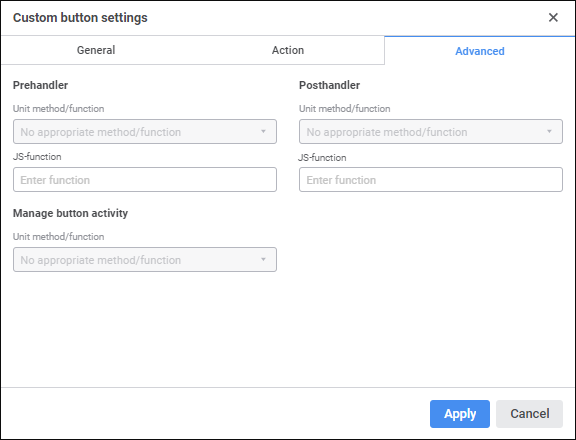
After the Fore unit is set up, set up prehandler, posthandler, and button activity management.
The prehandler is used to display a text message with user-defined text on clicking the custom button. For example, a prehandler with a message about calculation start that may take long time can be set up for the button that starts calculation. In this case, clicking the button before the calculation displays the configured message.
To set up posthandler, set the parameters:
Unit Method/Function. Select unit method or function in the drop-down list. The box is available only after the unit is selected.
The list contains all methods and functions of the selected unit corresponding to the signature:
Function <Function name>(<Report>: IPrxReport; [Var messageType: Integer]): String;
NOTE. If the unit does not contain methods and functions satisfying the required signature, the Unit Method/Function list is disabled.
Parameters:
Report. The regular report is sent to the parameter in the IPrxReport format. When working with this object, all properties and methods of the IPrxReport.
messageType. Optional parameter. It is used to determine displayed message format. If the parameter is not set, a confirmation dialog box is displayed. To hide the displayed message, set the returned value to Return. Available values:
0. Confirmation dialog box. Clicking the Yes button in the dialog box executes the operation specified for the button. Clicking the No button cancels the operation selected for the button.
1. Error. Clicking the OK button in the dialog box does not execute the operation specified for the button.
2. Warning. Clicking the OK button in the dialog box does not execute the operation specified for the button.
3. Information message. Clicking the OK button in the dialog box does not execute the operation specified for the button.
The example of function:
Function MessageInformationBox(Report: IPrxReport; Var messageType: integer): String;
Begin
messageType := 3;
Return "Operation will be available when all data will be entered";
End Function MessageInformationBox;
JS Function. Specify function name in the JavaScript language that should be started after the button action is executed. The signature to enter function name:
javascript:<Function name(custom parameters, callback, args)>
NOTE. Using angle brackets when specifying function name with parameters is mandatory.
Parameters:
Custom parameters. Custom button values according to the signatures of the called function. Optional parameter.
callback. Callback function. Mandatory parameter.
args. Function arguments generated by the platform. Optional parameter that allows for getting access to the object, from which JS-function was executed.
The examples of specifying function name:
javascript:<Test(callback)> - simple JS-function call without sending parameters to it.
javascript:<CalculateAB(100, "200", callback)> - JS-function call with sending two values of different types.
javascript:<Check(callback, args)> - JS-function call with the ability to access the object, from which the function was called.
If JS-function and Fore function are specified, Fore function is firstly executed and then JS-function.
The web application contain various resources that can be used in JS function code.
For details about signature and connecting JS-function to data entry form see the Connecting Custom JS-Function section.
The posthandler is used to execute required operations after finishing method work Only one posthandler can be set.
To set up posthandler, set the parameters:
Unit Method/Function. Select unit method or function in the drop-down list. The box is available only after the unit is selected.
The list contains all methods and functions of the selected unit corresponding to the signature:
Sub <Method name>(<Report>: IPrxReport);
NOTE. If the unit does not contain methods and functions satisfying the required signature, the Unit Method/Function list is disabled.
Parameter:
Report. The regular report is sent to the parameter in the IPrxReport format. When working with this object, all properties and methods of the IPrxReport interface.
The example of function:
Sub UpdateData(Report: IPrxReport);
Var
SheetT: IPrxTable;
ItemIndex: Integer;
Begin
ItemIndex := Report.ActiveSheet.Index;
SheetT := Report.Sheets.Item(ItemIndex) As IPrxTable;
SheetT.TabSheet.CellValue(10,10) := 1000000;
End Sub UpdateData;
JS Function. Specify function name in the JavaScript language that should be started after the button action is executed. The signature to enter function name:
javascript:<Function name(custom parameters, callback, args)>
NOTE. Using angle brackets when specifying function name with parameters is mandatory.
Parameters:
Custom parameters. Custom button values according to the signatures of the called function. Optional parameter.
callback. Callback function. Mandatory parameter.
args. Function arguments generated by the platform. Optional parameter that allows for getting access to the object, from which JS-function was executed.
The examples of specifying function name:
javascript:<Test(callback)> - simple JS-function call without sending parameters to it.
javascript:<CalculateAB(100, "200", callback)> - JS-function call with sending two values of different types.
javascript:<Check(callback, args)> - JS-function call with the ability to access the object, from which the function was called.
If JS-function and Fore function are specified, Fore function is firstly executed and then JS-function.
The web application contain various resources that can be used in JS function code.
For details about signature and connecting JS-function to data entry form see the Connecting Custom JS-Function section.
Set up button activity management
To set up button activity management, set the Unit Method/Function parameter, in which select the unit method or function in the drop-down list. The box is available only after the unit is selected.
The list contains all methods and functions of the selected unit corresponding to the signature:
Function <Function name>(<Report>: IPrxReport): Boolean;
NOTE. If the unit does not contain methods and functions satisfying the required signature, the Unit Method/Function list is disabled.
Parameter:
Report. The regular report in the IPrxReport format is sent to the parameter. When working with this object, all properties and methods of the IPrxReport interface are available. Available values:
True. The button is active.
False. The button is inactive.
NOTE. The condition execution check is permanently running, that is why Fore function must be executed quickly, otherwise the data entry form will not work.
See also: