 Table templates
When working with a text sheet, the following objects can be added to the sheet:
To add a table template to the text sheet:
Click the ![]() Insert Table button in the Table group of the Text Sheet.Format ribbon tab.
Insert Table button in the Table group of the Text Sheet.Format ribbon tab.
Select the Insert Table item in the text sheet's context menu.
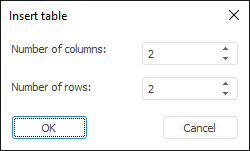
The Insert Table dialog box opens:

Use value editors to specify the number of columns and rows of the added table.
A table template is added to the text sheet. Fill it with required data.
To add a table copy from a standard report sheet:
Copy the required table.
Go to the text sheet. Then:
Select the Insert item in the text sheet's context menu.
Press CTRL + V.
Mind the following on adding a table from standard sheet:
Cell text cannot be rotated.
Diagonal cell borders are not displayed.
Cells are not lined up.
To add a data table to the text sheet:
Click the ![]() Insert Data Table button in the Insert group on the Text Sheet.Format ribbon tab.
Insert Data Table button in the Insert group on the Text Sheet.Format ribbon tab.
Select a source to create a table in the text sheet in the drop-down menu of the button.
NOTE. The list shows objects of both visible and hidden report sheets.
When objects are pasted from the clipboard, the object moves to the current position of the cursor.
On changing of data in table sources' data, the table is rebuilt.
When sources are deleted, the tables built based on these sources on the text sheet are also deleted.
Settings of the added tables built based in these sources cannot be changed.
The added tables located on the text sheet enable the user to go to the data area used as their base. To do this, select the Go to Range item in the added table's context menu. The sheet containing a source object opens. The sheet is scrolled in the way to show the source object in the visible part of the sheet.
The operation is available only for added table templates.
To insert rows or columns into the table, put the cursor to the table cell, relative to which it is required to insert rows or columns, then:
Select the Insert Cells item in the cell's context menu.
Click the Insert Cells button in the Table group on the Text Sheet.Format ribbon tab.
Select insert option in the drop-down list:
Row Above. A row is inserted above the current one.
Row Below. A row is inserted below the current one.
Column Left. A column is inserted to the left from the current one.
Column Right. A column is inserted to the right from the current one.
After selecting one of the options, a row or column is inserted into the table.
To set up formatting of the table placed on the text sheet, select the Table Properties item in the table's context menu.
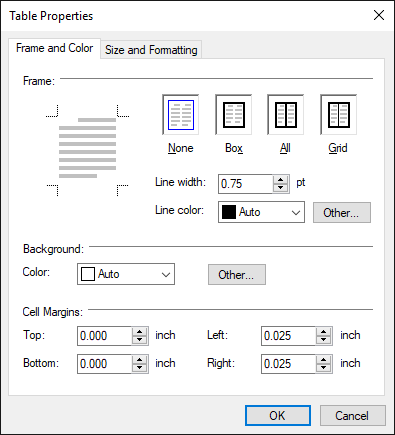
The Table Properties dialog box opens:

Determine general table settings on the Frame and Color tab:
Box. Set up table frame:
Frame and grid lines. A table frame presents external vertical and horizontal table borders. A table grid presents internal vertical and horizontal borders between table cells.
Select table grid and frame display option by means of the buttons:
None. Table frame and grid are not displayed.
Box. Only table frame is displayed.
All. Table frame and grid are displayed.
Grid. Only table grid is displayed.
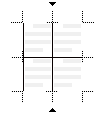
To add or remove specific lines of frame and/or grid, click the sample with the main mouse button:

Line Width. Set the required line width of frame and/or grid manually or use the value editor.
Color. Select frame and/or grid line color in the drop-down palette. Clicking the Other button opens the advanced color palette.
NOTE. If specific frame or grid lines are displayed, width and color are applied only to the line that is located in the sample area between the ▼ and ▲ icons or between the ► and ◄ icons.
Background. Set table cell fill color:
Color. Select table cell fill color in the drop-down palette. Clicking the Other button opens the advanced color palette.
Cell Margins. Use appropriate value editors to set internal cell margins.
Determine cell settings on the Size and Formatting tab:
Cell Height. Select the radio button next to the cell height autofit mode:
Auto. Cell height is determined automatically.
Minimum. Set the required cell height manually or use the value editor.
Formatting. In the drop-down list select alignment of table cell values: top, centered, or bottom.
Options. Set position of table cell values:
Allow Row to Break Across Pages. If the checkbox is selected, table cell values are broken by characters.
Repeat as Header Row at the Top of Each Page. If the checkbox is selected, values of selected cells are repeated on each table page.
The operation is available only for added table templates.
To delete rows or columns from the table, put the cursor to the table cell, or select the cell range included into the rows or columns required to delete, then:
Select the Delete Cells > Delete Rows or Delete Columns items in the selected range's context menu.
Select the Delete Cells > Delete Rows or Delete Columns items in the Table group of the Text Sheet.Format ribbon tab.
The rows or columns containing selected cells are deleted.
To delete a table from the text sheet, put the cursor to any table cell, then:
Select the Delete Cells > Delete Table item in the Table group of the Text Sheet.Format ribbon tab.
Select the Delete Cells > Delete Table item in the cell's context menu.
NOTE. The context menu item is available only for added table templates.
See also:
Inserting Tables, Charts and Maps from Table Sheet | Using Text Sheet | Adding a Text Sheet and Working with It | Add a Text Field | Setting Up Report Formatting