 To open the group of parameters
To set up print options, use the Print group of parameters on the side panel:
 To open the group of parameters
Execute one of the operations:
Select the Page Settings item in the Page Layout group of commands in the main menu.
Select the File > Print > Preview item in the main menu.
Click the  Print button on the Home toolbar tab.
Press CTRL+P.
Click the  Page Settings button at the top right corner.
Go to the Print group of parameters.
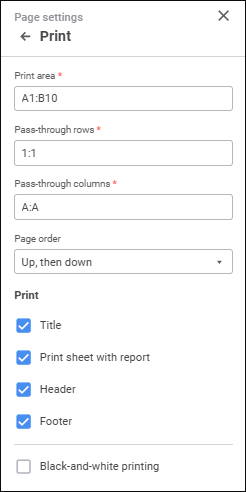
Set the parameters:
In the Print Area box enter the cell range to be printed.
Pass-through rows and pass-through columns
Set row and/or column ranges, which are required to print on every page in the Pass-Through Rows and Pass-Through Columns boxes.
When setting row and column ranges consider the following:
Ranges for pass-through rows and columns must include whole rows or columns.
On entering a composite range, ranges are separated with ";".
If the range entered from the keyboard does not include whole rows or columns, it is replaced with a whole row/column range, which contain the selected cells. For example, if the pass-through rows were entered as A1:F1; A10:A12, they will be replaced with 1:1; 10:12.
If intersecting or adjacent ranges are set (for example, 0:0 and 1:1), they are merged into one range.
When setting several ranges, they are ordered in the Pass-Through Rows and Pass-Through Columns boxes in ascending order for rows, and from left to right for columns.
NOTE. Using a Fore macro and using the TitleRowsScope/TitleColumnsScope properties, one can limit scope of pass-through rows and columns.
To set up page order during printing, select the option in the drop-down list:
Left, then Right. Report pages are printed first to the left, then to the right.
Up, then Down. Report pages are printed first up, then down.
When setting a composite range of pass-through rows or columns, consider the following output sequences:
If two or more ranges of pass-through rows were set, the data located between the first and the second range of pass-through rows are output first, then those between the second and the third range, and so on. If in this case the range of pass-through columns was set, it is interrupted with the ranges of pass-through rows.
If a report contains several tables that fit to width of one sheet, pass-through rows are set for the table, and there is still free space after the table is output to the page, the next table will be output to the same page considering the pass-through rows specified for this table and at least one data row.
When a pass-through row is set for several tables located one after another, consider that the range of pass-through rows is set for a whole row and not for a cell range.
If two or more ranges of pass-through columns were set, the data located between the first and the second range of pass-through columns is output first, then those between the second and the third range, and so on. If in this case the range of pass-through rows was set, it is interrupted with the ranges of pass-through columns.
If a report contains several tables that fit to height of one sheet, pass-through columns are set for the table, and there is still free space after the table is output to the page, the next table will be output to the same page considering the pass-through columns specified for this table and at least one data column.
On setting a pass-through column for several tables located one after another, consider that the range of pass-through columns is set for a whole column and not for a cell range.
To print report title, select the Print Title checkbox.
NOTE. The title is displayed only on the first page of each report sheet.
The report title can be set up in the Title group of parameters.
To print the current report sheet, select the Print Sheet with Report checkbox. The checkbox is selected by default.
When the checkbox is deselected, the report sheet is not printed. Consider that:
When the entire report is printed, this sheet is not printed.
When the report is exported to PDF and RTF, this sheet is unavailable for export.
When the Print Header or Print Footer checkbox is deselected, header or footer is hidden.
If the Black-and-White Printing checkbox is selected, all color formatting is reset on preview and print: the whole text, headers and footers are printed in gray shades regardless of the specified colors, the background is white. The checkbox is deselected by default.
NOTE. If black-and-white printing is used, image quality can be worse on preview. This does not affect the printing quality.
After executing the operations the print options are determined.
See also:
Setting Up Pixel-Perfect Report