In this article:
Setting Up Interaction between Client and Web Server via the HTTPS Protocol
Step 1. Placement and Installation of Security Certificates
Setting Up Web Application Work via HTTPS
Hypertext Transfer Protocol Secure (HTTPS) is an extended version of the Hypertext Transfer Protocol (HTTP) that uses encryption using the Transport Layer Security (TLS) protocol. The TLS protocol is cryptographic and and is used to create a protected communication channel between computers in the network. Cryptographic methods ensure confidentiality and integrity of transferred data, single-factor or two-factor authentication.
Security certificates are used to ensure trust between the server and the client interacting via the HTTPS protocol. Security certificates include a set of information about the certificate owner, the certificate owner's public key, the subject that issued and signed the certificate, and information for certificate validation.
The following security certificate types are required to ensure interaction between the server and the client via the HTTPS protocol:
Root certificate. It is issued by a Certification Authority (CA). The trust between the server and the client via the root certificate is used to build a chain of trust for other certificates. Therefore, a single trust space is created.
Intermediate certificate. It is issued by the intermediate certification authority and is signed by the root certification authority or other intermediate certification authority. The hierarchy of certification authorities is used to resolve various private tasks of issuance and maintenance of issued certificates.
Server certificate. It is used to authenticate the Apache2 web server in Linux OS or IIS in Windows OS.
Foresight Analytics Platform also supports web application work via the HTTPS protocol using by means of the GOST encryption. The GOST encryption requires the use of the means of cryptographic information protection: CryptoPro CSP, ViPNet CSP, Crypto-COM, MagPro CryptoPacket, and so on. The means of cryptographic information protection must be compatible with the operation environment of Foresight Analytics Platform and installed on the web application server and on the client computer. The means of cryptographic information protection are not included in the software package of Foresight Analytics Platform. Web application work via the HTTPS protocol is set up by means of the GOST encryption according to the documentation of the corresponding means of cryptographic information protection.
For details about web application work in the Chromium-Gost browser by means of CryptoPro SCP, see the Setting Up Web Application Work in Chromium-Gost Browser section.
Set up one of the options of interaction between web application configuration elements:
Client > HTTPS > web server > HTTPS > BI server.
Client > HTTPS > web server > HTTP > BI server.
When the web application works via the HTTPS protocol, also set up the work of web forms that use the WebSocket protocol. For details see the Setting Up Web Forms Work via HTTPS section.
Setting Up Interaction between Client and Web Server and between Web Server and BI Server via the HTTPS Protocol
Consider setting up of interaction between client and web server and between web server and BI server via the HTTPS protocol in Linux OS. Web server and BI server can be located on one physical server or on different ones.
To set up interaction between client and web server and between web server and BI server via the HTTPS protocol:
Make sure that the system contains the following folders:
For BI server:
/opt/foresight/fp10.x-biserver. Main files of BI server.
/etc/apache2-fp10.x. Configuration files of the Apache2 instance with BI server when Debian-based distributions are used.
/etc/httpd-fp10.x. Configuration files of the Apache2 instance with BI server when RedHat-based distributions are used.
/etc/httpd2-fp10.x. Configuration files of the Apache2 instance with BI server when ALT Linux is used.
For web server:
/opt/foresight/fp10.x-webserver. Main files of web server.
/etc/opt/foresight/fp10.x-webserver. The additional configuration file envvars of web server instance to set Apache2 environment variables.
/etc/apache2-fp10.x-web. Configuration files with the Apache2 instance with web server when Debian-based distributions are used.
/etc/httpd-fp10.x-web. Configuration files of the Apache2 instance with web server when RedHat-based distributions are used.
/etc/httpd2-fp10.x-web. Configuration files of the Apache2 instance with web server when ALT Linux is used.
NOTE. The specified folders are created by default during web application installation.
Determine DNS name of the server:
sudo hostnamectl set-hostname <DNS name of the server>
Download and unarchive the enable_https.zip archive. Place the enable_https.sh script in the home folder /home/<user name>.
Open the enable_https.sh script for edit and change values of preconfigured parameters if the system contains a set of ready security certificates:
CERT_DIR=./fp-certs
SERVER_CRT_NAME="fp_server.crt"
SERVER_KEY_NAME="fp_server.key"
Description of variables:
CERT_DIR. The path to the folder with the security certificate. The default path: ./fp-certs.
SERVER_CRT_NAME. Server certificate file name with the *.crt extension. The default name: fp_server.crt.
SERVER_KEY_NAME. Name of the server certificate private key with the *.key extension. The default name: fp_server.key.
NOTE. Skip the step to automatically generate self-signed security certificates. The self-signed certificates are linked to the DNS name of the server determined at Step 2.
Replace the current folder with the folder with the script:
cd /home/<user name>/enable_https.sh
Grant access permissions for script execution:
sudo chmod +x enable_https.sh
Run the script:
If address of the PPService.axd web service is specified in web application configuration files:
sudo ./enable_https.sh
If address of the PP.SOM.Som web service is specified in web application configuration files:
sudo ./enable_https.sh service
If web server and BI server are located on different physical servers, DNS name of the BI server and web server will be requested during script execution.
After executing the operations the web application is set up to work via the HTTPS protocol.
During the script execution:
The HTTP protocol is changed to HTTPS in configuration files of the web application:
/opt/foresight/fp10.x-webserver/r/config/config.json;
/opt/foresight/fp10.x-webserver/config/PP.xml;
The <VirtualHost *:8810> section is added with SSL and CORS settings for BI server:
/etc/apache2-fp10.x/mods-available/fp10.x-biserver.conf in Debian-based distributions.
/etc/httpd-fp10.x/conf.d/fp10.x-biserver.conf in RedHat-based distributions.
/etc/httpd2-fp10.x/conf/mods-enabled/fp10.x-biserver.conf in ALT Linux.
SSL settings and paths to web server security certificates are added:
/etc/apache2-fp10.x-web/sites-available/webserver.conf in Debian-based distributions.
/etc/httpd-fp10.x-web/conf.d/00-virtualhost.conf in RedHat-based distributions.
/etc/httpd2-fp10.x-web/conf/sites-enabled/000-default.conf in ALT Linux.
The PP_SOM variable is changed in the file /etc/opt/foresight/fp10.x-webserver/envvars.
The /home/<user name>/fp-certs folder is created with self-signed security certificates if Step 4 was skipped: the fp_server.crt server certificate; the fp_server.key server certificate private key; the fp_ca.crt root certificate; the fp_ca.key root certificate private key. Validity period of self-signed certificates is 1024 days.
The server certificate and its private key are copied from the folder specified in the CERT_DIR variable to the /opt/foresight/ssl/ folder.
The *.bak files are added to save backup copies of the changed files. Each file is created in the folder with the changed file. For example, the file /opt/foresight/fp10.x-webserver/r/config/config.json.bak containing settings before script execution.
Setting Up Interaction between Client and Web Server via the HTTPS Protocol
Consider setting up of interaction between client and web server via the HTTPS protocol. Web server and BI server will interact via the HTTP protocol. It is assumed that web server and BI server are located on the same physical server.
Step 1. Placement and Installation of Security Certificates
NOTE. Before executing the step see the guide of certification authority service provider and the operating system documentation.
To place and install security certificates:
Generate and save the server.key server certificate private key.
Create a request to issue the domain_name.csr server certificate.
Get the server.cer server certificate for Linux OS or the server.pfx server certificate for Windows OS signed by the certification authority that is trusted by all users.
Get the ca.cer root certificate and subca.cer intermediate certificates if they are in the chain of trust.
Place the certificates and keys for installation:
On the local user computer - the ca.cer root certificate file.
On the server - the server.cer server certificate file, the server.key server certificate private key file for Apache2 web server in Linux OS, or the server.pfx certificate file for IIS web server in Windows OS.
TIP. It is recommended to include certificates of intermediate certification authorities to the server certificate file and exclude the root certificate from it. If required, change the server certificate file in the text editor.
The specified certificate and key files are given as an example and may differ.
Step 2. Import of Root Certificate to Store
To import the root certificate to a trusted root certification authority store, use supported browser or operating system tools. Operating system tools can be used to import certificate to store only in Windows OS.
Consider certificate import in Mozilla Firefox:
Open browser settings at:
about:preferences
Open the Privacy and Security section.
Click the View Certificates button in the Certificates subsection. The Certificate Manager dialog box opens.
Click the Import button on the Authorities tab. A standard file selection dialog box opens.
Select the ca.cer root certificate. The Load Certificate dialog box opens.
Select the trust This CA to Identify Websites checkbox.
After executing the operations the root certificate is imported to the trusted root certification authority store.
To import the root certificate to a trusted root certification authority store using Windows OS tools:
Double-click the ca.cer root certificate. The Certificate dialog box opens.
Click the Install Certificate button. The certificate import wizard opens.
Select the Current User store location and click the Next button.
Select the Place All Certificates to the Following Store radio button, select the Trusted Root Certification Authorities certificate store in the Select Certificate Store dialog box and click the Next button.
After executing the operations the root certificate is imported to the trusted root certification authority store.
For other options of certificate installation and import in various operating systems and browsers see the public services portal.
Step 3. Setting Up Web Server
Setup steps differ depending on the web server and the operating system in use.
To set up the Apache2 web server in Linux OS:
Connect the mod_ssl module:
Debian-based distributions:
sudo a2enmod-fp10.x-web ssl
sudo a2ensite-fp10.x-web default-ssl
RedHat-based distributions:
sudo yum install -y mod_ssl
sudo cp /etc/httpd/conf.modules.d/00-ssl.conf /etc/httpd-fp10.x-web/conf.modules.d/
sudo systemctl restart httpd-fp10.x-web
ALT Linux:
sudo apt-get install -y apache2-mod_ssl
sudo cp /etc/httpd2/conf/mods-available/ssl.load /etc/httpd2-fp10.x-web/conf/mods-available/
sudo /usr/sbin/a2enmod-fp10.x-web ssl
sudo systemctl condreload httpd2-fp10.x-web.service
After executing the operations the mod_ssl module is connected. For details about the module see the Apache2 documentation.
For RedHat-based distributions the /etc/httpd-fp10.x-web/conf.d/ssl.conf configuration file will be created with the string to connect the module:
LoadModule ssl_module modules/mod_ssl.so
For ALT Linux the /etc/httpd2-fp10.x-web/conf/mods-enabled/ssl.load configuration file will be created with the string to connect the module:
LoadModule ssl_module /usr/lib64/apache2/modules/mod_ssl.so
Add SSL parameters to the <VirtualHost> section in the web server configuration file:
/etc/apache2-fp10.x-web/sites-available/webserver.conf in Debian-based distributions.
/etc/httpd-fp10.x-web/conf.d/00-virtualhost.conf in RedHat-based distributions.
/etc/httpd2-fp10.x-web/conf/sites-enabled/000-default.conf in ALT Linux.
SSLEngine On
SSLCertificateFile <path to folder>/server.cer
SSLCertificateKeyFile <path to folder>/server.key
SSLProxyEngine On
In the <path to folder> substitution specify the folder, which contains the server certificate and its private key.
NOTE. Add TLS protocol parameters generated by means of the SSL Configuration Generator tool.
Change the HTTP protocol to HTTPS in the web application configuration files /opt/foresight/fp10.x-webserver/r/config/config.json, /opt/foresight/fp10.x-webserver/config/PP.xml and make sure that the following conditions are satisfied:
Address of the PPService.axd service is specified in the serviceUrl field of the config.json file.
The <proxy> section is specified in the PP.xml file.
The example of the config.json file:
{
"targetRepo": "",
"serviceUrl": "https://<DNS name of the server>:8110/fp10.x/app/PPService.axd",
"locale": "ru",
"locales": ["ru"],
"title": "FAP10",
"baseUrl": "https://<DNS name of the server>:8110/fp10.x/",
"themes": ["fap10"]
}
The example of the PP.xml file:
<?xml version="1.0" encoding="utf-8"?>
<pp>
<proxy url="" />
<metabase id="WAREHOUSE" />
<serviceCM ParamsUrl="https://<DNS name of the server>:8110/fp10.x/r/#/settings"/>
<modules commonModulesUrl="https://<DNS name of the server>:8110/fp10.x/r/#">
</modules>
</pp>
Restart the web server:
Debian-based distributions:
sudo systemctl restart apache2-fp10.x-web
RedHat-based distributions:
sudo systemctl restart httpd-fp10.x-web
ALT Linux:
sudo systemctl restart httpd2-fp10.x-web
After executing the operations the Apache2 web server is set up.
To set up the IIS web server in Windows OS, open the home page of the IIS manager and execute the operations:
Open the
 Server Certificates feature in the IIS section by double-clicking or using the Open Feature context menu item.
Select the Import item on the Actions panel. The Import Certificate dialog box opens:
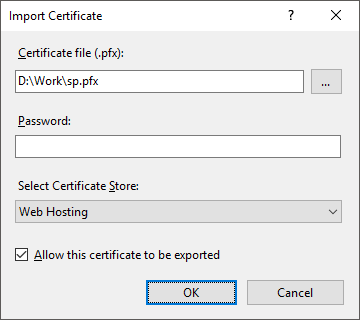
Set the parameters:
Certificate File (.pfx). Specify the path to the server.pfx server certificate.
Password. Specify the password that was used to create a server certificate.
Select Certificate Store. Select the Web Hosting option in the drop-down list.
Click the OK button.
Select the site in the Connections tree and select the Bindings item on the Actions panel. The Site Bindings dialog box opens.
Click the Add button. The Add Site Binding dialog box opens:
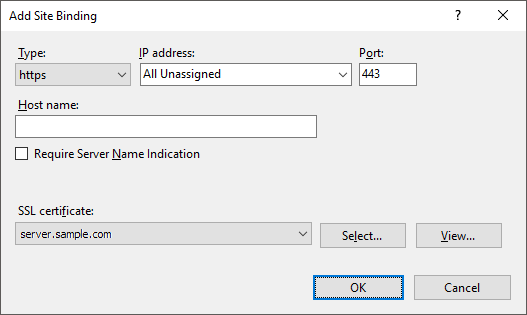
Set the parameters:
Type. Select the https option in the Type drop-down list.
SSL Certificate. Select the server corresponding to the imported server certificate in the drop-down list.
Add TLS protocol settings to the registry by means of the IIS Crypto utility.
Change the HTTP protocol to HTTPS and make sure that the DNS name of the server is specified in the PP.xml, config.json web application configuration files.
Select the server in the Connections tree and select the Restart item on the Actions panel.
After executing the operations the IIS web server is set up.
Step 4. Opening Web Application via the HTTPS Protocol
To open the web application via the HTTPS protocol, use the supported browser and specify the address in the connection string:
In Linux OS:
https://<DNS name of the server>:8110/fp10.x/r/
In Windows OS:
https://<DNS name of the server>/FP_App_v10.x/r/