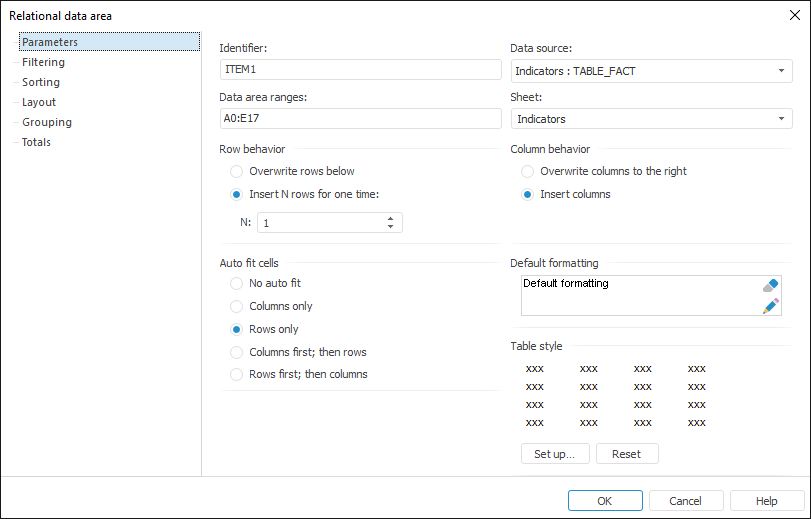
To set up relational data area general parameters, go to the Parameters tab of the Relational Data Area dialog box:

Determine the following parameters on this tab:
A unique sequence of Latin letters, digits and signs, that must start with a letter. It identifies a relational data area within the report in a unique way. By default, each relational data area is assigned an identifier shown in this box. To change identifier, enter a new value in this box.
In the drop-down list select a relational data source, previously added to the regular report. When creating a report template, relational data source may not be set.
Define the cell range on the sheet that will contain the relational data area. Parameter value can be specified as follows:
Single Cell. Define address of the sheet cell that is to become the top left cell for the data area.
Cell Range. Specify the cell range address. The specified range defines the data area ranges.
The range address should be specified as follows:
cell1:cell2
where:
cell1. Address of the top left cell in the range.
cell2. Address of the bottom right cell in the range.
In the drop-down list select the sheet that will show the relational data area.
The parameter determines row behavior on resizing the relational data area. The following options are available:
Overwrite Rows Below. Information contained in rows under the data area is to be replaced with source data.
Insert N Rows for One Time. The required rows are added to the report sheet. Thus, the data from the rows below is shifted down. Rows are inserted in iterations, by default, the number of rows (field N) inserted during an iteration is 1. When the relational data source includes many items, the insertion of new rows may take considerable time, that is why it is recommended to enter the value approximately equal to the number of items in the source, to speed up the process.
NOTE. If empty inserted rows are left after all the source records are pasted, these rows are automatically deleted.
The parameter determines column behavior on resizing the relational data area. The following options are available:
Overwrite Columns to the Right. Data contained in columns to the right of the data area is replaced with source data.
Insert Columns. The required columns are added to the report sheet. Thus, information contained in columns at the right side of the data area is shifted to the right.
This radio buttons group contains cell auto fit methods:
No Auto Fit. Columns and rows are not resized.
Columns Only. Each column width is adjusted to fit the longest line in cells of this column. The cells with word wrap are ignored, because such cells can adapt to any column width.
Rows Only. Each cell height is adjusted to fit the highest cell in this row.
Columns First, then Rows. First, columns width is adjusted in the same way as in the Columns Only parameter, then rows width in adjusted as in the Rows Only parameter.
Rows First, then Columns. First, rows height is adjusted in the same way as in the Rows Only parameter, then column height in adjusted as in the Columns Only parameter.
This group contains relational data area formatting parameters:
To edit formatting options:
Click the ![]() button.
button.
Select the Edit Formatting context menu item.
The Cell Format dialog opens.
To clear formatting and use formatting options by the default template:
Click the ![]() button.
button.
Select the Clear context menu item.
To copy or paste configured formatting from one component to another, use the Copy or Paste context menu items.
The group of parameters contains alternating table style settings. Click the Set Up button to set up style properties. The Alternating Table Style Properties dialog box opens.
See also:
Setting Up Relational Data Area Parameters | Data Visualization as Tables | Relational Data Area | Example of Creating a Relational Area
 Identifier