 To open the
Object Classes page
To open the
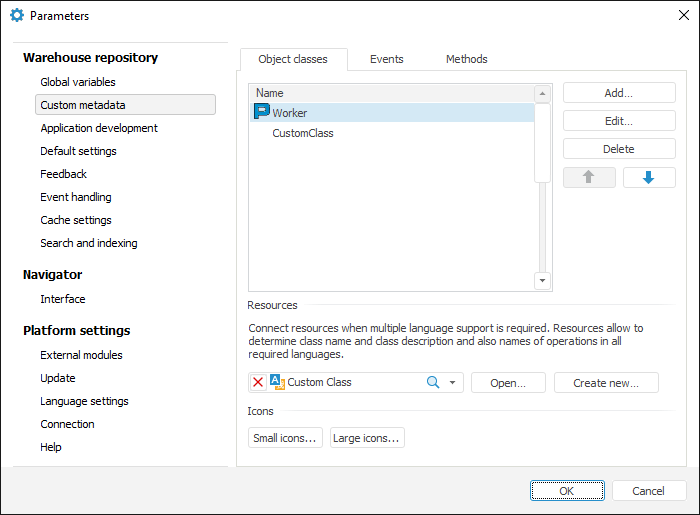
Object Classes pageThe list of custom classes is set in repository parameters on the Custom Metadata > Object Classes tab.
NOTE. Working with custom classes, events, and methods is available to the users who have repository administration permissions.

 To open the
Object Classes page
Go to the object navigator.
Select the Tools > Parameters main menu item.
At the left part select the Custom Metadata item and go to the Object Classes tab.

The following actions for custom object class descriptions can be executed on the tab:
To create a new object class, execute one of the following operations:
Click the Add button on the Object Classes tab.
Select the Add context menu item in the objects list area.
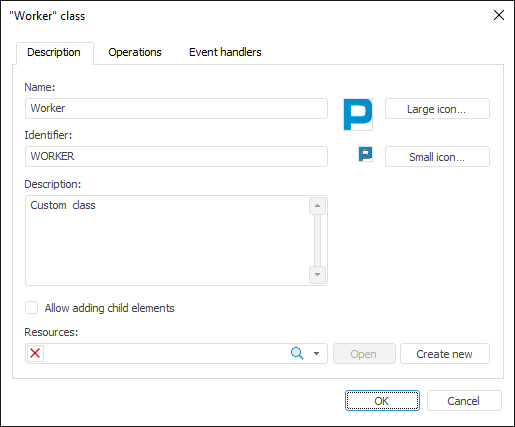
A dialog box describing a new class opens:

The Description tab is used to set basic properties of custom class. Available settings:
Name. Custom class name. A class with the CustomClass name is created by default
Identifier. Unique identifier of custom class.
Description. Any additional information about object class.
Allow Adding Child Elements. If the checkbox is selected, the created custom class objects will be container objects. Any repository objects can be created within these objects. This object also contains a proper identifier space.
To set icons that will be displayed for objects of user class it is required to set theResources object for all classes or for a specific class. The Resources object for all classes is selected on the Object Classes tab and only for the current class it is selected in the Resources drop-down list of class description. The New button enables the user to create the Resources object in the repository, which will be linked to the current object class. Use the Large Icon and the Small Icon buttons to load icons. Pressing the buttons opens the dialog box to select files, in which select the graphic file containing icons with sizes 32*32 or 16*16 respectively. After pressing the OK button the selected file will be divided into separate icons and saved into the specified resources.
To choose icons for the custom class, click the appropriate white space next to the buttons.
NOTE. Icons with the same index are used for classes. If the collection does not contain an icon with the required index, the objects of this class are displayed without an icon.
The dialog box also enables the user to determine the list of operations, which will be available for objects of this class. Determine required settings and click the OK button to save the class.
To edit the existing class, execute one of the following operations:
Select the class in the list and click the Edit button.
Select the class in the list and select the Edit context menu item.
Double-click the class in the list.
The dialog box for setting up class description, operations and operation handlers opens. Edit required settings and click the OK button to save changes.
To delete one or several classes, select the class(es) in the list and click the Delete button or select the same context menu item.
The class(es) will be deleted after confirmation.
To move a class in the list, select it and use the  and
and  buttons. The order of classes in the list affects the order, in which
they will be displayed in the context menu and in the list of commands
of the New Object button on the ribbon in the object navigator.
A proper set of operations can be set for each custom class. Access permissions can be distributed for these operations (For details see Additional Security Parameters).
The list of operations is formed on the Operations tab, which is available in parameters when editing or creating a class. The Event Handlers tab is used to set a class and a script that will be used to handle operations in the desktop and web applications, respectively.
To store icons and localize information about custom classes into various languages, set theResources object for classes. To do so, select the existing repository resources in the drop-down list or click the New button.
The following information is saved in the resource:
Class names.
Class description.
Names of operations created for classes.
Two groups of icons: 16*16 and 32*32.
If required, in each class settings determine proper resources that store information only about the class.
Resources identifiers:
String resources with the CLSNAMEn identifier are created for class names, where n is the number of the class, for example, CLSNAME1.
String resources with the CLSDESCRn identifier are created for class descriptions, where n is the number of the class, for example, CLSDESCR1.
String resources with the CLSn1OPn2<> identifier are created for class operations, where n1 is the number of the class, n2 is the number of the operation, for example, CLS1OP2.
Collections of small and large icons are stored in graphic resources that have idenSMALLICON and idenLARGEICON identifiers respectively, where iden is the ID of custom class container.
NOTE. After the Resources object is specified, string resources and icons for all existing classes are created automatically. Current names and descriptions are applied to default language.
To set up icons, it is required to set the Resources object for all classes or for a specific class where images will be stored.
After that use the Large Icon and the Small Icon buttons to select the file with icon for the class in the class description. The icon will be saved in resources. To use the icon, click on the white space next to the buttons and select the icon from the list of existing icons. The large and the small icon should have the same index in the list.
To move user object settings from test repository into a commercial one, update mechanism is used that is also used for other repository objects. To add custom classes to the update, select them in the list and execute the appropriate context menu item. Classes will be added as special objects. The further work on saving and applying the update is executed in the update manager.
NOTE. All changes of custom classes are applied only after Foresight Analytics Platform restart.
See also: