Click the cell, the selection with two blue points along the edges appears:

Drag the blue points to select the necessary range:

To select a table cell:
Click the cell, the selection with two blue points along the edges appears:

Drag the blue points to select the necessary range:

To select a row or a column:
Tap row or column header to open the dialog box to set up row or column parameters.
Enable the Selection switch button.
The table displayed in the dashboard with other blocks allows for multiple rows to be selected:
To select a single row, tap the row header.
To select multiple rows, tap the row header and double tap the next row header.
Selected data synchronization configured in the mobile application has limitations: selected data can be sent only from table to other visualizers.
To execute operations with the selected cells:
Tap the  button at the top right corner of the express report page.
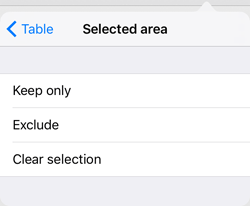
Select the Selected Area section in the Table dialog box that opens:

To deselect, execute one of the operations:
Tap any unselected cell, in this case the current element is deselected.
If rows or columns are selected, tap the row or column header and disable the Selection switch button.
Select the Clear Selection item in the Selected Area section of the Table dialog box to deselect all table cells.
To exclude data from data table, select the item in the Table dialog box in the Selected Area section:
Keep Only. All data except for the selected is excluded from analysis.
Exclude. The selected cells are excluded from analysis.
If required, the excluded data can be included into analysis by selecting these elements in the dimensions.
See also: