The Workspace tool supports inserting of repository objects used for system objects visualization.
To visually structure repository objects in the working area, use the following objects:
Line. It is used to create visual links between objects.
Shape. It is used to create visual blocks.
Image. It is used to create visual objects.
The following operations are available on working with objects:
To add a repository object:
In the web application:
Click the
Repository Object button on the toolbar.
Select repository object on the side panel.
To quickly search for repository objects, use the search string in the upper part of the side panel. Depending on the object display settings, enter name, identifier, or key of the searched object into the search string. Search is executed automatically while the searched text is entered into the search string. The list will display only the objects, which names, identifiers, or keys contain the entered text. To clear the search string, click the
Clear button or press the BACKSPACE key.
To set up displaying of repository objects on the side panel, click the
Show Object button and select display option in the drop-down menu:
Name. Objects are displayed with their names. Default option.
Identifier. Objects are displayed with their identifiers.
Key. Objects are displayed with their keys.
Several options can be selected. Identifier and key will be specified in brackets.
In the desktop application:
Click the Repository Object button on the Home toolbar tab. The Select Object dialog box opens.
Select repository object.

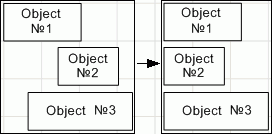
View objects that include the object
To view objects that include the object and links between them, follow the steps:
Select the object on the workspace using the mouse.
Select:
The Included In > Show Objects item:
In the object's context menu.
On the Designer ribbon tab (available only in the desktop application).
For example, the Cube object is included in the express report, regular report and virtual cube:

The Included In > Show Objects (recursively) item:
In the object's context menu.
On the Designer ribbon tab (available only in the desktop application).
For example, Cube is included in the express report, regular report and virtual cube. Virtual cube is included into express report which is included into three different Fore forms.


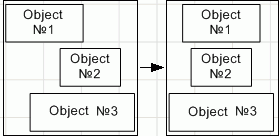
View objects that the object includes
To view objects that the object includes, and links between them, follow the steps:
Select the object on the workspace using the mouse.
Select:
The Consists Of > Show Objects item:
In the object's context menu.
On the Designer ribbon tab (available only in the desktop application).
For example, the Cube object consists of table and dictionaries:

The Consists Of > Show Objects (recursively) item:
In the object's context menu.
On the Designer ribbon tab (available only in the desktop application).
For example, the Cube object consists of the table and dictionaries. The Table Dictionary dictionary consists of the Territories table and the Measurement Units and Territories tables consist of the Data database:

When working with repository objects one can also manage objects in the working area and execute operations with a group of objects.
In the desktop application, depending on the selected repository object type, the context menu may include different commands. For example, context menu of dictionaries includes the Groups of Elements, Selection Schemas, and Alternative Hierarchies items; context menu of cubes includes the Save to File item; context menu of document includes the Save to File and Load to Document items.
To add a line:
Select line type:
In the web application in the drop-down menu of the button containing lines, on the toolbar. Line selection button looks like the last selected line type.
In the desktop application in the drop-down menu of the Line button on the Home ribbon tab.
Then put the cursor to the required line beginning, hold down the mouse button and move the cursor to the required line end. Release the mouse button.
For details about creating a line between objects, see the Creating Links Between Objects and Connection Points section.
Available line types:
In the web application:
. Straight line.
. Arrow.
. Angular line.
. Curved line.
In the desktop application:
Line.
Link.
Connecting line.
Curved line.
To add a shape:
In the web application select shape type in the drop-down menu of the button containing a set of shapes on the toolbar. Shape selection button looks like the last selected shape type.
In the desktop application click the Shape button on the Home ribbon tab and select the shape type in the drop-down list.
Available shape types:
In the web application:
. Rounded rectangle.
. Rectangle.
. Ellipse.
. Triangle.
. Tetragon.
. Pentagon.
. Hexagon.
. Octagon.
In the desktop application:
Rectangles.
Regular polygons.
Figured arrows.
Callouts.
Supported image formats: BMP, JPEG, JPG, JFIF, JPE, GIF, PNG.
To add an image:
Execute one of the operations:
In the web application click the
Image button on the toolbar.
In the desktop application click the Image button on the Home ribbon tab.
The file selection dialog box opens.
Select image file and click the Open button.
To set up object formatting, see the Object Formatting section.
To select an object in the working area:
Click on the object.
In the desktop application:
Press the TAB key to select the object from left to right and from top to bottom.
Press SHIFT+TAB to select object from bottom to top and from right to left.
NOTE. The object will be selected within the visible working area.
To select all objects in the working area, press CTRL+А.
To select several objects in the working area:
Hold down the CTRL key and click each selected element one by one.
Select the
Cursor mode on the toolbar in the web application or the
Pointer mode on the ribbon in the desktop application and use a frame to select objects:
Determine a group of objects to be selected.
Click and hold down the mouse button outside the group of objects to be selected.
Start dragging the mouse cursor. A rectangular frame appears:

Move the cursor until all required objects are within the frame.
Release the mouse cursor. All objects fully or partially located within the frame are selected.
On working with objects, standard operations with the clipboard.
Relative positioning of objects in the copied group is kept during the paste.
To delete the selected object:
Select the Delete item in the object's context menu.
Press the DELETE key.
Click the
Delete button on the toolbar in the web application or the
Delete button on the Format ribbon tab in the desktop application.
To move one or several selected objects in the working area:
Use the UP, LEFT, DOWN, RIGHT keys to move objects by one pixel.
Press SHIFT+UP, SHIFT+LEFT, SHIFT+DOWN, SHIFT+RIGHT to move objects by 10 pixels.
Press CTRL+UP, CTRL+LEFT, CTRL+DOWN, CTRL+RIGHT to move objects by 100 pixels.
To resize an object in the working area:
Using the mouse:
Hover the cursor to the point located at object border. The cursor will change to a two-headed arrow.
Hold down the mouse button and stretch or shrink the object to the required size.
Using the keyboard:
Press CTRL+SHIFT.
Resize the object by 1 pixel using the UP, DOWN, LEFT, RIGHT keys.
After executing the operations the object is resized.
To rotate one or several selected objects in the working area:
Select the Rotate item in the object's context menu and select rotation option:
Rotate 90o Clockwise.
Rotate 90o Counterclockwise.
Manually (unavailable if a group of objects is selected).
In the desktop application click the
Rotate/Flip button on the Format ribbon tab and select an option in the drop-down menu:
Rotate Left. The object will be rotated 90° counterclockwise.
Rotate Right. The object will be rotated 90° clockwise.
To reorder objects in the working area:
In the web application use the Bring to Front/Send to Back items in the objects' context menu.
In the desktop application:
Select the Order > Bring to Front/Send to Back item in the object's context menu.
Select the Format > Order > Bring to Front/Send to Back main menu item.
It is available only in the desktop application.
To flip the selected object, click the
Flip/Rotate item on the Format ribbon tab and select flip option:
Flip Horizontally.
Flip Vertically.
It is available only in the desktop application.
Objects in the working area can be grouped. For a group of objects one can set common formatting and order and resize objects. On resizing the group, objects included in the group are resized respectively.
To group selected objects:
Select the Grouping > Group item in the context menu of selected objects.
Click the
button on the Format ribbon tab.
Press CTRL+G.
It is available only in the desktop application.
To ungroup the selected group of objects:
Select the Grouping > Ungroup item in the context menu of selected objects.
Click the
button on the Format ribbon tab.
Press CTRL+U.
To align objects relative to one another:
Select several objects.
Execute one of the operations:
In the web application:
Select the Align item in the object's context menu.
Click the
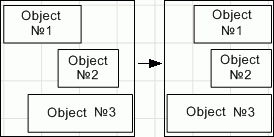
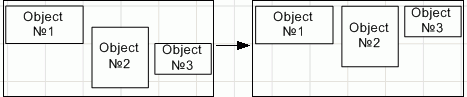
Align button on the toolbar.
In the desktop application:
Select the Align/Distribute item in the object's context menu.
Click the
Align button on the Format ribbon tab.
Select object alignment option in the command/button's drop-down menu:
Align Left. The selected objects are aligned to their left edges with the leftmost object:

Align Center. The selected objects are aligned on their vertical center. The midpoint is calculated from the rightmost and leftmost objects and their dimensions:

Align Right. The selected objects are aligned on their right edges with the rightmost object:

Align Top. The selected objects are aligned on their top edges with the topmost object:

Align Middle. The selected objects are aligned on their horizontal center. The midpoint is calculated from the topmost and bottommost objects and their dimensions:

Align Bottom. The selected objects are aligned on their bottom edges with the bottommost object:

It is available only in the desktop application.
To distribute objects relative to one another:
Select three or more objects by clicking them one after another while holding the SHIFT key down.
Select the item:
Align > <action option> on the Format ribbon tab.
Align/Distribute> <action option> of the context menu.
The following object distribution options are available:
Distribute Horizontally. There is equal distance between the edges of all selected objects. The distance is calculated from the leftmost and rightmost objects and their size:

Distribute Vertically. There is equal distance between the edges of all selected objects. The distance is calculated in the same way as in previous menu option:

It is available only in the desktop application.
To resize the selected objects in the desktop application:
Select the Size > <option> item in the context menu of object group.
Select the Equal Size > <option> item on the Format toolbar main menu tab.
The following resizing options for objects are available:
Align by the Widest. The width of all the selected objects matches the width of the widest object in the group:

Align by the Narrowest. The width of all the selected objects matches the width of the narrowest object in the group:

Align by the Highest. The height of all selected objects is changed to the height of the highest object in the group:

Align by the Shortest. The height of all selected objects is changed to the height of the shortest object in the group:


Allow or prohibit selecting object in group
It is available only in the desktop application.
To allow or prohibit editing an object in the group, select or deselect the Group > Select Objects in Group object context menu item.
Prohibition or allowance to edit an object in the group provides a possibility to limit object viewing or editing in workspace edit mode.
The checkbox selection is available only after the group of objects is created.
See also: