Foresight Analytics Platform enables the use of the Hive infrastructure as a data source. Hive is a data management system with the use of SQL-like query language (HiveQL) and it works on the basis of the Hadoop system of data storing and handling.
To start working with the Hive data source, execute the following steps.
To create a connection to the Hive data source it is necessary to use the appropriate ODBC driver.
The Hortonworks Hive ODBC Driver driver is recommended to use as the ODBC driver. Load the distribution file and install the driver by executing the command:
sudo dpkg -i ./clouderahiveodbc*.deb
IMPORTANT. Bitness of the installed application must be the same as bitness of Foresight Analytics Platform.
Open the file for edit: /opt/cloudera/hiveodbc/lib/64/cloudera.hiveodbc.ini and finf the parameters:
DriverManagerEncoding. Replace the parameter value with UTF-16.
ODBCInstLib in the iODBC category. Comment the parameter value.
ODBCInstLib in the unixODBC category. Uncomment the parameter value and set the libodbcinst.so.1 value.
The example of the cloudera.hiveodbc.ini file.
For details about connection setup see the guide.
There are two main methods for connection setup:
Prepare the /etc/odbcinst.ini file. The example of file contents:
[ODBC Drivers]
Cloudera ODBC Driver for Apache Hive 32-bit=Installed
Cloudera ODBC Driver for Apache Hive 64-bit=Installed
UsageCount=1
[Cloudera ODBC Driver for Apache Hive 32-bit]
Description=Cloudera ODBC Driver for Apache Hive (32-bit)
Driver=/opt/cloudera/hiveodbc/lib/32/libclouderahiveodbc32.so
UsageCount=1
[Cloudera ODBC Driver for Apache Hive 64-bit]
Description=Cloudera ODBC Driver for Apache Hive (64-bit)
Driver=/opt/cloudera/hiveodbc/lib/64/libclouderahiveodbc64.so
UsageCount=1
Check connection using the command:
isql -v -k "Driver={Cloudera ODBC Driver for Apache Hive 64-bit};Host=10.0.2.118;Port=10000;AuthMech=3;UID=root;PWD=hadoop"
Change the /etc/odbc.ini file according to the guide. The example of file contents:
[ODBC Data Sources]
HiveDSN=Cloudera
[HiveDSN]
Driver=/opt/cloudera/hiveodbc/lib/64/libclouderahiveodbc64.so
HiveServerType=2
ServiceDiscoveryMode=0
Host=10.0.2.118
Port=10000
UID=root
PWD=root
Check connection using the command:
isql -v "HiveDSN"
Before working with Hive it is necessary to set up a data source:
Open the control panel in the client computer, next go to the Administration > ODBC Data Source section.
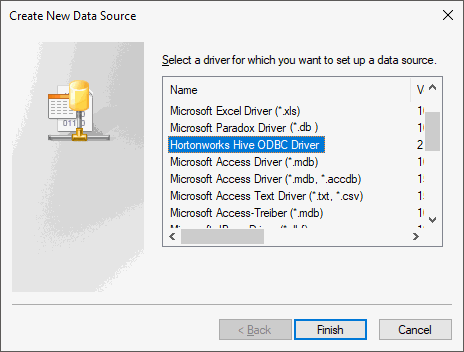
In the ODBC Data Source Administration dialog box go to the Custom DNS tab. Select the Add item.
In the Create New Data Source dialog box select the Hortonworks Hive ODBC Driver:
The Hortonworks Hive ODBC Driver DNS Setup dialog box opens:

Specify the following settings:
Data Source Name. Specify connection name.
Description. If required, specify connection description.
Host. Specify IP address or Hive server name.
Hive Server Type. Select Hive Server 2 as a server type.
Mechanism. Specify User Name (specify user name, of an account, created in your configuration of the Hadoop/Hive) authentication mechanism.
To set up database in Foresight Analytics Platform:
Specify the OLE DB(ODBC HIVE) DBMS client type in the database properties.
Specify a name of created data source (Data Source Name) as a server name.
Select automatic connection.
Fill the User Name/Password fields: specify user name of an account created in your configuration of Hadoop/Hive.
Database creation wizard window after specifying required parameters looks as follows:

After executing all configurations a new connection can be used to connect Hive tables to the platform repository and creating queries using the HiveQL language.
To connect to Hive data source correctly, set up JDBC driver:
Make sure that BI server is set up and integration with the Python programming language is executed.
Install pip3 with default parameters by executing the command:
sudo apt install python3-pip
Download the jaydebeapi library:
pip3 install jaydebeapi
Execute integration with the Java programming language.
Create the opt/jdbc directory:
sudo mkdir /opt/jdbc
Load the file with the JDBC driver HiveJDBC.jar to the /opt/jdbc folder.
Make the www-data user the owner of the opt/jdbc directory:
sudo chown -R www-data:www-data /opt/jdbc
Open the update file in the update manager.
The example of the update file: Update_pefx.zip.
The file contains the objects:
Tables and data dictionaries.
Cube built based on table and dictionary data.
Regular report and express report built based on cube data.
The config.ini module with the JDBC_HIVE_CONFIG identifier.
The example of module: config.ini.
Python module with the PYTHON_READ_DATA_JDBC_EXAMPLE identifier
The example of module: python.py.
The Install Callback for Cube module with the MOD_SET_CUBE_CALLBACK_JDBC_EXAMPLE identifier.
The example of module: Install Callback for Cube.
The Cube Callback module with the MOD_CUBE_FILLDATA_JDBC_EXAMPLE identifier.
The example of module: Cube Callback.
Start the Install Callback for Cube module for execution included in the update file. Set the parameters in the module:
| Name | Constant description |
| CUBE_ID | Cube identifier for data population. |
| MOD_ID | Identifier of the module executed on working with cube. |
Set the parameters in the config.ini module included in the update file:
| Name | Constant description |
| TABLE_DATA_ID | Identifier of the table, from which data should be obtained. |
| PY_MOD_ID | Python module identifier. |
| LINUX_PATH | Path to JDBC driver. |
| JDBC connection parameters (Hive): | |
| JDBC_CLASS | Driver class. |
| JAR_NAME | Name of file with JDBC driver in the operating system. |
| JDBC_URL | Service URL. |
| DB_USER | User name. |
| DB_PSWD | User password. |
After executing a sequence of operations, on each opening, data will be loaded to the cube from the Hive data source.
See also:
Connecting to Relational Databases