One can load ready styles to the styles table using:
Ready styles are imported to the styles table from other styles tables and from internal styles tables of regular reports.
NOTE. In the web application, style import is available only from other styles tables.
Style import differs in the desktop application and in the web application.
To import styles:
Execute one of the operations:
Click the
Import button on the Styles panel.
Select the
Import context menu item on the Styles panel.
The Style Import dialog box opens:

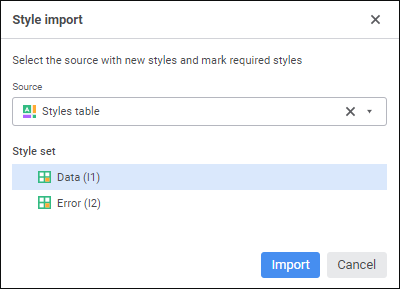
Select a styles table in the Source drop-down list. The list of available styles is displayed in the Style Set list.
To quickly select an object, enter object's name/identifier/key in the search box depending on display settings. Search is executed automatically while the searched text is entered into the search string. The list will display the objects, which names/identifiers/keys contain the entered text.
To set up displaying of objects in the list, click the
Show Object button and select display option in the drop-down menu:
Name. Objects are displayed with their names. Default option.
Identifier. Objects are displayed with their identifiers.
Key. Objects are displayed with their keys.
Several options can be selected. Identifier and key will be specified in brackets.
To reset selection for the selected object, click the
Clear button.
In the Style Set area select the styles, which should be imported, and click the Import button. To select all styles, select the Select All context menu item. To deselect all styles, select the Deselect All context menu item.
As a result, the selected styles are imported to the current styles table.
If identifier of the imported style matches one of the existing styles in the styles table, the operation confirmation dialog box opens:

Select the action with style:
Replace Existing Style. The style in the current table is replaced with the imported one.
Rename Copied Style. The "CopyN" suffix, where N is the copy index, will be added to the imported style identifier.
To apply the selected action for all imported styles having non-unique identifier, select the Apply in All Similar Cases checkbox. If the checkbox is deselected, the dialog box opens each time the conflict occurs.
To import styles:
Select the Import item in the Styles Table main menu. The Style Import dialog box opens:

Select the styles table or regular report in the Source drop-down list.
Select checkboxes next to the styles to be imported in the Style Set list.
TIP. To quickly select checkboxes for several styles, select them with holding the CTRL key and select the Select item in the context menu. To select checkboxes of all styles, use the Select All item, to deselect checkboxes of the selected styles, use the Deselect All item.
As a result, the selected styles are imported to the current styles table.
If identifier of the imported style matches one of the existing styles in the styles table, a conformation dialog box opens:

Select the action with style:
Replace Existing Style. The style in the current table is replaced with the imported one.
Rename Copied Style. The "CopyN" suffix, where N is the copy index, will be added to the imported style identifier.
To apply the selected action to all imported styles having non-unique identifier, select the Apply in All Similar Cases checkbox. If the checkbox is deselected, the dialog box opens each time the conflict occurs.
Styles can be exported to styles table from express reports, dashboards, regular reports and workbooks.
NOTE. Style export is available only in the desktop application.
To export:
Open a report containing styles created by the user.
Go to the ribbon tab that is used to set up visualizer and click the
Actions button in the group that is used to set up the style.
Tab and group name depend on visualizer. For example, for the table the tab is named Format and the group is named Cell Style; for the chart the tab is named Chart and the group is named Chart Style. For details about each visualizer, see the
Styles that can be exported are displayed in the Document Styles group. To export all styles from the group, select the Export to External Styles item in the
Actions button's menu. To export a specific style, select the Export to External Styles item in the style's context menu.
Specify the current styles table in the file selection dialog box that opens.
A confirmation request for adding selected styles to the styles table is displayed. Confirm it. Then you will be prompted to connect the selected styles table to the report. Confirm it if it is required to use styles from the selected styles table in the current report.
Styles from the report will be exported to the selected styles table. If identifier of the exported style matches one of the existing styles in the styles table, a confirmation dialog box opens:

Select the action with style:
Keep Both. The exported style is added to the styles table with a new unique identifier.
Replace. The style in the current table is replaced with the exported one.
Skip. The style is not exported to the styles table.
To apply the selected action to all exported styles with non-unique identifier, select the Apply in All Similar Cases checkbox. If the checkbox is deselected, the dialog box opens each time the conflict occurs.
See also: