In the web application click the Save button in the main menu.
In the desktop application:
Select the File>
 Save main menu item.
Click the
 Save button on the toolbar.
To save resources:
In the web application click the Save button in the main menu.
In the desktop application:
Select the File>  Save main menu item.
Click the  Save button on the toolbar.
After executing one of the operations the resources list is saved.
To save resource copy:
In the web application click the Save As button in the drop-down menu of the Save button.
In the desktop application:
Select the File >  Save As main menu item.
Click the  Save As button on the toolbar.
After executing one of the operations the Save Object Copy dialog box opens to select a folder to save the object with the ability to change its name and identifier.
To save a single graphic resource to a file:
In the web application:
Double-click the cell with the graphic resource. The side panel opens.
Click the  Save to File button.
In the desktop application:
Select a cell containing the graphic resource.
Save the resource to the file:
Select the Save to File item in the resource's context menu.
Open the Edit Image dialog box by selecting the Edit resource's context menu item and click the Save to File button.
After executing the operations a standard object saving dialog box opens.
To save several graphic resources to a folder:
Select cells containing graphic resources.
Select the Save to Folder item in the resources's context menu.
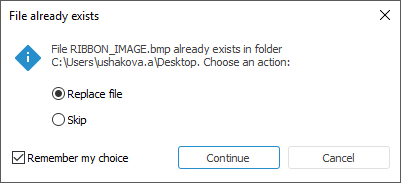
After executing the operations a standard object saving dialog box opens. If the specified folder contains images with the same names, the dialog box opens:

Select the next action:
Replace File. The existing file will be replaced.
Skip. Resource saving to the file will be skipped.
Remember My Choice. Select the checkbox to apply the selected action (replace file or skip saving) for all conflicts.
Cancel. Abort saving process of the selected resources.
Continue. Continue saving process taking into account the selected action.
NOTE. Saving several graphic resources to a folder is available only in the desktop application.
See also: