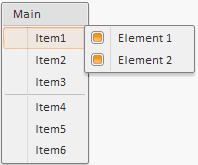
To execute the example, in the HEAD tag, add links to the PP.js library and PP.css visual styles. There is an example of the static Menu component creation, consisting of the title, six buttons and the separator between third and fourth items:
<body>
<div id="but"></div>
<div id= "div1">Item6</div>
<script type="text/javascript">
var showBut = new PP.Ui.Button({ ParentNode: document.getElementById("but"), Content: "Show" });
//menu
var menu = new PP.Ui.Menu();
//first child item of the menu
var item1 = new PP.Ui.MenuItem();
//first item submenu
var childMenu1 = new PP.Ui.Menu();
//first item of the first item submenu
childMenu1Item1 = new PP.Ui.MenuItem();
//contents
childMenu1Item1.setContent("Element 1");
//checkbox is selected
childMenu1Item1.setChecked(true);
//the second menu item of the item
childMenu1Item2 = new PP.Ui.MenuItem();
//contents
childMenu1Item2.setContent("Element 2");
//checkbox is selected
childMenu1Item2.setChecked(true);
//add submenu items for the first item
childMenu1.addItem(childMenu1Item1);
childMenu1.addItem(childMenu1Item2);
//specify menu for the first item
item1.setMenu(childMenu1);
//contents
item1.setContent("Item1");
//second menu item
var item2 = new PP.Ui.MenuItem();
//group name
item2.setGroupName("gr1");
//contents
item2.setContent("Item2");
var item3 = new PP.Ui.MenuItem();
//contents
item3.setContent("Item3");
//group name
item3.setGroupName("gr1");
//create and add the title to the menu
var header = new PP.Ui.MenuHeader();
header.setContent("Main");
menu.addItem(header);
//add items to the menu. Items from 1 to 3 are the instances of the MenuItem class
menu.addItem(item1);
menu.addItem(item2);
menu.addItem(item3);
//create and add the separator to the menu
var sep = new PP.Ui.Separator();
menu.addItem(sep);
//text
menu.addItem("Item4");
//HTML layout
menu.addItem("<span>Item5</span>");
//DOM node
menu.addItem(document.getElementById("div1"));
//calls the menu by clicking the button
showBut.Click.add(function (sender, args) { menu.show(50, 50) });
</script>
</body>
The menu of the following view opens by clicking the Show button after an example execution:

The menu consists of the Main title, the separator (between the third and the fourth items) and six items. First three items are the instances of the MenuItem class, fourth is the text, fifth is the HTML layout, sixth is the DOM node.
Using the Menu property a submenu that consists of two items is set for the first item. And for each of these submenu items a checkbox is set using the Checked property.
The common group name is set for the second and third menu item by the GroupName property. That means that the radio button, that is set when selecting the item, is configured for this items:

Only one radio button is available at the same time: or for the Item2, or the Item3.
See also: