To execute the example, in the HEAD tag of the HTML page add links to the following JS and CSS files:
PP.js
PP.css.
In the SCRIPT tag add a script to create the CheckBox component:
<script type="text/javascript">
    //Create a list to select several possible response options:
    function onLoad() {
        var checkbox1 = new PP.Ui.CheckBox({
                ParentNode: document.getElementById("CB1"),
                Content: "10"
            });
        var checkbox2 = new PP.Ui.CheckBox({
                ParentNode: document.getElementById("CB2"),
                Content: "12"
            });
        var checkbox3 = new PP.Ui.CheckBox({
                ParentNode: document.getElementById("CB3"),
                Content: "14"
            });
        var checkbox4 = new PP.Ui.CheckBox({
                ParentNode: document.getElementById("CB4"),
                Content: "16"
            });
        //Create a button that will check if responses are correct:
        var button = new PP.Ui.Button({ ParentNode: document.getElementById("btn"),
                Content: "Check"
            });
        //Add a handler for the Click event:
        button.Click.add(function(sender, args) {
            //Variables containing value of the CheckedState property:
            var cb1 = checkbox1.getCheckedState();
            var cb2 = checkbox2.getCheckedState();
            var cb3 = checkbox3.getCheckedState();
            var cb4 = checkbox4.getCheckedState();
            if (cb1 == true && cb4 == true && cb2 == false && cb3 == false)
                alert("Correct!");
            else
                alert("Sorry! Try again!");
        });
    }
</script>
In the BODY tag add elements with identifiers:
<body onload="onLoad()">
    Choose right variants:
    <div id = "CB1"></div>
    <div id = "CB2"></div>
    <div id = "CB3"></div>
    <div id = "CB4"></div>
    <div id = "btn"></div>
</body>
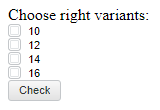
After executing the example the HTML page will contain instances of the CheckBox component:

On selecting the first and the last option and clicking the Check button, the message Correct is displayed, otherwise "Sorry! Try again!.
See also: