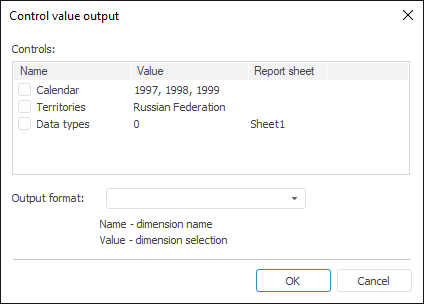
To add a control value to header, click the ![]() button in the header editing dialog box. The Control Value Output dialog box opens:
button in the header editing dialog box. The Control Value Output dialog box opens:

In the dialog box that opens determine the following parameters:
Controls. The list shows all available report controls, along with their current value and the sheet, to which they apply. If the sheet is not specified, the control is available for all report sheets. Select checkboxes next to the controls, which values should be output to header or footer.
Mind the following features when working with the list in the Controls group:
The list of controls allows for multiple selection of elements when holding down the SHIFT or CTRL keys. On selecting or deselecting checkbox for one of the selected elements, checkboxes of other selected elements are also selected or deselected.
To select or deselect checkbox for all the list elements:
Select the Select All or Deselect All context menu item.
Press CTRL+A.
Select the Select or Deselect context menu item to select or deselect the checkbox for selected elements.
Output Format. In the combobox specify format option or select the format of control values output in the list of the available options. The Name and Value substitutions are used to show control name and value respectively.
Press the OK button to add one tag per each selected control to the corresponding part of header or footer:
&[<Sheet ID>.<Control element ID>.Value Format = "<Selected/created format>"]
Where:
Sheet ID can be omitted if the control is available for all the sheets.
Format is an optional attribute. If the Format attribute is not specified, only the control value is shown (Value).
After creating a tag, only manual editing and deleting is available. Reopening this dialog box does not enable the user to edit it.
If no output format has been selected before clicking the OK button, the user is prompted to set default selection output format.
See also:
Headers and Footers | Setting Up Report for Printing | Using Table Sheet | Using Text Sheet | Working with Ready Reports