 To open the dialog box
To start calculation algorithms, execute Fore-based of Fore.NET-based units, open repository object, create a custom button or use the hyperlink.The signature and examples of functions for hyperlink are specified in the Hyperlink section.
IMPORTANT. It is available to set up hyperlinks for data entry forms only in the development environment using the ITabHyperlink interface will be available.
To use custom buttons:
Create a calculation algorithm, Fore unit or Fore.NET/JS-function or repository object. The following can be selected as repository object to be opened: dictionary, regular report, data entry form.
Create a custom button.
Apply custom button.
Set up the ribbon to structure added buttons.
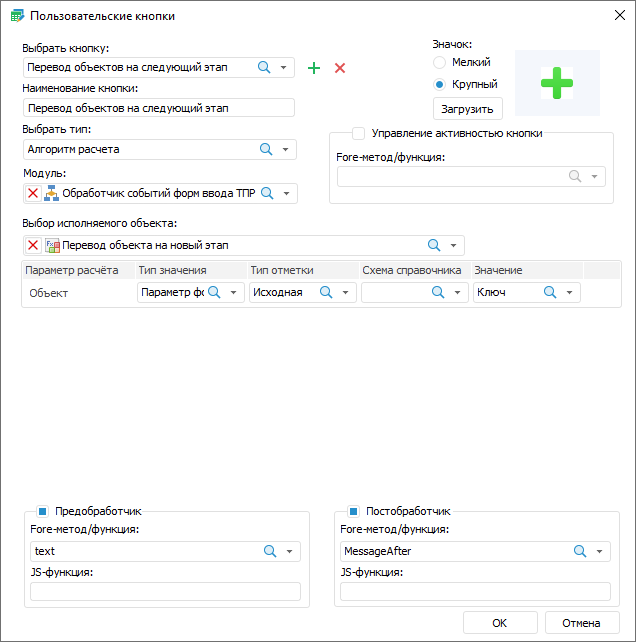
To create custom buttons, use the Custom Buttons dialog box.
Click the  Custom Button Editor button of the Custom Operations group on the Designer ribbon tab.
To create custom buttons:
Add a custom button, enter its name and determine type.
Determine settings for the selected type: calculation algorithm, Fore/JS functions unit or opening repository object.
Load icon for button and set up its size.
Select unit that can be used for prehandler, posthandler, managing button activity and for executable method/function on creating button of the Fore/JS Function Unit type.
To add a button:
Click the  button.
Enter the button name in the Button Name box explaining its functionality. The default button name is Custom Button N, where N is a button order number.
Select the object type in the drop-down list: Calculation Algorithm, Fore Unit/JS-function or Repository Object Opening.For each object type single settings that appear on changing object type are set.
To edit button, select a button in the drop-down list or click the  search button and start entering the button name.
On selecting the Calculation Algorithm type, the Select Executable Object drop-down list appears where it is required to select calculation algorithm.If the selected algorithm has parameters, the area of parameters setup will be displayed below the list:

The setup is the same as setup of parameters for calculation algorithms in table area.
On selecting the Fore/JS Function Unit type, set the additional settings:
Select a unit written on Fore or Fore.NET language in the Unit drop-down list.Only one unit can be set for the button.
NOTE. After selecting the unit, the Prehandler, Posthandler and Managing Button Activity areas become active.All methods/functions to set up handlers and to manage button activity must contained in the unit.
Public Sub <Function name>(<Report>: IPrxReport);
Begin
…
End Sub <Function name>;
Parameter:
Report. Data entry form is sent to the parameter in the IPrxReport format. On working with this object, all properties and methods of the IPrxReport interface will be available.
Function example:
Public Sub SubButton(Report: IPrxReport);
Var
NameSheet: String;
Begin
If WinApplication.InputBox("Rename sheet", "Enter sheet name", NameSheet) Then
Report.ActiveSheet.Name := NameSheet;
End If;
End Sub SubButton;
Select a method or function from the drop-down list in the Class Name field.
NOTE. If the specified unit does not contain any class, the Class Name list will be hidden.
Determine function name on JavaScript language in the JS Function box that is to be started in the web application after the button action is executed. Function name:
javascript: <Function name (custom parameters, callback, args)>
Parameters:
Custom parameters. Required custom parameters.
Callback. Mandatory parameter. Callback function.
Args. Function arguments.
Using angle brackets when specifying function name with parameters is mandatory.
Example of function name:
javascript:<AfterOperTest(callback)>
If JS function and Fore function are specified, Fore function is firstly executed in the web application and then JS function, in the desktop application only Fore function is executed.
JS function is added in the Layout and Formatting section of designer of business applications. Click the Add button in the File Loading area and load file in UTF-8 encoding. The function must have the required signature:
function <Function name>(custom parameters, callback, args)
{
…callback();
}
The following parameters can be obtained as arguments:
Report. Parameter to manage report.
DataEntryForm. Parameter to manage data entry form.
DataArea. Parameter to manage table area.
Function example:
function addAttachments(callback, args)
{
var rep = args.Report;
var da = args.DataArea
var grid = da.getGridView();
var tabSheet = grid.getTabSheet();
var tableSource = grid.getTableSource();
var onMeasuresLoaded = (function(){
var tabSheetRange = tabSheet.getSelection().getRange();
attachFile(da, tabSheetRange);
tableSource.MeasuresLoaded.remove(onMeasuresLoaded, this, );
});
tableSource.MeasuresLoaded.addOne(onMeasuresLoaded, this, args);
callback();
}
function attachFile(da, tabSheetRange) {
var rep = da.getSource();
var grid = da.getGridView();
var tabSheet = grid.getTabSheet();
if (tabSheetRange && tabSheetRange.isValid()) {
var cells = tabSheetRange.getCells();
if (cells.length == 1) {
var cell = cells[0];
var coord = cell.getCoord();
var range = { top: coord.rowIndex, left: coord.colIndex, width: 1, height: 1 };
var views = rep.getGridViews(range);
var gridKey = views.length ? views[0].key : undefined;
var attachDlg = da.getGridView().showAttachmentDialog(gridKey, coord.rowIndex, coord.colIndex);
}
}
}
 Set up repository object opening
On selecting the Open Repository Object type, determine additional settings:
Select the required object in the Open Repository Object drop-down list.

NOTE. When selecting a multisheet data entry form as an object for opening, make sure that the Load Only Active Sheet checkbox is selected to speed up form opening.
Select checkboxes if required:
Open in Modal Window. The checkbox is deselected by default. On selecting the checkbox, work with parent form is blocked during object opening. The checkbox is available on setting up data entry forms and dictionaries opening. The dictionary can be opened in modal window only in web application.
NOTE. The checkbox limits availability of side and navigation menu in designer of business applications. For details see the Feature of Displaying Elements section.
Update After Dialog Box is Closed. The checkbox becomes available after the Open in Modal Window checkbox is selected. Select sheets that must be updated after object closing.
Set parameters for objects with parameters:
Value Sending Method. In the drop-down list select:
Do Not Send. Default value. On opening the object, nothing is sent to the parameter.
Form Parameter. On opening an object, the form parameter value is sent to the parameter.
Dimension Attribute. On opening object, attribute value of the first element or of all elements of the selected dimension from selected area in the table is sent to parameter.
Manually. On opening the object, the specified value is sent to the parameter.
Consider Table. The checkbox is available, if the Dimension Attribute sending method is selected. To display only all attributes of all dimensions, without specifying table areas, deselect the Take Into Account Table Area checkbox. The checkbox is selected by default.
Value. The box contents depends on selected value sending method:
If the Do Not Send value sending method was selected, the box is unavailable.
If the Form Parameter value sending method was selected, then select a parameter in the drop-down list. The list displays available form parameters. The list of form parameters is filtered by object parameter type. Only one parameter can be selected.
If the Dimension Attribute value sending method was selected, then select an attribute in the drop-down list. The list displays all available attributes of all table area dimensions in the form. Only one attribute can be selected.
If the Manually value sending method was selected, then the Value field displays the editor corresponding to the parameter type. Only one element can be selected.
Selection Type. The drop-down list is available if tje Dimension Attribute value sending method was selected. In the drop-down list select:
First Element. The parameter send the selected attribute of the first dimension element from selection.
All Elements. Selected attribute values of all dimension elements from selection are sent to the parameter.
To load icon, click the Load button in the Icon area.In the drop-down list select patch to the icon file with the *.png, *.jpg, *.jpeg, *.bmp extension. If the icon is not loaded, the Custom Functions ribbon tab will display only button name.
NOTE. To provide a correct icon display of custom buttons, use 32-bit images with transparency.
To select size of the icon displayed on the Custom Functions tab, set the radio button in the Icon Size area: small or large. When the large icon is selected, button name will be displayed under the button; when the small icon is selected - next to the button. When several buttons with small icons are added, they are placed in several lines on the ribbon, whereas buttons with large icons are placed one after another, taking the entire ribbon height.
Set prehandler to output text message with user-defined text on clicking the custom button. For example: calculation execution and a prehandler with a message about calculation start that may take long time. In this case, clicking the button before the calculation automatically displays the configured message.
To set up prehandler:
Select the Prehandler checkbox.
NOTE. The area becomes active after unit selection.
Select the function in the Fore Method/Function list. The list contains all functions of the selected unit corresponding to the signature:
Function <Function name> (<Report>: IPrxReport; [Var messageType: Integer]): String;
Parameter:
Report. Data entry form is sent to the parameter in the IPrxReport format. When working with this object, all properties and methods of the IPrxReport interface are available.
messageType. Optional variable, use it to determine displayed message format. If the variable is not specified, the confirmation dialog box is used. To show message text to the development environment console in the desktop application and to not show the message in the web application, remove returned value in return. The example of such function is presented below.
Available values:
0. Confirmation dialog box. Clicking the Yes button in the dialog box executes the operation specified for the button. Clicking the No button in the dialog box cancels executing of the operation specified for the button.
1. Error. Clicking the OK button in the dialog box does not execute the operation specified for the button.
2. Warning. Clicking the OK button in the dialog box does not execute the operation specified for the button.
3. Information message. Clicking the OK button in the dialog box does not execute the operation specified for the button.
Function example:
Function MessageInformationBox(Report: IPrxReport; Var messageType: integer): String;
Begin
messageType := 3;
Return "Operation is available when all data is entered";
End Function MessageInformationBox;
The example of function, on executing it in the web application there is no message, and in the desktop application the message text will be displayed in the development environment console:
Function BeforeOper2(Report: IPrxReport): String;
Begin
debug.WriteLine("BeforeOper2");
Return "";
End Function BeforeOper2;
Determine function name on JavaScript language in the JS Function box that is to be started in the web application after the button action is executed. Function name:
javascript: <Function name (custom parameters, callback, args)>
Parameters:
Custom parameters. Required custom parameters.
Callback. Mandatory parameter. Callback function.
Args. Function arguments.
Using angle brackets when specifying function name with parameters is mandatory.
Example of function name:
javascript:<AfterOperTest(callback)>
If JS function and Fore function are specified, Fore function is firstly executed in the web application and then JS function, in the desktop application only Fore function is executed.
JS function is added in the Layout and Formatting section of designer of business applications. Click the Add button in the File Loading area and load file in UTF-8 encoding. The function must have the required signature:
function <Function name>(custom parameters, callback, args)
{
…callback();
}
The following parameters can be obtained as arguments:
Report. Parameter to manage report.
DataEntryForm. Parameter to manage data entry form.
DataArea. Parameter to manage table area.
Function example:
function addAttachments(callback, args)
{
var rep = args.Report;
var da = args.DataArea
var grid = da.getGridView();
var tabSheet = grid.getTabSheet();
var tableSource = grid.getTableSource();
var onMeasuresLoaded = (function(){
var tabSheetRange = tabSheet.getSelection().getRange();
attachFile(da, tabSheetRange);
tableSource.MeasuresLoaded.remove(onMeasuresLoaded, this, );
});
tableSource.MeasuresLoaded.addOne(onMeasuresLoaded, this, args);
callback();
}
function attachFile(da, tabSheetRange) {
var rep = da.getSource();
var grid = da.getGridView();
var tabSheet = grid.getTabSheet();
if (tabSheetRange && tabSheetRange.isValid()) {
var cells = tabSheetRange.getCells();
if (cells.length == 1) {
var cell = cells[0];
var coord = cell.getCoord();
var range = { top: coord.rowIndex, left: coord.colIndex, width: 1, height: 1 };
var views = rep.getGridViews(range);
var gridKey = views.length ? views[0].key : undefined;
var attachDlg = da.getGridView().showAttachmentDialog(gridKey, coord.rowIndex, coord.colIndex);
}
}
}
Select the Posthandler checkbox to execute required actions after method handling is finished, algorithm calculation is finished or object is closed. The posthandler starts after the object is closed, if data entry form is selected as object and the Open in Modal View checkbox is selected. Only one posthandler can be set.
To set up posthandler:
Select the Posthandler checkbox.
NOTE. The area becomes active after unit selection.
Select the method in the Fore Method/Function list. The list contains all methods of the selected unit corresponding to the signature:
Sub <Method name>(<Report>: IPrxReport);
Parameter:
Report. Data entry form is sent to parameter in the IPrxReport format. When working with this object, all properties and methods of the IPrxReport interface are available.
Method example:
Sub UpdateData(report: IPrxReport);
Begin
report.ActiveSheet.Table.Cell(10, 10).Value := 1000000;
End Sub UpdateData;
Determine function name on JavaScript language in the JS Function box that is to be started in the web application after the button action is executed. Function name:
javascript: <Function name (custom parameters, callback, args)>
Parameters:
Custom parameters. Required custom parameters.
Callback. Mandatory parameter. Callback function.
Args. Function arguments.
Using angle brackets when specifying function name with parameters is mandatory.
Example of function name:
javascript:<AfterOperTest(callback)>
If JS function and Fore function are specified, Fore function is firstly executed in the web application and then JS function, in the desktop application only Fore function is executed.
JS function is added in the Layout and Formatting section of designer of business applications. Click the Add button in the File Loading area and load file in UTF-8 encoding. The function must have the required signature:
function <Function name>(custom parameters, callback, args)
{
…callback();
}
The following parameters can be obtained as arguments:
Report. Parameter to manage report.
DataEntryForm. Parameter to manage data entry form.
DataArea. Parameter to manage table area.
Function example:
function addAttachments(callback, args)
{
var rep = args.Report;
var da = args.DataArea
var grid = da.getGridView();
var tabSheet = grid.getTabSheet();
var tableSource = grid.getTableSource();
var onMeasuresLoaded = (function(){
var tabSheetRange = tabSheet.getSelection().getRange();
attachFile(da, tabSheetRange);
tableSource.MeasuresLoaded.remove(onMeasuresLoaded, this, );
});
tableSource.MeasuresLoaded.addOne(onMeasuresLoaded, this, args);
callback();
}
function attachFile(da, tabSheetRange) {
var rep = da.getSource();
var grid = da.getGridView();
var tabSheet = grid.getTabSheet();
if (tabSheetRange && tabSheetRange.isValid()) {
var cells = tabSheetRange.getCells();
if (cells.length == 1) {
var cell = cells[0];
var coord = cell.getCoord();
var range = { top: coord.rowIndex, left: coord.colIndex, width: 1, height: 1 };
var views = rep.getGridViews(range);
var gridKey = views.length ? views[0].key : undefined;
var attachDlg = da.getGridView().showAttachmentDialog(gridKey, coord.rowIndex, coord.colIndex);
}
}
}
To manage button activity:
Select the Manage Button Activity checkbox to activate or deactivate the button by any condition.The parameter value or attribute, calculation result can be used as condition. Only one function can be set as button activation or deactivation condition.
NOTE. The area becomes active after unit selection.
Select the function in the Fore Method/Function list. The list contains all functions of the selected unit corresponding to the signature:
Function <Function name>(<Report>: IPrxReport): Boolean;
Parameter:
Report. Data entry form is sent to the parameter in the IPrxReport format. On working with this object, all properties and methods of the IPrxReport interface.
Available values:
True. The button is active.
False. The button is not active.
NOTE. The condition execution check is permanently running, that is why Fore function must be executed quickly, otherwise the data entry form will not work.
To delete button, use the  button.
Created custom buttons are displayed on the Custom Functions ribbon tab. The tab becomes available after the custom button is added.
On clicking the button, actions are executed according to settings made on creation:
Calculation Algorithm. Calculation is started on clicking.
Fore Unit/JS-function. Specified unit is started on clicking.
Open Repository Object. Object opens on clicking the button.
If additional options were set for the button:
Activate/Deactivate Button. After executing the condition specified in the unit, the button becomes active or unavailable.
Prehandler. After clicking the button, depending on the function construction the dialog box of the specified format with text that will be returned by prehandler function.Depending on the format view, the following buttons will be available in the dialog box:
Confirmation dialog box: the Yes and No buttons.To execute action of custom button, click the Yes button in the dialog box. To undo custom button action, click the No button in the dialog box.
Error, warning, information message: the OK button.To undo custom button action, click the OK button in the dialog box.
See also:
Building Data Entry Form | Working with Ready Data Entry Form