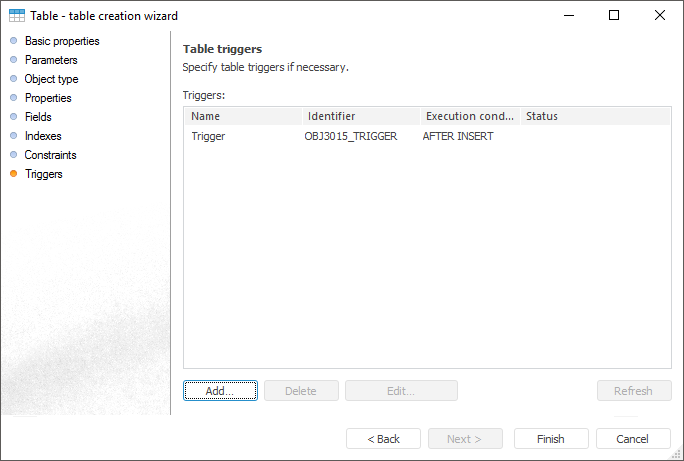
The Table Triggers page is used to create a list of table triggers.
Trigger is a function consisting of SQL commands and describing the operations to be executed under certain conditions.

To create a trigger:
Click the Add button.
Double-click next to the trigger list.
The Trigger Properties dialog box opens.
To edit selected trigger:
Click the Edit button.
Double-click the trigger.
The Trigger Properties dialog box opens. Enter required changes to it. The Trigger Properties dialog box also opens on double-click.
To delete the current trigger, click the Delete button.
If a trigger is created outside Foresight Analytics Platform (for example, in TOAD), it can be refreshed. To do this, click the Refresh button.
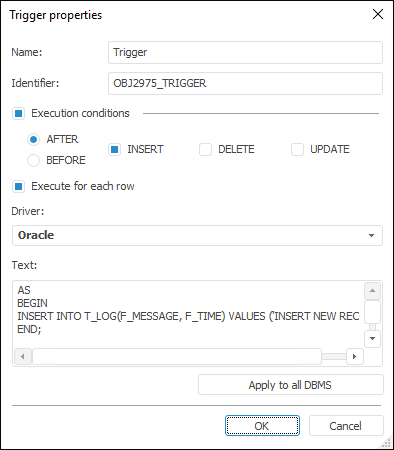
The Trigger Properties dialog box opens when a trigger is created or edited:

Determine the following attributes in the opened dialog box:
Name. Enter the trigger's name.
Identifier. The trigger’s unique identifier (only Latin letters, numbers, and underscores can be used; spaces are not allowed).
Execution Conditions. Define the condition, under which the calculation is executed: first you need to define the time of executing one or several selected events. To do this, select appropriate radio buttons:
After. After adding, deleting, or modifying data.
Before. Before adding, deleting, or modifying data.
Then select the trigger action event; to do this, checkmark appropriate boxes:
INSERT. Adding data to the table.
DELETE. Deleting data from the table.
UPDATE. Modifying data in the table.
NOTE. If a Microsoft SQL Server driver is chosen, the AFTER/BEFORE checkbox does not affect the created trigger, because Microsoft SQL Server does not have such division.
Execute for Each Row. This checkbox is relevant if Oracle drivers are selected. This is explained by the Oracle drivers feature which enables the user to set up triggers executed only once for each modified record (for each row) or triggers executed once for the entire modified set of records (without "for each row").
Driver. Select the driver type in the drop-down list. For details about available drivers see the Supported DBMS section. A driver corresponding to table database is highlighted in bold. It is selected by default on dialog box opening. It is available to determine a specific text for each driver, which is the trigger text, entered into corresponding field, must be linked to the selected database type. Start conditions do not depend on the driver. When the Execution Conditions checkbox is deselected, the Driver list and the Apply to All DBMS button are still available.
Text. Enter trigger code in the SQL language in this field. The code is entered according to the SQL syntax, which is set up for the selected DBMS. For example, the entire code must be specified between key words for servers based on Microsoft SQL Server:
AS
BEGIN
...
END;
The entire code must be specified between the key words for Oracle-based servers:
BEGIN
...
END;
Apply to All DBMS. This command enables the user to set the selected text for all DBMS. If at least one driver except the current one has non-empty trigger text, clicking this button opens a confirmation dialog box. Selecting Yes sets the displayed trigger text for all DBMS, that means that all currently existing trigger texts are replaced with the current one. If triggers' text is empty for all drivers except the current one, no confirmation dialog box is not displayed.
See also: