Executing the example requires data area or table visualizer with the EaxObject identifier located on the regular report's active sheet.
To create a macro, select the Create > Development Environment > Unit item in the context menu of the Object Navigator window. The development environment dialog box opens.
Add links to the Dimensions, Express, Matrix, Pivot, Report, Tab, Ui system assemblies. To do that, select the Assembly > Edit Links item. In the Assembly Links dialog box that opens on the System Assemblies tab, select checkboxes next to the required assemblies names.
Enter the following code into the development environment window:
Sub AttributeValue(Row: Integer; Column: Integer);
Var
rep: IPrxReport;
tab: ITabSheet;
sheet: IPrxTable;
DataArea: IEaxDataAreaViews;
grid: IEaxGrid;
result_eax: IEaxDrillResult;
result_prx: IPrxDrillCellResult;
slice_eax: IEaxDataAreaPivotSlice;
slice_prx: IPrxSlice;
dim: IDimInstance;
DimSelection: IDimSelection;
dim_prx: IPrxSliceDimension;
DimAttr: IDimAttributeInstance;
DimElements: IDimElements;
DataBinding: IPrxTableDataBinding;
FocusedRow, FocusedColumn, dimInd, ind: Integer;
AttrValue: Variant;
Begin
rep := PrxReport.ActiveReport;
sheet := rep.ActiveSheet As IPrxTable;
tab := sheet.TabSheet;
// index of the row, in which focused cell is located:
FocusedRow := Row;
// index of the column, in which focused cell is located:
FocusedColumn := Column;
// === Table visualizer ===
DataArea := rep.DataArea.Views;
grid := DataArea.FindById("EaxObject") As IEaxGrid;
result_eax := grid.DrillCellResult(FocusedRow, FocusedColumn);
If result_eax <> Null Then
slice_eax := grid.Slice As IEaxDataAreaPivotSlice;
dim := slice_eax.Pivot.LeftHeader.Dim(0);
DimSelection := result_eax.Selection.FindByKey(dim.Key);
WinApplication.InformationBox("Element attribute value: " + #10 + #13 + DimSelection.ToString);
End If;
// === Data area ===
DataBinding := (rep.ActiveSheet As IprxTable).DataBinding;
result_prx := DataBinding.DrillCell(FocusedRow, FocusedColumn);
If result_prx <> Null Then
slice_prx := rep.DataSources.Item(0).Slices.Item(0);
dim_prx := slice_prx.LeftHeader.Item(0);
dimInd := slice_prx.Selection.IndexOfKey(dim_prx.Key);
ind := result_prx.Coord.Item(dimind);
DimAttr := dim_prx.Dimension.Attributes.Item(0);
DimSelection := result_prx.Selection.Item(dimind);
DimElements := DimSelection.Dimension.Elements;
AttrValue := DimElements.AttributeValueO(ind, DimAttr);
WinApplication.InformationBox("Element attribute value: " + #10 + #13 + AttrValue);
End If;
End Sub AttributeValue;
After the unit is created and saved connect it to the report.
If it is required that a link opens in the web application, create a custom JS-function identical to the Fore procedure and connect it to the report. For details about how to do it, see the Connecting Custom JS-Function to Report article.
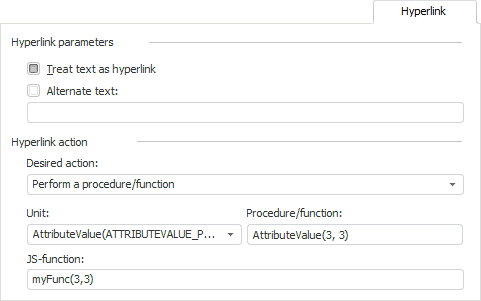
Open the Cell Format dialog box for a cell in regular report. Go to the Hyperlink tab, specify the created unit, procedure and JS-function in the corresponding boxes:

NOTE. The considered example contains numbers of data area row and column as procedure parameters: AttributeValue(3, 3).
A cell containing a hyperlink looks as follows:
![]()
Click the cell with hyperlink.
After executing the example, attributes of data area element are obtained by the selected data area cell. For example:

See also: