In the web application click the Start Parameters button in the main menu.
In the desktop application:
Select the Task Container > Save Options for Scheduler main menu item.
Click the
 button on the toolbar.
Press CTRL+S.
To create the Scheduler.xml configuration file automatically in the scheduled tasks container, follow the steps:
Save options for task scheduler:
In the web application click the Start Parameters button in the main menu.
In the desktop application:
Select the Task Container > Save Options for Scheduler main menu item.
Click the button on the toolbar.
Press CTRL+S.
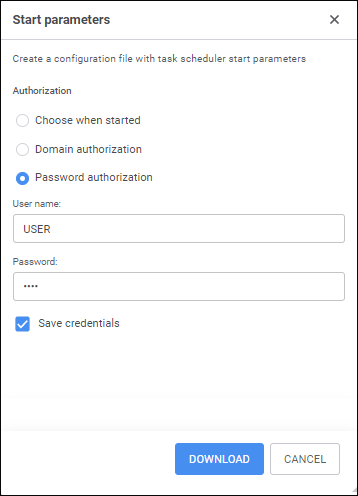
After executing the operations the Start Parameters dialog box opens in the web application or the Save Task Scheduler Settings dialog box in the desktop application.
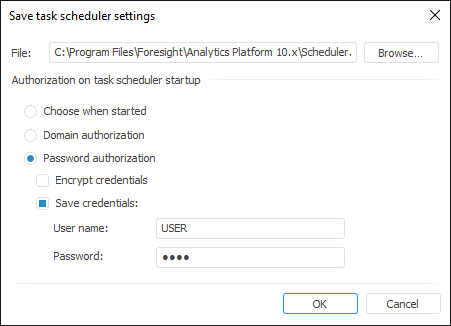
Specify the full name of the saved file in the File input box. You can change file name and path manually or by clicking the Browse button.
In the Authorization parameter group set the type of authorization, which is specified in the settings:
Choose When Started. The authorization type is defined in the Database Authorization dialog box shown at the scheduler start. The following parameters are set in the configuration file: <Credentials Authentication="0" Ask="1"/>.
Domain Authorization. During authorization the system uses the same user name and password as it used to connect the user to the domain. The following parameters are set in the configuration file: <Credentials Authentication="2"/>.
Password Authorization. During authorization, the system uses the user defined name and password. After this radio button is selected, the following checkboxes also become available:
Encrypt Credentials. If the checkbox is selected, user password is encrypted and stored in the Scheduler.xml file. The following parameters are set in the configuration file: <Credentials Authentication="6">. It is available only in the desktop application.
Registration user credentials in the web application are encrypted by default.
IMPORTANT. To work correctly, task scheduler must be started under the user, with which Foresight Analytics Platform was started and a configuration file was created.
Save Credentials. After the checkbox is selected, specify user name and password, which will be used on authorization. By default the current system user is selected in the User Name box. The following parameters are set in the configuration file: <Credentials Authentication="1" USER="USER1" PASSWORD="KEYWORD"/>. The USER attribute value and the PASSWORD attribute value match the values specified in the User Name box and the Password box.
By default, the checkboxes are deselected that is why the user name and password need to be specified in the Database Authorization dialog box at the task scheduler start. The following parameters are set in the configuration file: <Credentials Authentication="1" Ask="1"/>.
If both checkboxes are selected, the following parameters are set in the configuration file: <Credentials Authentication="6"> <Key Name="…" Realm="…" Crs="…" Crsa="…"/>. The Name, Realm, Crs, Crsa attributes are formed automatically and are read-only.
To save the configuration file in the web application, click the Download button. By default, the created configuration file is saved to the downloads folder.
Place the created configuration file:
In the /opt/foresight/fp10.x-biserver/etc folder in Linux OS.
Next to the Scheduler.exe scheduler's executable file in the folder C:\Program Files\Foresight\Analytics Platform 10.x in Windows OS.
When the configuration file is created automatically, only basic settings are created. To extend the configuration file, see the Extending Configuration File Manually section.
See also:
Creating a Configuration File | Extending Configuration File Manually