
 To open the dialog box
Dimension synchronization enables the user to control element selection in several objects that use different data slices.
Synchronization is executed by setting up groups between data slice dimensions used by objects. If several objects use the same slice as a data source, synchronization settings for these objects will match. To provide correct setup, synchronized slice dimensions must be based on one dictionary.
NOTE. Dimension synchronization is not set up automatically, even if the slices set up to the same data source are created. All synchronization settings are determined by the user.
To set up dimension synchronization, use the Selection Synchronization dialog box.
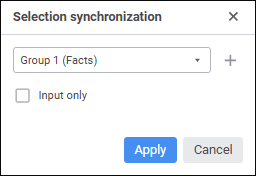
To add a dimension to the synchronization group, create a group or select the group in the drop-down list if groups have been already added.
To set up synchronization in the report:
Create a synchronization group. To create a synchronization group for the dimension, click the  Create New Group button. The group named Group <group_number> (<Dimension_name>) is added.
Determine the link type used for dimension synchronization. When the Input Only checkbox is selected, the dimension will receive selection of the other dimensions, with which synchronization is set up. When the checkbox is deselected, the dimension will receive and transfer selection to controlling dimensions.
Click the Apply button to include the dimension in the synchronization group.
As a result, dimension synchronization is set up. The dimensions with configured synchronization display the  icon and a tooltip in the Dimensions area on the control panel.
Only one group can be created based on any dimension. The dimension included in different slices enables the user to create several groups.
To exclude the dimension from the group, select the None option in the list in the Selection Synchronization dialog box.
See also:
Setting Up Dimensions and Element Selection
 Actions button in the