In this article:
Setting Up Step Description Parameters
Setting Up Links between Data Entry Form/Report and Process Parameters
Creating the Data Entry Step
To create a step to enter a specific data set, open the data entry step wizard.

 Open the wizard
Setup of the Data Entry step includes the following operations:
Set up basic step properties. After basic step properties have been determined, click the Next button.
Set up links between data entry form/report and process parameters.
Setting Up Step Description Parameters
To set up step description parameters, use the Step Description page in the step wizard:
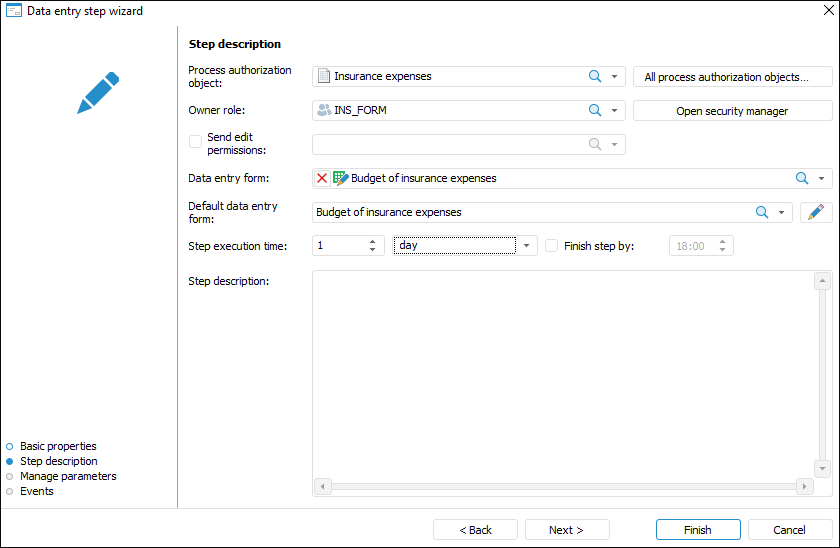
Set the parameters:
Process Authorization Object. The box is mandatory. Select the required object in the process authorization objects drop-down list.
If there is no appropriate authorization object, click the All Process Authorization Objects button. The Set Up Process Authorization Objects dialog box opens where an authorization object can be added.
NOTE. To ensure correct work of business processes in a data entry form, selection by dimensions of the authorization object should be fully contained in the selection by dimensions of data entry form that is used in the process step.
Owner Role. The box is mandatory. In the drop-down list select the user or the group of users responsible for step execution on process execution. The list contains users specified in the authorization object.
If the list does not contain the required group of users, click the Open Security Manager button. The dialog box of the security manager of Foresight Analytics Platform, which enables the user to create the required group of users.
The selected user will get default access to read and write to data segment.
Send Edit Permissions. Select the checkbox and select the group or user in the list to grant read and write permissions to data segment. The checkbox is deselected by default. When the checkbox is selected, the group or user selected in the Owner Role box get read-only permissions,
Data Entry Form. The box is mandatory. Select data entry forms and/or reports, in which the step execution/rejection result will be saved. The list contains repository objects tree where data entry forms, regular reports, and folders containing them are only displayed. When selecting a data entry form or a report, you can use search.
If data entry forms, which use data from the same authorization object, are selected to save step execution/rejection result, any of the selected forms will allows for data entry and approval. To correctly execute the step and display process tree in data entry form – selection by dimensions of data entry form should fully contain selection by dimensions of authorization object that is used in process step.
If regular reports are selected to save step execution/rejection result, step management is available only in process monitoring.
Default Data Entry Form. When several data entry forms or regular reports are selected, in the drop-down list specify a default data entry form or report. A default data entry form or report will open on process step execution. To edit the a default data entry form or report, click the
 Edit button. The data entry form or report will open for edit.
Step Execution Time. Specify the time, in which a step should be executed on process execution. Execution time is counted from step activation.
Enter a numeric value of step execution time and select a time measurement unit in the list: minute, hour, day (default), week, month, quarter, half-year, or year.
To determine time, by which step must be finished, select the Finish Step By checkbox. When the Minute or Hour measurement units are selected, this box is hidden.
If the step is not finished by the scheduled execution period, the step status becomes Expired.
The step execution period impacts the whole process execution period, which is determined during process start.
Step Description. The box is optional. A text box for entering a comment for a step.
After the parameters have been determined on the Step Description page, click the Next button.
Setting Up Links between Data Entry Form/Report and Process Parameters
To open data entry form/report with the same parameters as the running process step, set up a link between data entry form/report parameters and process parameters on the Manage Parameters page of the step wizard:
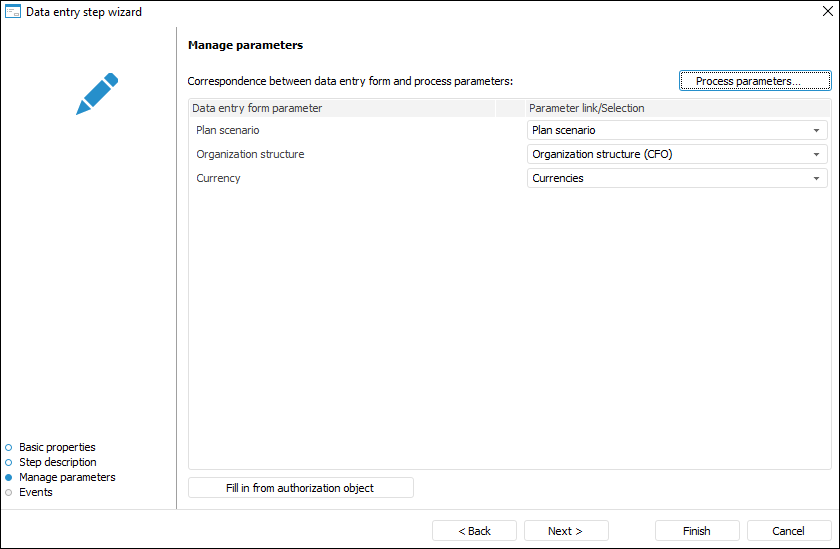
Determine correspondence between data entry form parameters and process parameters:
To automatically copy parameter settings from authorization objects, click the Fill from Authorization Object button.
To manually set correspondence in the Parameter Link/Selection column, select the checkbox:
Undefined. In this case the data entry form or report opens with parameter value specified in the default data entry form or report:

Bind. In this case the process parameter corresponding to data entry form or report parameter is selected:
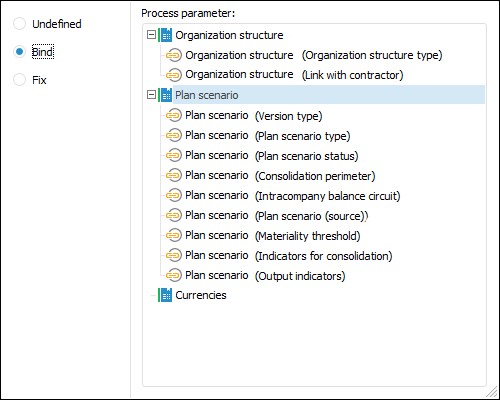
Select the dictionary attribute to be sent as a parameter to data entry form or report if required.
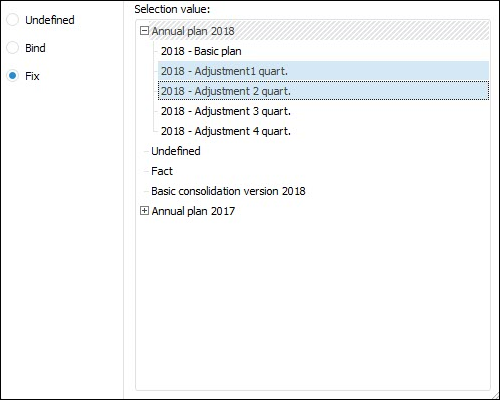
Fix. In this case, the specified values are selected in the drop-down list to send a limited number of parameter values to data entry form or report:
If there is no required process parameter, click the Process Parameters button. The Process Settings and Parameters dialog box opens where a process parameter can be added.
NOTE. When setting up links between data entry form and process parameters, use dictionaries of one type. For example, do not link dictionary with text elements and calendar dictionary. In this case, after the process is started, the monitoring window displays error message.
After the parameters have been determined on the Manage Parameters page, click the Next button.
Setting Up Events Executed on Step Execution Start or End
To set up the events executed automatically on step execution start and end, use the Events page in the step wizard:
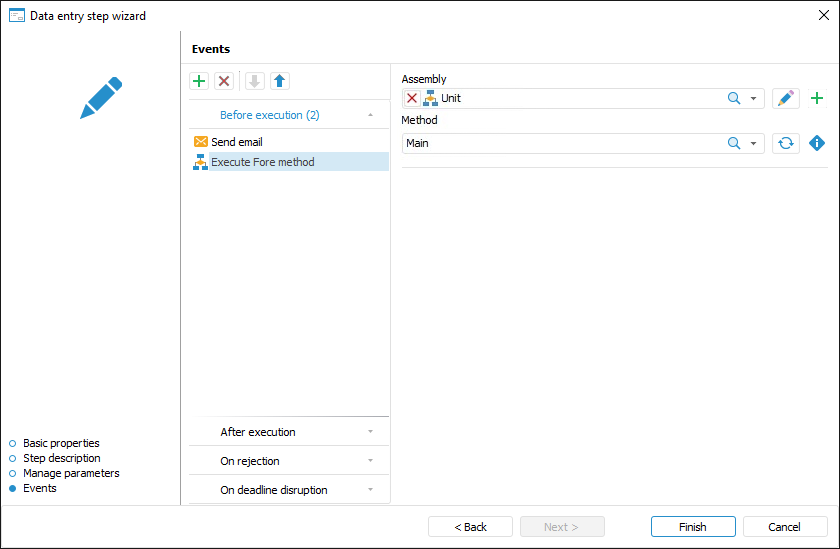
Create a list of executed operations:
Select the tab with the configured event on the Events wizard page. The following events are available:
Before Execution. The list of actions will be started before executing the current step in the specified order.
After Execution. The list of actions will be started after executing the current step in the specified order.
On Rejection. The list of actions will be started on the current step rejection. The list is available for steps with manual execution. If the step is executed automatically, the tab is not displayed.
On Deadline Disruption. The list of actions will be started on deadline disruption to execute the current step in the specified order. To execute the actions:
When the server execution of processes is selected, select the Check Deadline Disruption of Steps checkbox on the Scheduler page and set check frequency.
When the client execution of processes is selected, select the Check Deadline Disruption item on the Administration page.
Click the
 Add button on the toolbar and select the added action:
 Execute Fore Method. Determine:
Unit. In the drop-down list select a Fore unit, the list contains all repository units and folders containing units. Search by unit name is available.
To edit the selected unit, click the Edit button.
To create a unit, click the Add button.
Method. Select a method in the drop-down list. The list contains all unit methods corresponding to the signature:
Sub <Fore-method name>(Sender: IBProcessInstance; Args: IBProcessStepStateEventArgs);
Parameter:
Sender. Process instance.
Args. Event information: step, step old state, new state.
To refresh the methods list, click the  Refresh List button.
To copy method signature, click the  Copy Signature button.
 Send Email. Set message parameters:
To. Enter address of one or several main recipients separated by the ; character. The box is mandatory.
Copy. Enter address of one or several recipients separated by the ; character to see the message.
BCC. Enter address of one or several recipients separated by the ; character to see the message. The address will be hidden from other message recipients.
Subject. Enter message subject.
Contents. Enter message contents using the option of variables values substitution with step parameters, links to step objects to view in the web application, file attachments.
NOTE. The number of added actions is unlimited.
To reorder operation execution, use the  Move Up and
  Move Down buttons on the toolbar on the Events wizard; to delete, click the
  Delete button.
The list of automatically executed actions can be empty.
To determine parameters on the Events page, click the Finish button.
After creating the process steps, set up steps execution conditions