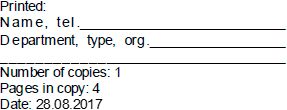
Marking step is used on selecting mandatory access control or level-based access control method to mark documents on exporting and printing.
To add a marking stamp:
Select the Mark Objects on Export and Print checkbox in the Security Level Parameters dialog box.
Open the Marking Stamp dialog box:
In the web application, in the Mandatory Access Control section or the Security Levels section click the Marking Stamp button on the toolbar.
In the desktop application:
From the Mandatory Access Control section select the Mandatory Access Control > Marking Stamp main menu item.
In the Security Levels section select the Security Levels > Marking Stamp main menu item.
After executing one of the operations the dialog box with the current stamp template opens:

Set up marking stamp contents in the Marking Stamp Text area: The stamp may contain arbitrary text.
NOTE. A marking stamp will be applied to all repository reports and documents. A unique marking stamp can be set up for a specific report using the IGxDocument.Stamps property.
Click the Default button to reset the stamp text to default appearance:

Clicking the Template button opens a list of automatically filled in boxes inserted into marking stamp contents:
&[TOTAL_COPIES]. A number of printed copies. Filled in automatically. The substitution value is equal to one on export.
&[SHEETS_PER_COPY]. A number of sheets in a copy. Filled in automatically.
&[DATE]. Print or export date. Filled in automatically.
&[NAME]. User name.
&[DEPARTMENT]. Department name.
After executing the operations, on exporting and printing marking stamp will be contained on the marked documents.
See also:
Setting Up Mandatory Access Control Method | Setting Up Level-Based Access Control Method | Setting Up Security Level Parameters