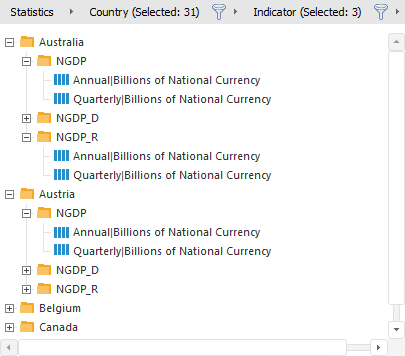
A series tree shows the tree structure of the open data source elements. The structure of the series tree is based on the chain of attributes defined in the breadcrumb. Levels of the hierarchy of the series tree are shown as folders, which names correspond to attribute values. Multiple elements can be selected in the series tree by holding down SHIFT or CTRL.
A breadcrumb is located above the series tree. The breadcrumb can be worked with after selecting a data source. The default attribute order is set on creating time series database.
After attribute order in the breadcrumb changes, the series tree hierarchy is rebuilt. If the breadcrumb does not contain selected attributes, the elements are shown as a list.
Series tree example:

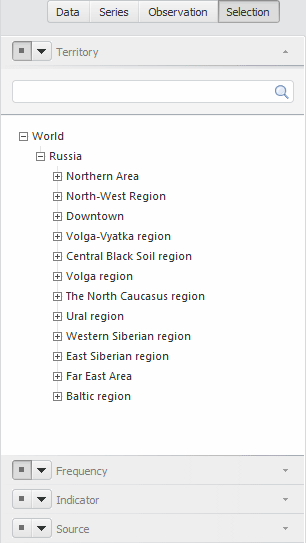
Changing the order and the contents of attributes is performed in the breadcrumb using the Selection group of tabs on the side panel. Each tab corresponds to the data source attribute and contains a search string and a list of attribute values.
Make sure that the side panel is displayed.
Click the series tree.
Set the Selection radio button on the side panel.
For example:

Go to the Home or View ribbon tab.
Click the ![]() Series Tree button.
Series Tree button.
A series tree can also be shown or hidden in the desktop application by using the Source button located above the series tree.
A workbook sheet can contain series from different data sources.
Select the following repository objects as sources:
Time series database.
Standard cube. The following conditions have to be satisfied to use a cube:
An MDM repository used by default must be specified. This repository must contain measures and units dictionaries that are used in time series databases.
A cube must satisfy the conditions:
It can have only one one fact with one value.
It can have only one source table with data.
It must have at least one dimension.
The formulas created using the Fore language are not supported in relations between dimensions.
The name of the selected data source is displayed as the first element in the breadcrumb.
To select a data source:
In the desktop application:
Click the Source button located above the series tree. The repository object tree is displayed.
Select the required source.
In the web application:
Go to the Home or View ribbon tab.
Click the bottom part of the ![]() Series Tree button. The list of all available data sources is displayed.
Series Tree button. The list of all available data sources is displayed.
Select the required source.
The series tree and the breadcrumb are rebuilt according to the selected source.
In the desktop application:
Open the drop-down menu of the Source button located above the series tree.
Click the Data Import button.
In the web application:
Go to the Home ribbon tab.
Click the bottom part of the ![]() Series Tree button. The list of all available data sources is displayed.
Series Tree button. The list of all available data sources is displayed.
Click the Data Import button.
The data import wizard opens, which is used to create a new data source.
Open the series tree context menu.
Select or deselect the Show Tooltip checkbox. If the checkbox is selected, the tooltip is shown.
Open the series tree context menu.
Select the Hide item. The menu to set up filtering parameters appears:
No Filter. If the checkbox is selected, empty values are not filtered. The series tree displays empty folders and non-existing but possible elements. Non-existing elements are the elements obtained from the difference between the Cartesian product of all the attributes displayed in the elements tree and existing elements.
Empty Series. If the radio button is selected, the series tree does not show empty series.
Empty Series and Folders. If the radio button is selected, the series tree does not show empty series and folders. By default this radio button is selected.
The series tree is rebuilt taking into account the set filtering.
NOTE. Which series should be considered as empty depends on the Empty Series Indicator checkbox in time series database properties. By default the checkbox is deselected, and the series is considered empty if the revision containing the information about this series is missing in the time series database. If the checkbox is selected, the series is considered empty if it does not contain data.
NOTE. The option is available only in the desktop application. Search is performed only among expanded elements, that is, if there is a group of elements and it is collapsed, the search is not performed inside of it.
To search elements by name:
Select the Search item in the context menu of any element.
Click the series tree and press CTRL + F.
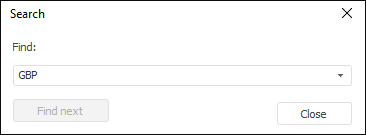
The Search dialog box opens:

Enter the element name and click the Find Next button. The first element found is highlighted.To find the next element corresponding with the conditions, click the Find Next button again.
If an element with the specified name is not found, the appropriate message appears.
To quickly select a data source, use the breadcrumb:
Click the name of the data source in the breadcrumb. A list of available data sources appears.
NOTE. The drop-down list contains data sources used on the current sheet of the workbook before. On navigating between workbook sheets, the data sources used on other sheets are added to the list. On adding a sheet all data sources used in the workbook are displayed in the list.
Select required data source.
Consequently:
The breadcrumb and the series tree are rebuilt according to the new data source settings.
In the repository source tree in the drop-down menu of the Sources button, the selection will be focused on the selected data source.
In the desktop application. Click the attribute name in the breadcrumb.
In the web application. Click the ![]() button located after the attribute name in the breadcrumb.
button located after the attribute name in the breadcrumb.
The menu containing items to work with the attribute opens.

 Show the list of available attributes
In the desktop application. Click the ![]() button located after the attribute name in the breadcrumb.The list of available attributes appears.
button located after the attribute name in the breadcrumb.The list of available attributes appears.
In the web application. Open the attribute menu. The menu opens, containing a list of available attributes and items to work with them.
Open the list of available attributes and select the required one. In the web application the attributes available for adding are combined into the Add group.
The attribute is added to the breadcrumb after the ![]() button. All the succeeding attributes are deleted.
button. All the succeeding attributes are deleted.
Use the Selection tab group on the side panel. Click the ![]() button corresponding to the attribute.
button corresponding to the attribute.
The attribute is added to the breadcrumb to the same position it is located on the side panel.

 Replace attribute in breadcrumb
Open the list of available attributes.
Select the required attribute. In the web application attributes available for replacement are combined into the Replace group.
The attribute is placed in the breadcrumb instead of the attribute, which menu was opened. Order and contents of other attributes is not changed.

 Remove attribute from breadcrumb
Open the attribute menu and select the Remove item.
Use the Selection tab group on the side panel. Release the ![]() button corresponding to the attribute.
button corresponding to the attribute.
The attribute is removed from the breadcrumb.
Open the attribute menu.
Select the Clear Breadcrumb item.
All attributes are removed from the breadcrumb.

 Change order of attribute sequence in breadcrumb
Changing attribute order is possible:
Using the Selection group of tabs on the side panel. Click the ![]() button corresponding to the attribute. The following menu appears:
button corresponding to the attribute. The following menu appears:
Up. Moves tab one position up. The attribute matching the tab is moved one position left in the breadcrumb.
Down. Moves the tab one position down. The attribute corresponding to the tab is moved one position right in the breadcrumb.
Using the attribute menu items in the desktop application:
Right. Moves the attribute one position right.
Left. Moves the attribute one position left.

 Set default sequence of attributes
To set default sequence of attributes:
Click the  button located after root element in the breadcrumb.
Select the Default Order item.
The default sequence of mandatory attributes is restored.
Use the Selection group of tabs on the side panel. Click the name of the tab corresponding to the attribute.
In the web application click the name of the attribute in the breadcrumb.
The hierarchic list with the attribute values is displayed.
To expand or collapse hierarchy, use the items in the context menu of the list: Expand All and Collapse All.
For quick sorting:
Click the ![]() button.
button.
Select the Sorting item. The submenu to set attributes values sorting order is displayed.
Select the radio button that determines the sorting direction. By default sorting is not applied.
Element order is changed corresponding to the selected sorting direction.
NOTE. Quick sorting is available only in the web application.
For extended sorting:
In the desktop application, open the attribute menu. In the web application open the context menu of attribute value list.
Select the Sorting item. A submenu is displayed:
Apply from Source. To sort attribute values, the parameters set for the source dimension are used.
NOTE. The command is available only in the web application.
Ascending. Sorting is performed by ascending values of the attribute selected in the dimension attributes list.
Descending. Sorting is performed by descending values of the attribute selected in the dimension attributes list.
NOTE. If a dimension attribute is not set, sorting is performed by the first attribute in the list.
List of Dimension Attributes. The list contains all attributes of the source dimension. Select the radio button next to the attribute, by which values sorting is performed.
If the sorting direction is not set before attribute selection, the ascending values sorting is performed.
The order of elements will be changed according to the specified sorting parameters.

 Filter series tree by attribute values
Filtering is performed by:
Breadcrumb. Select the Filtering checkbox in the attribute menu and specify the filter.
The Selection tabs on the side panel. Go to the tab corresponding to the required attribute and specify the filter.
The filter is formed by the attributes values selection. To work with a selection, use items of the attribute values list context menu:
Select All. Selects all elements.
Deselect All. Deselects all elements.
Select All Descendants. Selects the specified element and all its children.
Deselect Descendents. Deselects the specified element and all its children.
Advanced Selection:
Select Level.Selects all elements on the same level with the specified dictionary element; the level can be chosen in the drop-down list.
Deselect Level.Deselects all elements on the same level with the specified dictionary element; the level can be chosen in the drop-down list.
Apply Selection Schema. Automatically applies the selected selection schema on any change of selection. To disable the application, select the Reset item.
Select Group. Deselects the the currently selected elements and selects elements included in the group of elements.
Select Hierarchy. Deselects the the currently selected elements and selects elements included in the alternative hierarchy.
Selection data is shown in brackets after the attribute name in the breadcrumb.
Use the Selection group of tabs on the side panel:
Go to the tab corresponding to the required attribute.
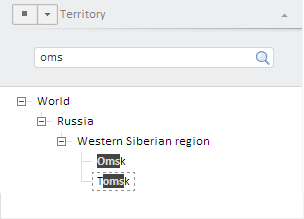
Enter the required value to the search string in the upper part of the tab. The elements list contains only the elements corresponding to the search conditions.
NOTE. To search in the web application, click the ![]() button.
button.
For example:


 Rename elements in the list of attribute values
Open the context menu of the attribute values list.
Select the Names option. A submenu is displayed:
Default. The list contains values of the attribute used by default to form element names in the source dimension.
List of Dimension Attributes. The list contains all attributes of the source dimension. Select the radio button next to the attribute, which values should be displayed in the list.
Names of elements in the list are changed according to the specified parameters.

 Set up elements display in the attribute values list
Setting up the list of displayed elements is available on using the element group or alternative hierarchy.
Open the context menu of the attribute values list and select one of the items in the View group:
Group of Elements. Shows only elements of the selected group of elements in the list.
Alternative Hierarchy. Shows only elements of the selected alternative hierarchy in the list.
To return to the list of elements, select the Reset item.
See also: