Preparation and Deployment of Fault-Tolerant Cluster
In this article:
Deployment Architecture Schema
Preparing Environment for Foresight Mobile Platform
Preparing Kubernetes (k8s) Cluster
Preparing to Start Foresight Mobile Platform
Clusters are used to distribute traffic, support databases, store files and business applications in the network. To provide horizontal scaling of all system components, a new approach to cluster deployment is implemented.
Advantages of new approach:
Use new tools for deployment and service of cluster components without system downtime for maintenance.
Use freeware with paid options.
Support Ceph modern distributed file system.
Quick installation and easy service of Foresight Mobile Platform.
Friendly user interface Rancher for diagnostics of the current software state.
Deployment Architecture Schema
Main stages of fault-tolerant cluster deployment that are given in this article:
Prepare environment for Foresight Mobile Platform.
Prepare to start Foresight Mobile Platform.
Start Foresight Mobile Platform.
Generalized schema of fault-tolerant cluster architecture deployment:
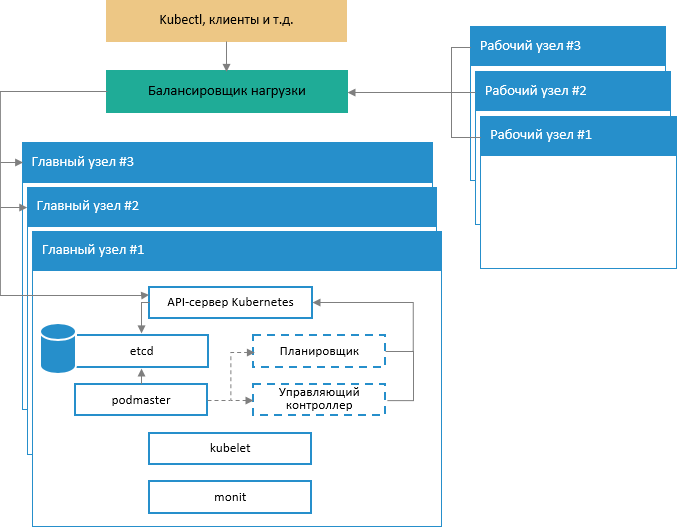
The schema displays work of Kubernetes system services on main cluster nodes and also interaction of main nodes with work nodes and incoming requests via special services with load balancing support.
Schema of providing control cluster part fault-tolerance:
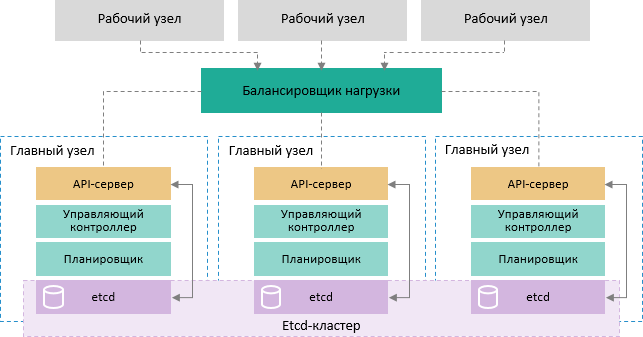
NOTE. Each main node in the cluster contains the following processes and components:
1. kube-apiserver. Single control point for cluster. The kubectl command interacts directly via API.
2. kube-controller-manager. Process of cluster status control via controllers.
3. kube-scheduler. Process of task planning on all available cluster nodes.
4. etcd. Database based on the key-value pairs that stores information about statuses of all cluster components.
Technical Specifications
Six virtual or physical nodes are required to create a minimum fault-tolerant cluster configuration. Each node should have at least two network interfaces.
Three nodes are main ones and are used exclusively for cluster control, cluster integrity control, planning and commissioning application containers in cluster units. Main nodes must meet the following system requirements:
Configuration: 4-core processor, 8 GB RAM, 50 GB hard drive.
Operating system: Linux Ubuntu 16.04.
Three nodes are work ones and execute main functions (these nodes use application units). Work nodes must meet the following system requirements:
Configuration: 8-core processor, 8 GB RAM, two hard drives 100 GB and 150 GB each.
Operating system: Linux Ubuntu 16.04.
Configurable software environment: Docker, Kubernetes and Ceph (if required).
The /var/lib/docker directory must be connected to a separate hard drive or LVM.
NOTE. Main nodes will be further designated as kn0, kn1, kn2, work nodes will be designated as kn3, kn4, kn5.
Preparing Environment for Foresight Mobile Platform
Preparing Nodes
To prepare nodes:
- Create the fmpadmin user at all nodes who will be used to set and control the future cluster:
sudo useradd -m -d /home/fmpadmin -s /bin/bash fmpadmin
# Set password for fmpadmin user
sudo passwd fmpadmin
Add the fmpadmin user to sudo users to avoid entering password each time on using the sudo command:
echo "fmpadmin ALL = (root) NOPASSWD:ALL" | sudo tee /etc/sudoers.d/fmpadmin
chmod 0440 /etc/sudoers.d/fmpadmin
Disable SWAP partition on all cluster nodes because kubelet does not support work with SWAP:
sed -i '/ swap / s/^\(.*\)$/#\1/g' /etc/fstab
swapoff –all
IMPORTANT. If all cluster nodes are virtual machines operated with VMware, install vmware-tools package on each node:
sudo apt-get install -y open-vm-tools
Install basic packages and environment of Docker Community Edition:
sudo apt-get update
sudo apt-get install -y apt-transport-https ca-certificates curl software-properties-common
sudo curl -fsSL https://download.docker.com/linux/ubuntu/gpg | sudo apt-key add -
sudo add-apt-repository "deb [arch=amd64] https://download.docker.com/linux/ubuntu $(lsb_release -cs) stable"
sudo apt-get update
To view the list of Docker Community Edition versions available for installation, execute the command:
sudo apt-cache madison docker-ce
Example of command execution result:
###On each of your machines, install Docker. Version 18.09.9 is recommended, but 1.11, 1.12, 1.13, 17.03 and 19.03.5 are known to work as well.
### Latest validated Docker version: 18.09.x
## Install docker ce.
sudo apt-get update && sudo apt-get install docker-ce=5:18.09.9~3-0~ubuntu-xenial
Add the fmpadmin user to the docker group:
sudo usermod -aG docker fmpadmin
Set up the file /etc/hosts identically at all nodes:
127.0.0.1 localhost
<host-ip-address> kn0.our.cluster kn0
<host-ip-address> kn1.our.cluster kn1
<host-ip-address> kn2.our.cluster kn2
<host-ip-address> kn3.our.cluster kn3
<host-ip-address> kn4.our.cluster kn4
<host-ip-address> kn5.our.cluster kn5
# The following lines are desirable for IPv6 capable hosts
#::1 localhost ip6-localhost ip6-loopback
#ff02::1 ip6-allnodes
#ff02::2 ip6-allrouters
Generate SSH key for the fmpadmin user at the kn0 node:
Execute the command as the fmpadmin user:
ssh-keygen
The dialog is displayed in the console, for example:
Enter file in which to save the key (/home/user/.ssh/id_rsa):
Press the ENTER key. Then it is prompted to enter a pass phrase for additional protection of SSH connection:
Enter passphrase (empty for no passphrase):
Skip this step and the next step. To do this, press the ENTER key. As a result, a SSH key is created.
Create a configuration file for SSH:
vim ~/.ssh/config
Configuration file contents:
Host kn0
Hostname kn0
User fmpadmin
Host kn1
Hostname kn1
User fmpadmin
Host kn2
Hostname kn2
User fmpadmin
Host kn3
Hostname kn3
User fmpadmin
Host kn4
Hostname kn4
User fmpadmin
Save changes and exit the editor.
Change file permissions:
chmod 644 ~/.ssh/config
Collect public keys of all nodes (it is executed on the kn0 node under the fmpadmin user):
$ ssh-keyscan kn0 kn1 kn2 kn3 kn4 >> ~/.ssh/known_hosts
Add the created SSH key to all nodes:
ssh-copy-id kn1
ssh-copy-id kn2
ssh-copy-id kn3
ssh-copy-id kn4
NOTE. When password is requested, enter the password of the fmpadmin user.
Set up NTP server to synchronize time between the nodes:
sudo apt-get install -y ntp ntpdate
cp /etc/ntp.conf /etc/ntp.conf.orig
NOTE. The setup should be executed for the second interface that is used only for inter-node traffic.
At the kn0 node:
cat << EOF > /etc/ntp.conf \
server 127.127.1.0 prefer \
fudge 127.127.1.0 stratum 10 \
interface ignore wildcard \
interface listen <address that will be used for ntp server lan ip> \
EOF
systemctl restart ntp.service
At other nodes:
server <address ntp server lan ip at the kn0 node> iburst
restrict default
interface ignore wildcard
interface listen <your ntp client lan ip>
sudo systemctl restart ntp.service
As a result, the nodes are prepared.
Installing Heartbeat Package
Target nodes for the Heartbeat package are three work nodes with a common virtual IP address. Continuous availability of services is ensured by the Heartbeat package.
NOTE. The Heartbeat package can be installed ands set up on the kn3, kn4 and kn5 nodes.
To install and set up the Heartbeat package:
Install and set up Heartbeat:
apt-get update && apt-get -y install heartbeat && systemctl enable heartbeat
NOTE. All three servers share the same IP address - <main external cluster ip>. This virtual IP address is to be moved between servers that is why you should activate the net.ipv4.ip_nonlocal_bind parameter to enable binding of system services to a non-local IP address.
Add this option to the file /etc/sysctl.conf for the kn3, kn4, kn5 nodes:
# echo ‘net.ipv4.ip_nonlocal_bind=1’ >> /etc/sysctl.conf
# sysctl -p
Create the file /etc/ha.d/authkeys. This files stores Heartbeat files for mutual authentication, and the file must be identical on both servers:
# echo -n securepass | md5sum
bb77d0d3b3f239fa5db73bdf27b8d29a
# Where securepass – password for Heartbeat.
# Copy the output hash sum to the clipboard.
kn3
$ sudo vi /etc/ha.d/authkeys
auth 1
1 md5 bb77d0d3b3f239fa5db73bdf27b8d29a
kn4
sudo vi /etc/ha.d/authkeys
auth 1
1 md5 bb77d0d3b3f239fa5db73bdf27b8d29a
kn5
sudo vi /etc/ha.d/authkeys
auth 1
1 md5 bb77d0d3b3f239fa5db73bdf27b8d29a
Make sure that the file /etc/ha.d/authkeys is available only for the Root user:
Kn3# sudo chmod 600 /etc/ha.d/authkeys
Kn4# sudo chmod 600 /etc/ha.d/authkeys
Kn5# sudo chmod 600 /etc/ha.d/authkeys
Create main configuration files for Heartbeat on the selected servers (files slightly differ for each server):
Create the file /etc/ha.d/ha.cf on the kn3, kn4, kn5 nodes.
NOTE. To get configuration node parameters, execute uname -n on all three servers. Also use the name of your network card instead of ens160.
Kn3# vi /etc/ha.d/ha.cf
# keepalive: how many seconds between heartbeats
#
keepalive 2
#
# deadtime: seconds-to-declare-host-dead
#
deadtime 10
#
# What UDP port to use for udp or ppp-udp communication?
#
udpport 694
bcast ens160
mcast ens160 225.0.0.1 694 1 0
ucast ens160 <main kn3 ip>
# What interfaces to heartbeat over?
udp ens160
#
# Facility to use for syslog()/logger (alternative to log/debugfile)
#
logfacility local0
#
# Tell what machines are in the cluster
# node nodename ... -- must match uname -n
node kn3
node kn4
node kn5
kn4# vi /etc/ha.d/ha.cf
# keepalive: how many seconds between heartbeats
#
keepalive 2
#
# deadtime: seconds-to-declare-host-dead
#
deadtime 10
#
# What UDP port to use for udp or ppp-udp communication?
#
udpport 694
bcast ens160
mcast ens160 225.0.0.1 694 1 0
ucast ens160 <main kn4 ip>
# What interfaces to heartbeat over?
udp ens160
#
# Facility to use for syslog()/logger (alternative to vlog/debugfile)
#
logfacility local0
#
# Tell what machines are in the cluster
# node nodename ... -- must match uname -n
node kn3
node kn4
node kn5
kn5# vi /etc/ha.d/ha.cf
# keepalive: how many seconds between heartbeats
#
keepalive 2
#
# deadtime: seconds-to-declare-host-dead
#
deadtime 10
#
# What UDP port to use for udp or ppp-udp communication?
#
udpport 694
bcast ens160
mcast ens160 225.0.0.1 694 1 0
ucast ens160 <main kn5 ip>
# What interfaces to heartbeat over?
udp ens160
#
# Facility to use for syslog()/logger (alternative to vlog/debugfile)
#
logfacility local0
#
# Tell what machines are in the cluster
# node nodename ... -- must match uname -n
node kn3
node kn4
node kn5
Create the file /etc/ha.d/haresources. It contains a common virtual IP address and sets which node is the main one by default. The file must be identical at all nodes:
Kn3# vi /etc/ha.d/haresources
Kn3 <main virtual cluster ip>
Kn4# vi /etc/ha.d/haresources
Kn3 <main virtual cluster ip>
Kn5# vi /etc/ha.d/haresources
Kn3 <main cluster ip> ### here and above, kn3 = hostname of the node selected as the main one by default for Heartbeat.
Start Heartbeat services on all nodes and make sure that the specified virtual IP address is set on the kn3 node:
Kn3# systemctl restart heartbeat
Kn4# systemctl restart heartbeat
Kn5# systemctl restart heartbeat
kn1# ip a s
ens160: <BROADCAST,MULTICAST,UP,LOWER_UP> mtu 1500 qdisc pfifo_fast state UP group default qlen 1000
link/ether xx:xx:xx:xx:xx:xx brd ff:ff:ff:ff:ff:ff
inet <main kn3 ip>/24
valid_lft forever preferred_lft forever
inet <main cluster ip>/24
Check access by main cluster ip:
nc -v <main cluster ip> 22
Connection to x.x.x.x 22 port [tcp/*] succeeded!
SSH-2.0-OpenSSH_7.2p2 Ubuntu-4ubuntu2.7
The Heartbeat package is successfully installed and set up.
Preparing Ceph System Cluster
Installing Ceph
To install and set up Ceph:
Install python:
apt-get update && apt-get install -y python python-pip parted
NOTE. All commands must be executed on one node.
Execute commands:
sudo fdisk -l /dev/sdb
sudo parted -s /dev/sdb mklabel gpt mkpart primary xfs 0% 100%
sudo mkfs.xfs -f /dev/sdb
sudo fdisk -s /dev/sdb
sudo blkid -o value -s TYPE /dev/sdb
Deploy Ceph first at the kn0 node:
sudo -H pip install ceph-deploy
ceph-deploy new kn0
The ceph.conf file is created in the current directory.
Edit the ceph.conf file according to the file ./fmp_k8s_v1/ceph/ceph.conf included in the distribution package:
[global]
fsid = a997355a-25bc-4749-8f3a-fb07df0f9105 - replace it with value from your file ceph.conf
mon_initial_members = kn1,kn0,kn3 - replace it with names of your nodes
mon_host = 10.30.217.17,10.30.217.20,10.30.217.23 - replace it with addresses of your nodes
auth_cluster_required = cephx
auth_service_required = cephx
auth_client_required = cephx
# Our network address
public network = 10.30.217.0/24 - replace it with your network address
rbd default features = 3
[mon.kn0]
host = kn0 - replace it with your node name
mon addr = 10.30.217.20:6789 - replace it with your node address
[mon.kn1]
host = kn1 - replace it with your node name
mon addr = 10.30.217.17:6789 - replace it with your node address
[mon.kn3]
host = kn3 - replace it with your node name
mon addr = 10.30.217.23:6789 - replace it with your node address
# added below config
[osd]
osd_journal_size = 512
osd_pool_default_size = 3
osd_pool_default_min_size = 1
osd_pool_default_pg_num = 64
osd_pool_default_pgp_num = 64
# timeouts for OSD
osd_client_watch_timeout = 15
osd_heartbeat_grace = 20
osd_heartbeat_interval = 5
osd_mon_heartbeat_interval = 15
osd_mon_report_interval = 4
[mon]
mon_osd_min_down_reporters = 1
mon_osd_adjust_heartbeat_grace = false
mon_client_ping_timeout = 15.000000
NOTE. Replace all names and addresses of nodes with your own ones.
Install Ceph packages on all nodes:
ceph-deploy install kn0 kn1 kn2 kn3 kn4 kn5
This will take long time.
Set up monitoring of the kn1 node:
# specify node instead of create-initial
ceph-deploy mon create-initial
This command will create a monitoring role key. To get key, execute the command:
ceph-deploy gatherkeys kn1
Adding OSD Nodes
After Ceph is installed, add OSD roles to the Ceph cluster on all nodes. They will use the /dev/sdb hard drive section to store data and log.
Check if the /dev/sdb hard drive section available at all nodes:
ceph-deploy disk list kn3 kn4 kn5
Delete section tables at all nodes:
ceph-deploy disk zap kn3 /dev/sdb
ceph-deploy disk zap kn4 /dev/sdb
ceph-deploy disk zap kn5 /dev/sdb
This command will delete all data from the /dev/sdb section on OSD Ceph nodes.
Prepare and activate all OSD nodes, make sure that there are no errors:
ceph-deploy osd create kn3 --data /dev/sdb
The last output line should be: Host kn3 is now ready for osd use.
ceph-deploy osd create kn4 --data /dev/sdb
The last output line should be: Host kn4 is now ready for osd use.
ceph-deploy osd create kn5 --data /dev/sdb
The last output line should be: Host kn5 is now ready for osd use.
Send admin keys and configuration to all nodes:
ceph-deploy admin kn0 kn1 kn2 kn3 kn4 kn5
Change key file permissions. Execute the command at all nodes:
sudo chmod 644 /etc/ceph/ceph.client.admin.keyring
As a result, a Ceph cluster is created.
IMPORTANT. Add Ceph Manager Service.
To add Ceph Manager Service:
Execute the command on the kn0 (ceph-admin) node:
ceph auth get-or-create mgr.kn1 mon 'allow profile mgr' osd 'allow *' mds 'allow *'
The command will return the mgr keyring value. Copy the value and go to the next step.
Execute the command:
ssh (monitoring role node, e.g. kn1)
sudo –i
mkdir /var/lib/ceph/mgr/ceph-kn1
Then edit the file vi /var/lib/ceph/mgr/ceph-kn1/keyring. Insert the mgr keyring value from the previous step.
Execute the command:
chmod 600 /var/lib/ceph/mgr/ceph-kn1/keyring
chown ceph-ceph –R /var/lib/ceph/mgr/
Start ceph-mgr manager:
sudo systemctl start ceph-mgr.target
Check status of the Ceph cluster:
sudo ceph –s
cluster:
id: a997355a-25bc-4749-8f3a-fb07df0f9105
health: HEALTH_OK
services:
mon: 3 daemons, quorum kn1,kn3, kn0
mgr: kn1(active)
mds: cephfs-1/1/1 up {0=kn1=up:active}, 2 up:standby
osd: 3 osds: 3 up, 3 in
data:
pools: 0 pools, 0 pgs
objects: 0 objects, 0 B
usage: 3.0 GiB used, 147 GiB / 150 GiB avail
pgs:
If the cluster returned HEALTH_OK, the cluster works.
Creating a Metadata Server
The use of CephFS requires at least one metadata server. Execute the command to create it:
ceph-deploy mds create {ceph-node}
Deploying Ceph Managers
A Ceph manager works in the active or standby mode. Deploying additional Ceph managers ensures that if one of Ceph managers fails, other Ceph manager can continue operations without maintenance.
To deploy additional Ceph managers:
Execute the command:
ceph-deploy mgr create node2 node3
Execute the following commands to check Ceph:
Get state of Ceph cluster:
sudo ceph -s
View all existing pools of the occupied space.
sudo ceph df
View OSD nodes status:
sudo ceph osd tree
Create a single kube pool for the Kubernetes (k8s) cluster:
sudo ceph osd pool create kube 32 32
>> pool 'kube' created // The two ’30’s are important – you should review the ceph documentation for Pool, PG and CRUSH configuration to establish values for PG and PGP appropriate to your environment
Check the number of pool replicates:
$ sudo ceph osd pool get kube size
size: 3
Check the number of pool placement groups:
$ sudo ceph osd pool get kube pg_num
pg_num: 32
Bind the created pool with RBD application to use it as a RADOS device:
$ sudo ceph osd pool application enable kube rbd
>>enabled application 'rbd' on pool 'kube'
- Create a separate user for the kube pool and save keys that are required to allow access k8s to the storage:
$ sudo ceph auth get-or-create client.kube mon 'allow r' osd 'allow rwx pool=kube'
[client.kube]
key = AQC6DX1cAJD3LRAAUC2YpA9VSBzTsAAeH30ZrQ==
mkdir ./to_etc
sudo ceph auth get-key client.admin > ./to_etc/client.admin
sudo cp ./to_etc/client.admin /etc/ceph/ceph.client.admin.keyring
sudo chmod 600 /etc/ceph/ceph.client.admin.keyring
Convert file contents to the following:
[client.admin]
key = AQCvWnVciE7pERAAJoIDoxgtkfYKMnoBB9Q6uA==
caps mds = "allow *"
caps mgr = "allow *"
caps mon = "allow *"
caps osd = "allow *"
sudo ceph auth get-key client.kube > ./to_etc/ceph.client
sudo cp ./to_etc/ceph.client /etc/ceph/ceph.client.kube.keyring
sudo chmod 644 /etc/ceph/ceph.client.kube.keyring
- Convert file contents to the following:
[client.kube]
key = AQCvWnVciE7pERAAJoIDoxgtkfYKMnoBB9Q6uA==
caps mds = "allow *"
caps mgr = "allow *"
caps mon = "allow *"
caps osd = "allow *"
The Ceph distributed file system is successfully installed and set up.
Preparing Kubernetes (k8s) Cluster
Execute all commands on main Kubernetes nodes under the root user. Due to possible issues with incorrect traffic routing using iptables bypass when RHEL / CentOS 7 is used, make sure that net.bridge.bridge-nf-call-iptables in the sysctl configuration is set to 1.
Execute the following at each node:
Make changes to the system as the root user to ensure correct work of networks in k8s:
cat >>/etc/sysctl.d/kubernetes.conf<<EOF
net.bridge.bridge-nf-call-ip6tables = 0
net.bridge.bridge-nf-call-iptables = 1
EOF
sysctl –system
apt-get update && apt-get install -y apt-transport-https curl
Add the official Kubernetes GPG key to the system:
curl -s https://packages.cloud.google.com/apt/doc/apt-key.gpg | apt-key add -
Add a Kubernetes repository:
cat <<EOF > /etc/apt/sources.list.d/kubernetes.list
deb https://apt.kubernetes.io/kubernetes-xenial main
EOF
Set the value /proc/sys/net/bridge/bridge-nf-call-iptables that is equal to 1 to ensure correct work of CNI (Container Network Interface). To do this, check the current value:
cat /proc/sys/net/bridge/bridge-nf-call-iptables
If the current value is 0, execute the command:
echo 1 > /proc/sys/net/bridge/bridge-nf-call-iptables
Initialize the Kubernetes cluster on the kn0 node under the root user:
Go to the home directory of the fmpadmin user: /home/fmpadmin. Unpack the archive with scripts and yaml files on the same controlling node:
% tar –xvzf ./fmp_k8s_v<version number>.tar
Go to the directory with unpacked scripts:
% cd ./ fmp_k8s_v<version number>/
Go to the rke subdirectory:
% cd ./rke
Execute the command:
% ls –lh ./
The list of files in the current directory is displayed:
-rwxr-xr-x 1 root root 388 Mar 26 20:44 fmpclust.yml
-rw-rw-r-- 1 root root 1.3K Mar 26 20:48 ReadMe.txt
-rwxr-xr-x 1 root root 36M Mar 28 14:54 rke
Move or copy the rke file to the /usr/local/bin/ directory:
% mv ./rke /usr/local/bin/
Set permissions for the rke file:
% chmod 755 /usr/local/bin/rke
Edit contents of the fmpclust.yml file according to your configuration:
vi ./fmpclust.yuml
nodes:
- address: m1
user: your user
role: [controlplane,etcd]
- address: m2
user: your user
role: [controlplane,etcd]
- address: m3
user: your user
role: [controlplane,etcd]
- address: w1
user: your user
role: [worker]
- address: w2
user: your user
role: [worker]
- address: w3
user: your user
role: [worker]
services:
kubelet:
extra_binds:
- "/lib/modules:/lib/modules"
extra_args:
node-status-update-frequency: 10s
etcd:
snapshot: true
creation: 6h
retention: 24h
kube-api:
extra_args:
default-not-ready-toleration-seconds: 30
default-unreachable-toleration-seconds: 30
kube-controller:
extra_args:
node-monitor-period: 5s
node-monitor-grace-period: 40s
pod-eviction-timeout: 30s
authentication:
strategy: x509
# sans:
# - "10.99.255.254"
network:
plugin: flannel
NOTE. 10.99.255.254 — common IP address of servers cluster (if applicable); m1, m2, m3 - names of Kubernetes main nodes; w1,w2, w3 - names of Kubernetes work nodes; your user - the user, from whom interaction between nodes is made (fmpadmin).
Deploy and initialize the cluster:
% rke up --config fmpclust.yml
This takes considerable time and all details of cluster deployment stages are displayed in the console.
If everything is correct, the cluster is successfully deployed, and the server console displays the string:
INFO[0103] Finished building Kubernetes cluster successfully
If there are errors, execute rke up with the debug key to display detailed information.
% rke -d up --config fmpclust.yml
After cluster initialization, the kube_config_fmpclust.yml file appears in the current directory next to the fmpclust.yml file. Move or copy the file to the user profile. This will allow the user to interact with the cluster. Execute this operation as the fmpadmin user:
% mkdir ~/.kube
% cd ./ fmp_k8s_v<version name>/rke/
% cp ./kube_config_fmpclust.yml ~/.kube/config
% sudo chown -R fmpadmin:fmpadmin /home/fmpadmin/.kube
As a result, the Kubernetes (k8s) cluster is installed and initialized. Check its performance:
Check server and k8s client versions:
% kubectl version - -short
The following is displayed in the console:
Client Version: v1.13.5
Server Version: v1.13.5
Check status of the k8s component:
% kubectl get cs
The following is displayed in the console:
NAME STATUS MESSAGE ERROR
scheduler Healthy ok
controller-manager Healthy ok
etcd-0 Healthy {"health": "true"}
etcd-1 Healthy {"health": "true"}
etcd-2 Healthy {"health": "true"}
Installing Rancher
Rancher is a software for easy control of k8s cluster.
To install and set up Rancher:
Create a folder to store Rancher information at the kn4 node:
% sudo mkdir –p /opt/rancher
Start Rancher with mounting to host:
% sudo docker run -d --restart=unless-stopped -p 8180:80 -p 8446:443 -v /opt/rancher:/var/lib/rancher rancher/rancher:stable
Open the browser and open the URL: https://ip-address-of-kn0:8446, where ip-address-of-kn0 is IP address of the kn0 node. Set password for the Rancher administrator role in the web interface:
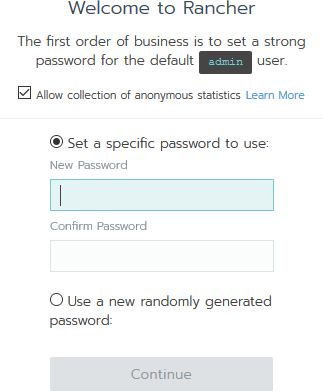
Add the created cluster to Rancher. Click the Add Cluster button:

Select addition type. Click the Import button:

- Specify name and description for the added cluster and click the Create button:

Copy the last command on the page:
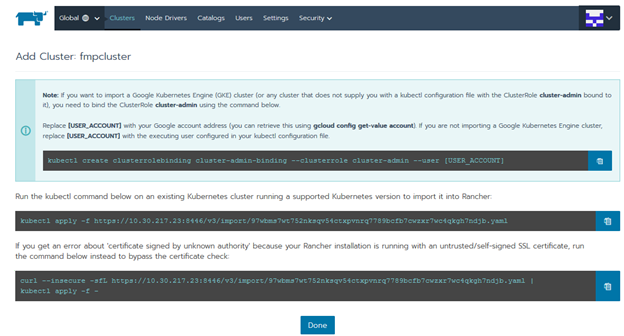
General command view:
% curl --insecure -sfL https://<server ip>:8446/v3/import/dtdsrjczmb2bg79r82x9qd8g9gjc8d5fl86drc8m9zhpst2d9h6pfn.yaml | kubectl apply -f -
Where <server ip> is IP address of the node.
Execute the copied command in the console of the kn0 node. The following is displayed in the console:
namespace/cattle-system created
serviceaccount/cattle created
clusterrolebinding.rbac.authorization.k8s.io/cattle-admin-binding created
secret/cattle-credentials-3035218 created
clusterrole.rbac.authorization.k8s.io/cattle-admin created
deployment.extensions/cattle-cluster-agent created
daemonset.extensions/cattle-node-agent created
Wait until the system starts:

After the initialization ends, cluster status changes to Active:

General state of clusters:
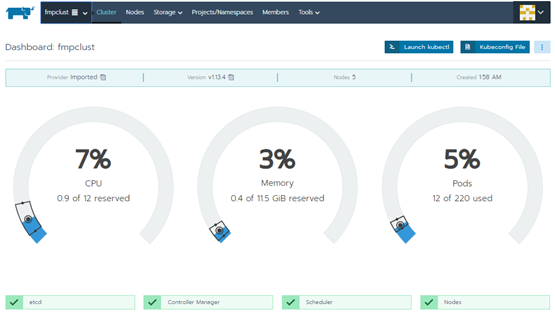
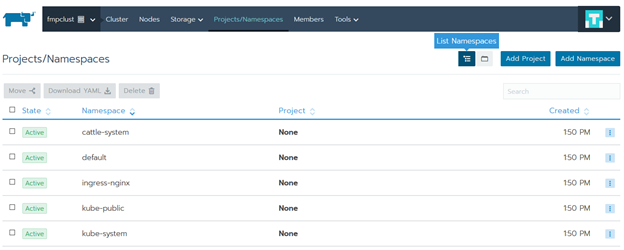
Go to the Projects/Namespaces section and create Project for the platform:
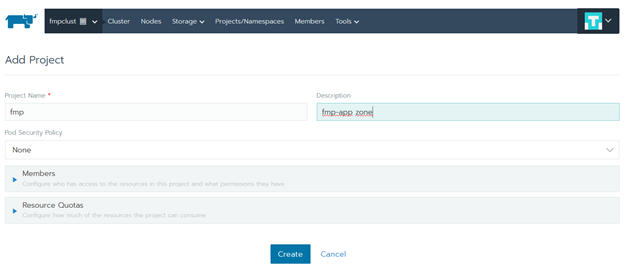
Click the Add Project button. Fill in the Project Name box, add description in the Description box and click the Create button:
Click the Add Namespace button. Fill in the Name box and click the Create button:

The setup in the graphic web interface is completed. Go to the nodes console.
Preparing to Start Foresight Mobile Platform
Open the console of one of the Kubernetes main nodes as the fmpadmin user. The archive with application container images and the archive with scripts and yaml files used for starting the application in the Kubernetes environment are loaded to the user's home directory.
Copy the fmp_v<version number>.tgz archive to cluster work nodes.
Load container images to the system:
docker load -i fmp_v<version number>.tgz
NOTE. Unpack this archive on all cluster work nodes.
After the successful import delete the archive.
Unpack the archive with scripts and yaml files at one control node:
% tar –xvzf ./fmp_k8s_v<version number>.tar
Go to the directory with unpacked scripts:
% cd ./ fmp_k8s_v<version number>
Edit contents of the yaml file ./storage/ceph-storage-ceph_rbd.yml:
apiVersion: storage.k8s.io/v1
kind: StorageClass
metadata:
name: fast-rbd
provisioner: kubernetes.io/rbd
parameters:
monitors: 10.30.217.17:6789, 10.30.217.20:6789, 10.30.217.23:6789
adminId: admin
adminSecretName: ceph-secret
adminSecretNamespace: "kube-system"
pool: kube
userId: kube
userSecretName: ceph-secret-kube
In the monitors string specify IP addresses or DNS names of nodes of Ceph cluster with specified monitoring role. To view which clusters have this role specified, execute the command:
% sudo ceph -s
The result of command execution, for example:
cluster:
id: a997355a-25bc-4749-8f3a-fb07df0f9105
health: HEALTH_OK
services:
mon: 3 daemons, quorum kn1,kn0,kn3
mgr: kn3(active), standbys: kn0
osd: 4 osds: 4 up, 4 in
The "mon" string in the "services" section indicates names of the nodes with specified monitoring role.
Add secret-keys of distributed Ceph file storage in Kubernetes:
Get key of Ceph administrator:
% sudo ceph --cluster ceph auth get-key client.admin
>> AQCvBnVciE8pERAAJoIDoxgtkfYKZnoBS9R6uA==
Copy the key to the clipboard.
IMPORTANT. Avoid spaces when copying and pasting key to the command to add to Kubernetes settings!
Add the output key to Kubernetes secrets by explicitly specifying it in the command:
% kubectl create secret generic ceph-secret --type="kubernetes.io/rbd" \
--from-literal=key='AQCvWnVciE7pERAAJoIDoxgtkfYKMnoBB9Q6uA==' --namespace=kube-system
Command execution result:
secret/ceph-secret created
Create a single pool for Kubernetes nodes in the Ceph cluster. The created pool will be used in RBD at nodes:
% sudo ceph --cluster ceph osd pool create kube 32 32
Create a client key. Ceph authentication is enabled in the Ceph cluster:
% sudo ceph --cluster ceph auth get-or-create client.kube mon 'allow r' osd 'allow rwx pool=kube'
Get the client.kube key:
% sudo ceph --cluster ceph auth get-key client.kube
Create a new secret in the project namespace:
% kubectl create secret generic ceph-secret-kube --type="kubernetes.io/rbd" \
--from-literal=key='AQC6DX1cAJD3LRAAUC2YpA9VSBzTsAAeH30ZrQ==' --namespace=fmpns
After adding both secrets one can start Foresight Mobile Platform.
Starting Foresight Mobile Platform
Execute scripts in the following order in the fmp_k8s_v<version number> directory:
create-rbds.sh. The script creates and prepares volumes for the fmp application in Ceph (it is used if there is Ceph).
fmp_k8s_storage_inst.sh. The script is executed if the Ceph distributed file storage is used. See above how to set up Ceph cluster.
Go to the volumes directory. Open the set_my_monitors.sh script for edit and replace IP addresses in it addresses of your nodes with the Ceph Monitor role in strings:
export mon1='192.1.1.1'
export mon2='192.1.1.2'
export mon3='192.1.1.3'
Execute the set_my_monitors.sh script in the volumes directory.
Come back to the enclosing directory.
fmp_k8s_volumes_inst.sh. The script creates and prepares volumes to be used in the fmp application.
fmp_k8s_configmap_inst.sh. The script creates a variables map.
fmp_k8s_services_inst.sh. The script sets up services to provide fmp application components interaction.
fmp_k8s_deployments_inst.sh. The script sets up conditions to start components of the fmp application.
Init pod. On the first startup, internal fmp services are initialized, which requires to start a separate Init pod. As soon as Init pod executes all necessary procedures, it turns to the Succeeded state.
Go back to the web interface and make sure that all required objects are created and application containers are running without errors.
Check if the storage is connected. Go to the Storage > Storage Classes section:

Check if persistent volumes are created. Go to the Storage > Persistent Volumes section:
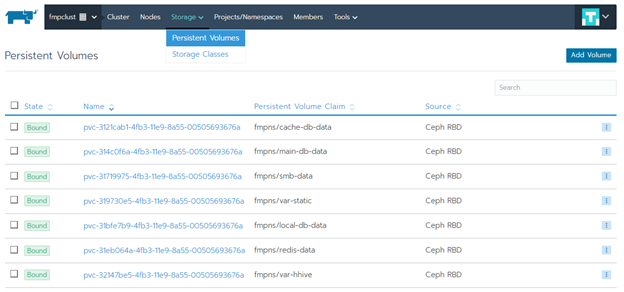
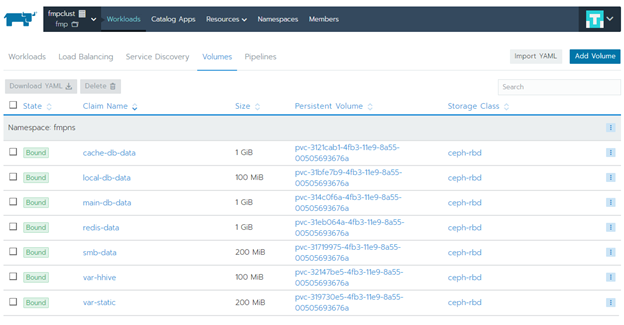
Then select the fmp application and go to the Workbooks section to the Volumes tab:
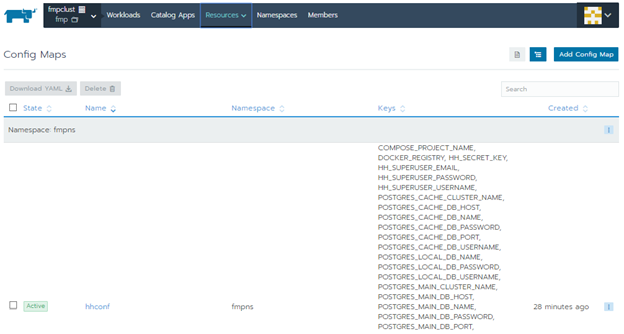
Check if config maps are present that is a list of loaded variables. Go to the Resources section:
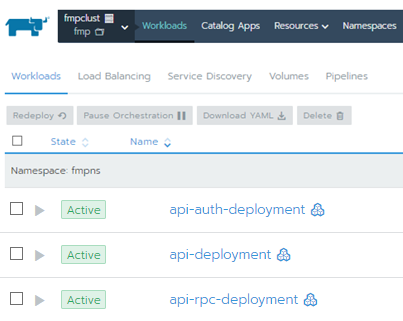
Go to the Workbooks section and make sure that elements are created on the tabs:
Workloads:
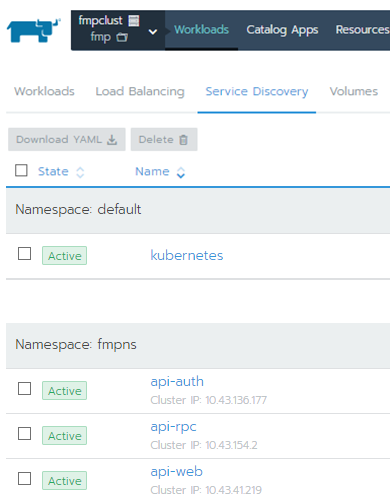
Service Discovery:
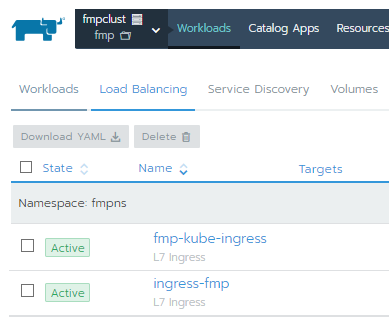
Load Balancing is successfully turned into the Active state:
As a result, a fault-tolerant cluster and Foresight Mobile Platform.
Open the browser and follow the IP address <main cluster ip> specified on HAProxy setup. The login dialog box of Foresight Mobile Platform opens:

List of Ports Used for Cluster Work
Ports used by Kubernetes for main cluster nodes functioning are displayed in the table:
| Protocol | Search direction | Range of ports | Purpose | Use |
TCP |
inbound |
6443 | Kubernetes API server | all |
TCP |
inbound |
2379-2380 | etcd server client API | kube-apiserver, etcd |
TCP |
inbound |
10250 | kubelet API | self, control plane |
TCP |
inbound |
10251 | kube-scheduler | self |
TCP |
inbound |
10252 | kube-controller-manager | self |
Ports used by Kubernetes for cluster work nodes functioning are displayed in the table:
| Protocol | Search direction | Range of ports | Purpose | Use |
TCP |
inbound |
10250 |
kubelet API |
self, control plane |
TCP |
inbound |
30000-32767 | nodePort Services |
all |
RKE (Rancher Kubernetes Engine) node - Ports for outgoing connections are displayed in the table:
| Protocol | Source | Range of ports | Purpose | Description |
TCP |
RKE node |
22 |
all nodes specified in cluster configuration file |
setup of node via SSH executed by RKE |
TCP |
RKE node |
6443 |
controlling nodes |
Kubernetes API server |
NOTE. In this article, roles of main nodes and etcd nodes are combined.
Ports for incoming connections of controlling nodes are displayed in the table:
| Protocol | Source | Range of ports | Description |
TCP |
any that consumes Ingress services | 80 | ingress controller (HTTP) |
TCP |
any that consumes Ingress services | 443 | ingress controller (HTTPS) |
TCP |
rancher nodes | 2376 | Docker daemon TLS port used by Docker Machine (only needed when using Node Driver/Templates) |
TCP |
etcd nodes; control plane nodes; worker nodes |
6443 | Kubernetes API server |
UDP |
etcd nodes; |
8472 | canal/flannel VXLAN overlay networking |
TCP |
control plane node itself (local traffic, not across nodes) | 9099 | canal/flannel livenessProbe/readinessProbe |
TCP |
control plane nodes | 10250 | kubelet |
TCP |
control plane node itself (local traffic, not across nodes) | 10254 | ingress controller livenessProbe/readinessProbe |
TCP/UDP |
any source that consumes NodePort services | 30000-32767 | NodePort port range |
Ports for incoming connections of controlling nodes are displayed in the table:
| Protocol | Purpose | Range of ports | Description |
TCP |
rancher nodes | 443 | rancher agent |
TCP |
etcd nodes | 2379 | etcd client requests |
TCP |
etcd nodes | 2380 | etcd peer communication |
UDP |
etcd nodes; control plane nodes; worker nodes |
8472 | canal/flannel VXLAN overlay networking |
TCP |
control plane node itself (local traffic, not across nodes) | 9099 | canal/flannel livenessProbe/readinessProbe |
TCP |
etcd nodes; control plane nodes; worker nodes |
10250 | kubelet |
TCP |
control plane node itself (local traffic, not across nodes) | 10254 | ingress controller livenessProbe/readinessProbe |
Ports for incoming connections of work nodes are displayed in the table:
| Protocol | Source | Range of ports | Description |
TCP |
any network that you want to be able to remotely access this node from |
22 | remote access over SSH |
TCP |
any that consumes Ingress services | 80 | ingress controller (HTTP) |
TCP |
any that consumes Ingress services | 443 | ingress controller (HTTPS) |
TCP |
rancher nodes | 2376 | Docker daemon TLS port used by Docker Machine (only needed when using Node Driver/Templates) |
UDP |
etcd nodes; |
8472 | canal/flannel VXLAN overlay networking |
TCP |
worker node itself (local traffic, not across nodes) | 9099 | canal/flannel livenessProbe/readinessProbe |
TCP |
control plane nodes | 10250 | kubelet |
TCP |
worker node itself (local traffic, not across nodes) | 10254 | ingress controller livenessProbe/readinessProbe |
TCP/UDP |
any source that consumes NodePort services | 30000-32767 | NodePort port range |
Ports for incoming connections of work nodes are displayed in the table:
| Protocol | Purpose | Range of ports | Description |
TCP |
rancher nodes | 443 | rancher agent |
TCP |
control plane nodes |
6443 |
Kubernetes API server |
UDP |
etcd nodes; control plane nodes; worker nodes |
8472 |
canal/flannel VXLAN overlay networking |
TCP |
worker node itself (local traffic, not across nodes) |
9099 |
canal/flannel livenessProbe/readinessProbe |
TCP |
worker node itself (local traffic, not across nodes) |
10254 |
ingress controller livenessProbe/readinessProbe |