Select the Update > Save main menu item.
Click the  Save button on the Update Manager toolbar.
The created update can be saved as:
Update file.
Repository object.
Before saving, a confirmation dialog box for object sorting opens. If the answer is positive, objects will be automatically sorted, otherwise the object order remains the same.
After the update is saved, proceed to installation. For details about update installation, see the Installing Update section.
The update list can be also exported to the *.txt file.
To save the created update to a file:
Select the Update > Save main menu item.
Click the Save button on the Update Manager toolbar.
Selecting one of the commands opens a standard dialog box for file saving. Specify the file name and location. Files with the *.pefx extension are used as version updates. Click the Save button to save the update file.
NOTE. If you save an update opened from a file, this dialog box will not open. You can also select the Update > Save As main menu item, which saves a file under a new name.
The following types of files are available on saving depending on whether the update file is opened or created:
Update File.pefx. The file containing data of updated objects and access permissions to them.
Administrator Update File.pefx. The file containing data about updated objects.
ISA Update File.pefx. The file containing data about access permissions to updated objects.
NOTE. On separating administrators roles the Update File.pefx type is not available on saving.
To save the created update to repository, select the Update > Save to Repository menu item. The dialog box with repository objects opens, in which specify name and location for the update to be saved.
NOTE. On saving the update opened from the repository, use the Save toolbar button or select the Update > Save main menu item to save the update with the same name. The update is saved without opening additional dialog boxes. You can also select the Update > Save As main menu item, which saves the update to the repository under a new name. Selecting this item opens the dialog box for specifying name and location of the saved file.
The update will be saved as a repository object. This object can be used to create new update files with the *.pefx extension.
If access permissions have been updated for one or several objects, a confirmation message is displayed during the saving procedure:
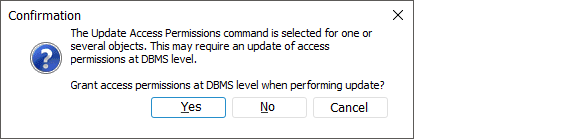
Click the Yes button to update access permissions at the DBMS level. Click the No button to update permissions only at the platform level; to apply access permissions at the DBMS level, update the users.
After this dialog box closes, a standard save dialog box opens.
See also: