In this article:
Adding, Moving and Deleting Calculation Algorithm
Setting Up Properties of Selected Calculation Algorithm
General Settings of Calculation Algorithm
Setting Up Link of Calculation Algorithm and Data Entry Form Parameters
Setting Up Data Entry Forms Binding to Algorithm
Selecting Calculation Algorithms
To calculate and control table area data, use created calculation algorithms.
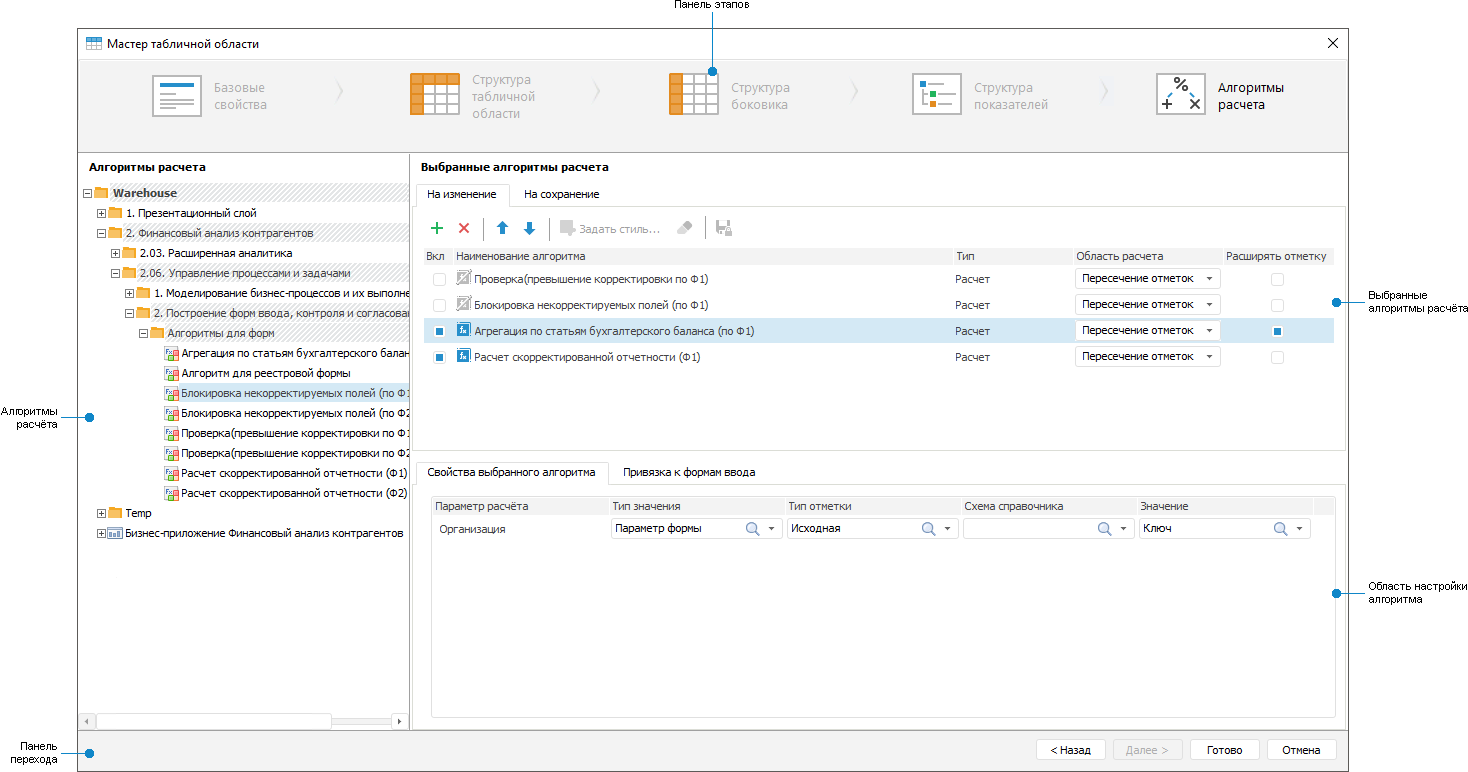
To select calculation algorithms, use the Calculation Algorithms page of the Table Area Wizard dialog box:

 Elements of the Calculation Algorithms page
To determine a calculation algorithm:
Add a ready calculation algorithm.
Set up properties of the selected algorithm:
Link data entry forms to algorithm for detailing formulas used in calculation algorithm.
TIP. To set up displayed columns in tables on the Properties of Selected Algorithm and Binding to Data Entry Forms tabs, see the Setting Up Tab Table section of this article.
After selecting calculation algorithms, finish table area creation by clicking the Finish button.
When working with a ready data entry form, the formula used for cell calculation is displayed in the formula string.
After the table area is set up, follow the step if required:
Adding, Moving and Deleting Calculation Algorithm
Select the ready calculation algorithm in the Calculation Algorithms area and move it to the Selected Calculation Algorithms area using the  button or using Drag&Drop.
Depending on the calculation execution option, move the algorithm to the tab:
To Change. Algorithms added to this tab will be executed when data will changed in data entry form. Calculation is executed in cells that use changed data in formulas. Cell values calculated by means of the connected calculation algorithm are displayed as changed data.
NOTE. To run recalculation, select the Merge Requests on Calculation checkbox on the General tab of the Parameters dialog box.
To Save. Algorithms added to this tab will be executed only when data will be saved in data entry form; when data changes, the calculation will not be executed. The calculation is executed in sources by all data.
To set up execution order of calculation algorithms, use the  and
and  buttons on the tab toolbar.
To delete the selected calculation algorithm:
Click the
 button on the tab toolbar.
Select the Delete context menu item.
Setting Up Properties of Selected Calculation Algorithm
To set up properties of the selected calculation algorithm, select it in the Selected Calculation Algorithms area. Depending on the algorithm type, various settings are available. The algorithm type is determined automatically. The type of calculation algorithm is specified in the Selected Calculation Algorithms area table in the Type column:
Calculation. The algorithm contains only calculation blocks. It can be added to the To Change and To Save tabs.
Control. The algorithm contains only control blocks. It can be added only to the To Change tab.
Calculation/Control. The algorithm contains both calculation blocks and control blocks. It can be added to the To Change and To Save tabs.
General Settings of Calculation Algorithm
Determine general settings of calculation algorithm in the Selected Calculation Algorithms area:
If required deselect the checkbox next to the algorithm in the On column to confirm debugging og claculation algorithms work in data entry form. Checkboxes are selected for all algorithms by default.
Set up font, fill and other to format cells where control was applied. To do this, open the Formatting dialog box by clicking the
 Set Style button. For example, if data did not pass the control, cells with it will not be highlighted by color different from the color used for table area formatting. If formatting settings were set both in calculation algorithm and data entry form, it will be applied together. If the same settings were specified, the settings from data entry form will be applied. It is available on the Control calculation type on the To Change tab.
Set up changed data save lock in table area with applied control. To do this, click the
 button. On saving changed data if at least for one table area the control was applied, the information message indicating that entered data must be changed displays. On executing the operations updating the table area: saving, creating a copy, refreshing, changing parameters values, closing, entering on approving data entry form; transposing and editing table area - the warning will be displayed that changed data will not be saved, because it does not match control settings. If the operation is agreed, the changed data will be reset and the operation will be applied. On canceling operation the changed data remains in table area. It is available on the Control calculation type on the To Change tab.
Select the type of calculation area creation that will be used on algorithm calculation from the Calculation Area drop-down list:
Selection intersection. The intersection of selection from algorithm by all dimensions with selection from table area will be used for calculation. Selected by default.
Calculation Period from Algorithm. The intersection of selection from algorithm by all dimensions, except the calendar one, with selection from table area will be used for calculation.
All Selection from Algorithm. All selection from algorithm without taking into account selection from table area will be used for calculation.
Select the checkbox next to the algorithm in the Expand Selection column to expand the range of loaded data based on the selection specified in the algorithm. It is available on the To Change tab. On selecting the checkbox, all values specified on setting up algorithm will be taken into account in calculation and not only displayed in table area.
Setting Up Link of Calculation Algorithm and Data Entry Form Parameters
Set up link between calculation parameters and data entry parameters on the Properties of Selected Algorithm, selecting:
Value Type. Determine values that are used on calculation algorithms:
Form Parameter. Calculation uses parameter value of data entry form.
Constant Value. Calculation uses a constant value.
Selection Type. Depending on the selected value type:
If the Form Parameter type is selected, choose the selection type in the drop-down list. Available values: initial, first element, last element, initial+children, initial+children (recursive), children, children (recursive).
If the Constant Value type is set, the selection type is unavailable.
Dictionary Schema. Select selection schema of dictionary used as algorithm parameter in the drop-down list. If selection schema is not set for dictionary, the list will be empty.
NOTE. Dictionary selection schema has a greater priority than selection type.
Value. Depending on the selected value type:
If the Form Parameter type is selected, determine parameter or form parameter attribute by selecting it in the drop-down list.
If the Constant Value type is selected, set the constant value.
If calculation algorithm and data entry form are built on the same source, the algorithm parameters will be automatically linked to the data entry form parameters. By default:
The Form Parameter value type.
The Source selection type.
Dictionary schema: undefined.
Value: parameter built on the same dictionary.
Setting Up Data Entry Forms Binding to Algorithm
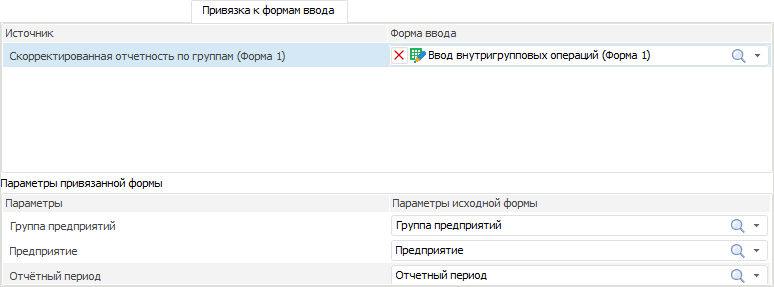
Bind data entry forms to the algorithm, in order to detail formulas that are used in calculation algorithm, by using the Binding to Data Entry Forms tab:

NOTE. The Binding to Data Entry Forms tab is not active for the Control algorithm type. If calculation algorithm is of the Calculation/Control type, the tab displays only calculation block and aggregation block consumers.
To do this, specify:
Source. The list displays objects that are consumers in calculation algorithm.
Data Entry Form. Select the form to be bound in the drop-down list or click the
 search button and enter the name. The list is represented by filtered repository object tree where data entry forms and folders containing data entry forms are specified. To cancel form binding, click the
  button.
NOTE. Make sure that the Load Only Active Sheet checkbox is selected for linked multisheet data entry form to speed up form opening.
Bound Form Parameters. The list contains parameters of the form selected in the Data Entry Form box.
Source Form Parameters. The list contains source form parameters. For parameters of the bound form specify source form parameters, which values will be sent to the bound form parameters. It is not necessary to bind all parameters. Select a parameter in the drop-down list or click the
 search button and enter the name.
The bound form opens on viewing formula description. If source form parameters transfer is not set up for all bound form parameters, the dialog box to enter parameter values opens on opening the bound form.
Example of Algorithm Use
Editing Previously Configured Forms
On editing data entry forms created in previous versions of Foresight Analytics Platform, calculation algorithms added to control entered data will be disabled. On opening such data entry form for edit, the message indicating that the Control type calculations are disabled and that changes need to be made in the algorithm or that algorithm connection settings in data entry forms must be changed.
Setting Up Tab Table
The number of displayed columns and the order of their position in table can be set up:
To change one column, select or deselect the checkbox next to the column name in the table context menu, the position order stays the same.
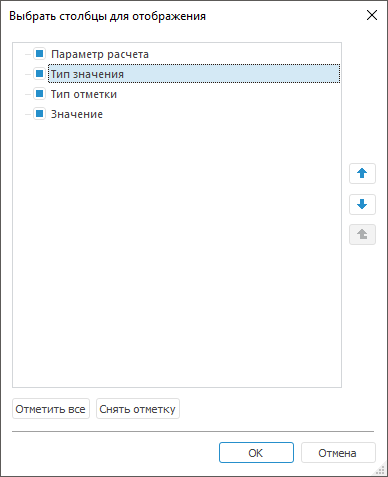
To change several columns and to change their order, open the Select Columns for Display dialog box, by selecting the Select columns table context menu item:

To change the number of displayed columns:
Select or deselect the checkbox next to the column name.
Select all columns by clicking the Select All button.
Deselect all columns by clicking the Deselect All button.
To change column order, use the  and
and  buttons by selecting the column.
